Creating Toolbars & Multiple Document Windows
Turning a Panel into a Docked Toolbar
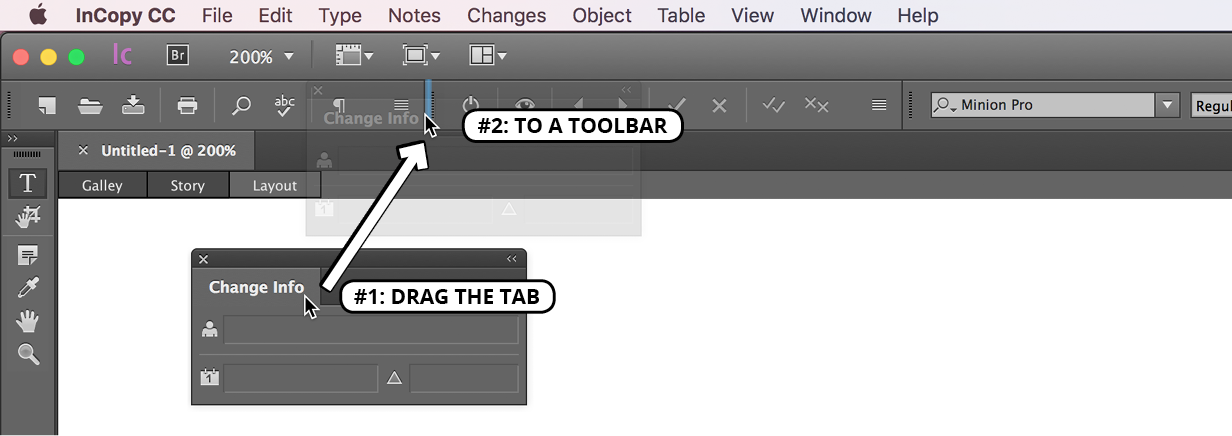
Maximizing screen real estate is crucial in professional design workflows. While panels offer comprehensive functionality, toolbars provide a streamlined alternative that conserves precious workspace without sacrificing essential tools. You can transform any compatible panel—whether floating independently or docked to the workspace periphery—into a space-efficient toolbar by simply dragging its name tab to either the top or bottom edge of your screen. This docking action instantly converts the panel into a compact horizontal toolbar that remains easily accessible while freeing up significant screen space for your primary work area. Note that certain specialized panels cannot be converted to toolbar format due to their complex interface requirements.
Beyond workspace optimization, multiple document windows enable sophisticated editing workflows that have become increasingly valuable in today's collaborative publishing environment.
Converting Panel to Toolbar
Locate the Panel
Find the panel you want to convert, whether it's floating or docked on the side of the screen.
Drag the Name Tab
Click and drag the name tab of the panel toward the toolbar area at the top or bottom of the screen.
Drop in Toolbar Area
Release the panel when you see the toolbar highlighting, indicating it will dock as a toolbar.
Not all panels can be converted to toolbars. Some panels contain too many options or specialized functions that require the full panel interface to remain functional.
Toolbars vs Full Panels
Simultaneously Seeing a Document in Multiple Views
Ensure your target document is open and active in the workspace.
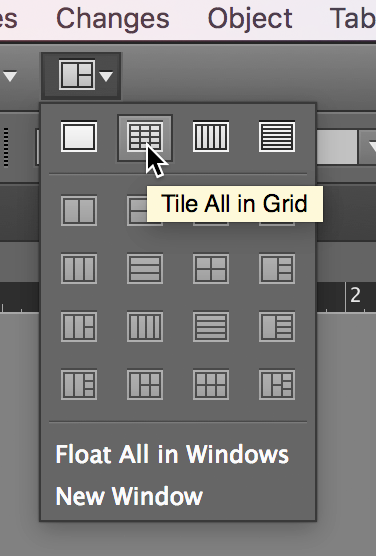
Navigate to the Application Bar at the top of your screen and locate the Arrange Documents button
 . Click this button and select New Window from the dropdown menu. Alternatively, access this function through the main menu by choosing Window > Arrange > New Window.
With your duplicate window now created, return to the Arrange Documents button
and select Tile All in Grid. This intelligent arrangement positions both windows side by side, creating an optimal dual-pane workspace for comparative editing and review.
Configure the first window to display your preferred view mode—typically Layout view for visual context and design accuracy.
Set the second window to a complementary view mode, such as Story view, which provides focused text editing without layout distractions. This dual-view approach is particularly powerful for copy editors who need to maintain design awareness while concentrating on content refinement.
Experience real-time synchronization as modifications in either window instantly reflect across both views, ensuring seamless workflow continuity. This live updating capability allows you to see immediate formatting impacts while maintaining focus on content quality—a workflow enhancement that has proven invaluable for professional editors managing complex documents with tight deadlines.
Setting Up Multiple Document Views
Open Document
Ensure you have a document file currently open in InDesign before proceeding with multiple view setup.
Create New Window
Click the Arrange Documents button in the Application Bar and select New Window, or use Window > Arrange > New Window menu option.
Arrange Windows
Click the Arrange Documents button again and select Tile All in Grid to position windows side by side for easy comparison.
Set Different Views
Choose Layout view in one window and Story view in the other window to see different perspectives of your document simultaneously.
Common View Combinations
Layout and Story View
Perfect for editing text content while seeing the overall page design. Changes in text immediately reflect in both views for comprehensive editing control.
Normal and Preview Mode
Edit elements in Normal view while seeing the final appearance in Preview mode. This combination helps ensure design accuracy during the creative process.
Any changes made in one window will automatically appear in the other window in real-time. This synchronized editing allows you to see the immediate impact of your modifications across different view modes.
Multiple View Setup Checklist
Multiple views require an existing document to duplicate the window view
Located in the Application Bar for quick window management access
Generates a second view of the same document for comparison purposes
Grid arrangement ensures both views are clearly visible and accessible
Set different view types in each window to maximize workflow efficiency