Customizing the Interface: Panels & Workspaces
Efficient interface management is crucial for professional productivity in InCopy. By strategically expanding or collapsing panels, you can eliminate screen clutter while maintaining quick access to essential tools. This streamlined approach allows you to focus on content creation rather than wrestling with interface elements.

Toggling the Panel Dock Between the Full Panel & Icons
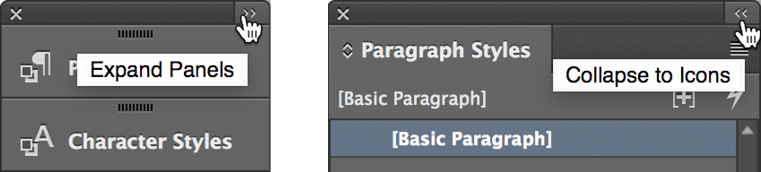
The panel dock's dual-state system gives you maximum flexibility in screen real estate management. Click the double-arrow button at the top right of the panel dock to seamlessly transition between expanded panels (revealing full functionality and content) and collapsed icon mode (preserving workspace while maintaining accessibility). This toggle becomes particularly valuable when working on smaller screens or managing complex documents that demand maximum viewing area.
Panel Dock Toggle Process
Locate Toggle Button
Find the button positioned at the top right corner of the panel dock area
Click to Expand
Click the button to expand collapsed panels and view their full content and options
Click to Collapse
Click again to collapse panels back to icon-only view for maximum screen real estate
Reordering Docked Panels
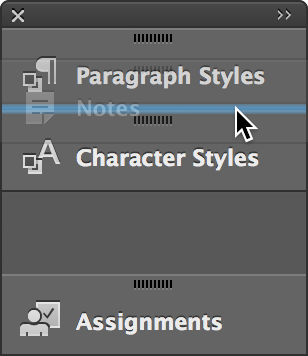
Customize your workflow by arranging panels according to your usage patterns and project requirements. Simply drag any panel's icon or name vertically within the dock—the blue insertion line provides precise positioning feedback, ensuring your panels land exactly where intended. Consider placing your most frequently accessed panels at the top for optimal efficiency, particularly when working under tight editorial deadlines.
Understanding the fundamentals of panel docking transforms your workspace from a default configuration into a personalized command center. The following techniques will help you establish an interface that supports your specific editorial workflow.
Watch for the blue line indicator that appears while dragging panels. This line shows exactly where the panel will be positioned when you release the mouse, ensuring precise placement in your desired order.
Panel Reordering Best Practices
Reduces mouse travel distance for frequently accessed tools
Creates logical workflow sections for better organization
Ensures accurate placement before releasing the drag operation
Docking Panels to the Side of the Screen
Strategic panel docking creates a consistent, accessible workspace that adapts to your content creation needs. While panels typically dock to the right side of the screen (following standard design application conventions), you can position them on either side based on your monitor setup and workflow preferences. Once you establish the initial dock, expanding your panel collection becomes intuitive.
When establishing your first docked panel, drag the panel's tab toward the right edge of your screen. Watch for the dark band indicator—this visual cue confirms InCopy recognizes your docking intention. Release the mouse when the band appears to lock the panel in position.
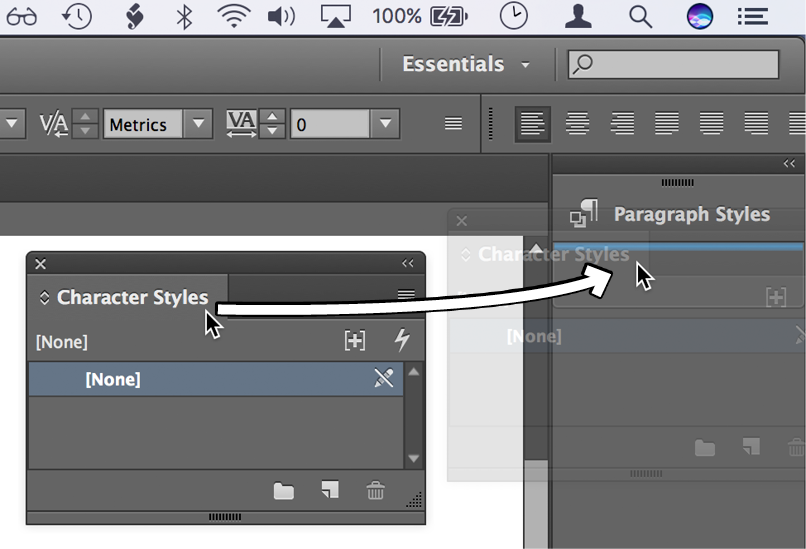
Adding subsequent panels requires simply dragging them into the established docked area. The interface intelligently accommodates additional panels, automatically organizing them within the dock structure. This modular approach allows you to build a comprehensive toolkit without sacrificing workspace organization.
Initial Panel Docking Process
Select Panel Tab
Click and hold the panel's tab that you want to dock to the screen edge
Drag to Screen Side
Move the panel tab to the right side of the screen until a dark band indicator appears
Release to Dock
Release the mouse button when the dark band appears to complete the docking process
Once you have established an initial docked area, additional panels can be easily added by simply dragging them into the existing docked space. This creates a consolidated panel workspace.
Undocking Panels
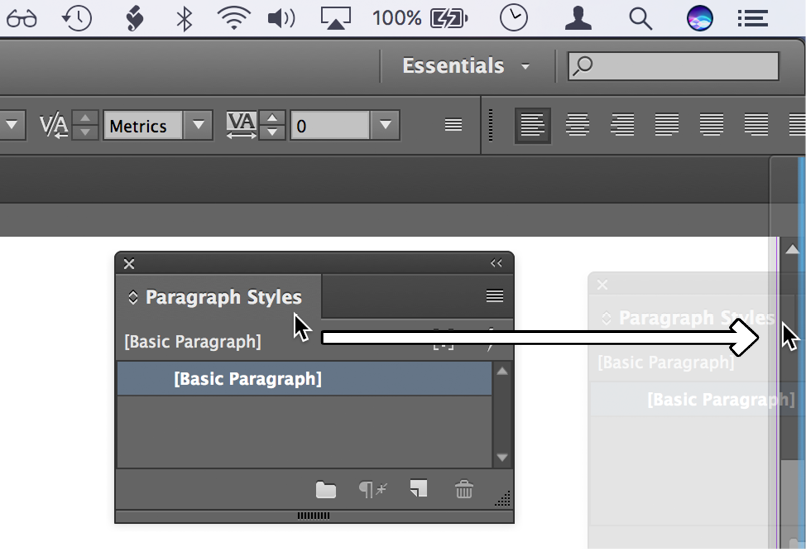
Flexibility remains paramount when working with complex documents or collaborative projects that may require temporary interface adjustments. To liberate a panel from the dock, simply drag its icon, name, or tab away from the docked area and release it in your main workspace. This creates a floating panel that can be positioned anywhere on your screen, ideal for temporary focused work or multi-monitor setups.
The true power of interface customization lies in your ability to save and recall these configurations. Workspaces provide the foundation for consistent, efficient editorial environments across projects and collaborations.
Panel Undocking Method
Select Panel Element
Click and drag the panel's icon, name, or tab from the docked area
Move to Center Screen
Drag the panel away from the dock toward the middle area of the screen
Release to Float
Release the mouse button anywhere in the center area to create a floating panel
Saving a Workspace
Professional workflows demand consistency and reliability. After investing time in perfecting your panel arrangements, toolbar positions, and interface preferences, preserve these configurations as custom workspaces. This insurance policy protects your productivity setup against accidental changes or software resets, ensuring you can instantly return to your optimized environment regardless of circumstances.
Navigate to Window > Workspace > New Workspace.
Assign a descriptive name that reflects the workspace's purpose (such as "Editorial Review" or "Final Proofing") and click OK.
Saving workspaces provides a safety net for interface customization. Even if panels get accidentally rearranged or disrupted, loading a saved workspace instantly restores your preferred layout configuration.
Workspace Saving Process
Arrange Interface
Position all toolbars and panels exactly as you want them for your workflow
Access Workspace Menu
Navigate to Window menu, then select Workspace, followed by New Workspace option
Name and Save
Enter a descriptive name for your workspace configuration and click OK to save
Loading a Workspace
Workspace management becomes particularly valuable when transitioning between different types of editorial work or collaborating with teams that have established interface standards. Whether you're switching from content creation to review mode or adapting to organizational preferences, saved workspaces provide instant environment transformation.
Access Window > Workspace and select your desired configuration, such as Essentials for general editing or any custom workspace you've created.
The interface immediately reorganizes according to your selected workspace specifications, repositioning panels, adjusting visibility settings, and restoring your preferred arrangement. This transformation supports seamless transitions between different editorial phases or project requirements.
NOTE: InCopy intelligently remembers workspace modifications, automatically saving adjustments you make during active sessions. If you need to revert to the original saved configuration—perhaps after experimental changes or collaborative adjustments—simply choose Window > Workspace > Reset [workspace name] to restore the pristine saved state.
Workspace Loading Behavior
Workspaces remember your customizations and reload in their modified state. To return to the original saved configuration, you must choose Window > Workspace > Reset [workspace name] to restore the initial settings.