Topics Covered in This Ruby on Rails Tutorial:
Resourceful vs. Non-resourceful Routing, Assigning Instance Variables, What If the Names Don't Match?, Optional Bonus: Redirects
Exercise Preview
Photos courtesy of istockphoto, © Korhan Karacan, Image #15095805, Marcello Bortolino, Image #17472015, Sergey Kashkin, Image #318828
This exercise builds on previous Rails fundamentals. Complete exercises 3A-3B first to follow the natural progression from basic controllers to advanced routing concepts.
Exercise Overview
In our previous exercise, we built a basic controller to handle simple requests. Now we'll dive deeper into the MVC paradigm—the architectural pattern that makes Rails applications scalable and maintainable. You'll discover how proper routing transforms a collection of files into a cohesive web application, and understand the critical distinction between Resourceful and Non-Resourceful routing patterns that can make or break your application's design.
If you completed the previous exercises (3A–3B), you can skip the following sidebar and proceed directly to the "Getting Started" section. We strongly recommend finishing those exercises first, as they establish the foundational concepts you'll build upon here.
If You Did Not Complete the Previous Exercises (3A–3B)
- Close any open files in your editor to avoid confusion.
- Open the Finder and navigate to Class Files > yourname-Rails Class
- Launch Terminal.
- Type
cdfollowed by a single space (do NOT press Return yet). - Drag the yourname-Rails Class folder from the Finder directly into the Terminal window, then press ENTER.
- Run
rm -rf flixto remove any existing copy of the Flix project. - Execute
Git clone https://bitbucket.org/Noble Desktop/flix.Gitto download the complete Flix repository. - Navigate into the project:
cd flix - Checkout the appropriate branch:
Git checkout 3Bto sync with the end state of the previous exercise. - Install required gems:
bundle - Install JavaScript dependencies:
yarn install—check-files
Getting Started
Before we begin exploring advanced routing concepts, let's ensure your development environment is properly configured and pointing to the correct project directory.
Open the Finder and navigate to Class Files > yourname-Rails Class
Launch Terminal.
Type
cdfollowed by a single space (do NOT press Return yet).Drag the flix folder from the Finder into the Terminal window.
In Terminal, press Return to change into the project directory.
Environment Setup Process
Navigate to Project Directory
Open Finder and locate your Rails class files, then use Terminal to navigate to the project folder
Initialize Terminal Session
Type 'cd' followed by a space, then drag the project folder to Terminal and press Enter
Verify Project State
Ensure you're in the correct directory and have completed prerequisite exercises
Generating a New Model
Starting a new Rails project often feels overwhelming—where do you begin when faced with a blank application? Experienced Rails developers follow a time-tested approach: start with your data model. Understanding your application's core entities and their relationships provides a solid foundation for everything that follows.
Our Flix application centers around movies, making our first model choice obvious. We'll create a comprehensive movie model that demonstrates Rails' full range of data types and conventions.
You've seen model generation before when we created the recipes model using scaffolding:
rails generate scaffold recipe title:string description:string prep_time:string ingredients:text directions:textThis scaffolding approach created a complete CRUD interface, allowing us to access recipe properties as methods on the @recipe instance variable. For example, @recipe.title retrieves the recipe's title for display in our views.
In Terminal, type the following command but do not press Return yet:
rails generate model movieBefore defining our movie model's attributes, let's examine Rails' available field types. Understanding these data types is crucial for building robust, performant applications:
- string: Single-line text up to 255 characters (ideal for titles, names)
- text: Multi-line text with virtually unlimited length (perfect for descriptions, reviews)
- integer: Whole numbers (1, 2, 3...) for counts, IDs, ratings
- decimal: Precise decimal numbers (1.5, 3.14...) essential for currency
- boolean: True/false values that automatically generate methods ending with ? question marks
- date, time, datetime: Temporal data types for scheduling and timestamps
Our movie model will incorporate all these field types, giving you hands-on experience with Rails' complete data type ecosystem.
Complete your Terminal command by adding these attributes, then press Return:
rails generate model movie title:string description:text placement:string mpaa_rating:string runtime:integer poster:string has_subtitles:boolean ticket_price:decimal release_date:dateRails responds by creating several files, each marked with a green
createindicator. The most critical file is app/models/movie.rb—your model's core logic lives here. Rails also generates test files (which we'll explore later) and a migration file whose name begins withdb/migrate/…followed by a timestamp. This migration file deserves closer examination.In Finder, navigate to flix > db > migrate > #
_create_movies.rbNOTE: The
#represents a unique timestamp that Rails generates automatically—yours will differ from others'.Rails timestamps every migration file to ensure proper execution order. This timestamp system is why you should always use
rails generatecommands rather than manually creating model files—Rails handles the complex orchestration automatically.Open #
_create_movies.rb in your code editor to examine Rails' auto-generated migration structure.Study the file's opening lines:
class CreateMovies < ActiveRecord::Migration[6.1]
   def change
This code defines a
CreateMoviesclass inheriting fromActiveRecord::Migration. The bracketed version number ensures backward compatibility as Rails evolves. Thechangemethod indicates this migration is reversible—you can apply it or roll it back during development without data loss.Examine the
create_tablecall:create_table :movies do |t|This method constructs your database table structure, translating your command-line attributes into proper database columns with appropriate data types and constraints.
Rails Field Types Overview
| Feature | Field Type | Use Case |
|---|---|---|
| string | Single-line text | Titles, names, short descriptions |
| text | Multi-line text | Long descriptions, content blocks |
| integer | Whole numbers | Counts, IDs, runtime minutes |
| decimal | Floating point numbers | Prices, ratings, percentages |
| boolean | True/false values | Feature flags, status indicators |
| date/time/datetime | Temporal data | Creation dates, scheduling |
Editing a Migration File
While generating columns via command line is convenient, migration files aren't set in stone. Professional Rails developers frequently fine-tune migrations before applying them—adding constraints, modifying column names, or setting defaults. Let's customize our migration to demonstrate this flexibility.
Locate this line around line 9:
t.string :posterModify it to be more descriptive:
t.string :poster_imageNext, we'll add precision constraints to our decimal field. This is crucial for financial data—without proper constraints, decimal values can display excessive digits or behave inconsistently across different database systems.
Find this line around line 11:
t.decimal :ticket_priceAdd precision and scale parameters:
t.decimal :ticket_price, precision: 8, scale: 2Precisiondefines the total number of significant digits, whilescalespecifies decimal places. Our 8,2 configuration allows up to $999,999.99—sufficient room for Flix's growth while maintaining precise currency handling.Notice this auto-generated line around line 14:
t.timestampsRails automatically adds timestamp columns to track when records are created and updated. This auditing capability is invaluable for debugging, analytics, and compliance requirements.
Save the migration file.
Return to Terminal.
Apply the migration to your database:
rails db:migrateThis command executes your migration, creating the movies table with your specified structure. Your database now matches your model definition.
Always set precision and scale for decimal fields. Use precision: 8, scale: 2 for monetary values to ensure consistent formatting across different database systems.
Rails migration filenames always start with a timestamp so Rails can run them in the proper order.Populating a Database with a Seed File
An empty database makes development challenging—you can't test user interfaces, validate business logic, or demonstrate functionality without data. While production applications receive data from users, development environments need sample data for testing and demonstration purposes.
Rails addresses this need with seed files—Ruby scripts that populate your database with realistic sample data. Professional development teams use seed files to ensure consistent test environments and enable rapid onboarding of new developers.
Open two Finder windows and arrange them side-by-side for easy file management.
In one window, navigate to your seed file destination: flix > db
In the second window, locate the prepared seed file: Class Files > yourname-Rails Class > flix snippets > seeds.rb
Copy seeds.rb from the snippets folder and paste it into flix > db
When prompted about replacing the existing file, click Replace—we're overwriting Rails' blank seed file template.
Open the newly copied seeds.rb in your code editor.
Examine the code starting at line 8. You'll see
Movie.createfollowed by an array of hashes containing sample movie data. Each hash represents one movie record with all the attributes we defined in our model—title, description, runtime, and so forth.Seed files typically contain hand-crafted data designed to showcase your application's features. They're essential when sharing projects between developers or deploying to new environments.
Return to Terminal.
Execute the seed file to populate your database:
rails db:seedYour database now contains sample movie data, ready for display and testing. The next section will show you how to access and present this data to users.
Non-Resourceful Routing Explained
Let's review the Non-Resourceful routing approach we used earlier to display content at localhost:3000/movies. Understanding this pattern is crucial before we explore Rails' more powerful routing conventions.
Our Non-Resourceful route required four distinct steps:
- Generated a controller using
rails generate controller - Added an explicit route in routes.rb mapping /movies to a controller action
- Created an
aboutmethod in MoviesController—even an empty method sufficed - Built a corresponding view file about.html.erb in the correct directory structure
This approach works well for simple, static pages, but it doesn't scale efficiently for data-driven applications. Each URL requires manual configuration, leading to verbose routing files and potential inconsistencies.
Non-Resourceful Route Creation
Generate Controller
Use rails generate controller command to create the controller file structure
Add Route Definition
Manually add route mapping in routes.rb file connecting URL to controller action
Create Controller Action
Define the method in the controller class to handle the request
Build View Template
Create corresponding ERB template file in the appropriate views directory
Non-Resourceful Routing vs. Resourceful Routing
Non-Resourceful routing offers maximum flexibility—you can map any URL to any controller action. This power comes with complexity costs that become evident as applications grow. Imagine manually creating routes for every movie: movies/star-wars, movies/the-godfather, movies/blade-runner-2049. You'd spend more time configuring routes than building features.
Resourceful routing offers a superior approach based on REST (Representational State Transfer) principles. It assumes controllers implement standard methods corresponding to CRUD operations (Create, Read, Update, Delete). This convention-over-configuration philosophy dramatically reduces boilerplate code while ensuring consistent, predictable URL patterns.
Non-Resourceful Routing Trade-offs
Resourceful Routing
Now we'll transform our application to use Rails' resourceful routing conventions—a shift that will unlock powerful features while reducing configuration overhead.
Open flix > config > routes.rb in your code editor.
Modify the existing route as shown:
Rails.application.routes.draw do
   get 'about' => 'movies#about'
end
Save the file.
Switch to your browser.
Reload localhost:3000/movies—notice it no longer exists.
Navigate to localhost:3000/about—this displays correctly as the about page's new location.
Return to routes.rb in your editor.
Add the resourceful route declaration:
Flix::Application.routes.draw do
   get 'about' => 'movies#about'
   resources :movies
end
This single line creates a comprehensive set of RESTful routes following Rails conventions—a dramatic improvement over manual route definition.
Save the file.
In Terminal, stop the server with CTRL-C.
Examine all available routes:
rails routesThe
rails routescommand reveals your application's complete routing table—use it whenever you need to verify available endpoints. Notice how declaring movies as a resource automatically generated multiple routes:- Rails expects an index action at /movies to list all movies
- Individual movie details are served at /movies/:id (such as /movies/1 or /movies/shrek)
GETroutes serve pages for viewing, creating, and editingPOST,PUT,PATCH, andDELETEroutes handle form submissions and data modifications
We'll begin with the
indexaction—the foundation of any resource-based interface.
Non-Resourceful Route Creation
Generate Controller
Use rails generate controller command to create the controller file structure
Add Route Definition
Manually add route mapping in routes.rb file connecting URL to controller action
Create Controller Action
Define the method in the controller class to handle the request
Build View Template
Create corresponding ERB template file in the appropriate views directory
Understanding CRUD Operations
Resourceful routing implements CRUD operations—the four fundamental functions of persistent storage. CRUD stands for Create, Read, Update, Delete, and each operation maps to specific HTTP verbs that browsers and APIs use to communicate intent:
- Create = POST (submit new data)
- Read = GET (retrieve and display data)
- Update = PUT/PATCH (modify existing data)
- Delete = DELETE (remove data)
The distinction between PUT and PATCH reflects different update strategies: PUT replaces entire records, while PATCH applies partial updates to specific fields. Modern Rails applications typically use PATCH for form-based updates.
Assigning Instance Variables
Controllers serve as intermediaries between your data models and view templates. Their primary responsibility is fetching appropriate data and making it available to views through instance variables. Let's implement the index action to display our movie collection.
Open flix > app > controllers > movies_controller.rb
Add the index method to your controller:
class MoviesController < ApplicationController
   def about
   end

   def index
   end
end
Save the file.
We need a corresponding view template for the index action. Rather than building HTML from scratch, we'll use a pre-built template to focus on the controller concepts. Navigate to yourname-Rails Class > flix snippets in Finder and copy index.html.erb
Navigate to flix > app > views > movies
Paste the template file (Cmd-V) into the movies folder.
Now we have the three components of a complete MVC interaction: controller, action method, and view template. Let's test our implementation.
Start the Rails server:
rails serverIn your browser, navigate to localhost:3000/movies
You'll encounter a
NoMethodError—but this is actually progress! Rails' detailed error messages are invaluable debugging tools, and this error teaches us about the relationship between controllers and views.The error occurs because our view template expects an instance variable called
@moviescontaining our movie collection. The controller must fetch this data and assign it to an instance variable that the view can access.Return to movies_controller.rb in your editor.
Update the index method to fetch movie data:
class MoviesController < ApplicationController
   def about
   end

   def index
      @movies = Movie.all
   end
end
Save the file.
Reload localhost:3000/movies in your browser
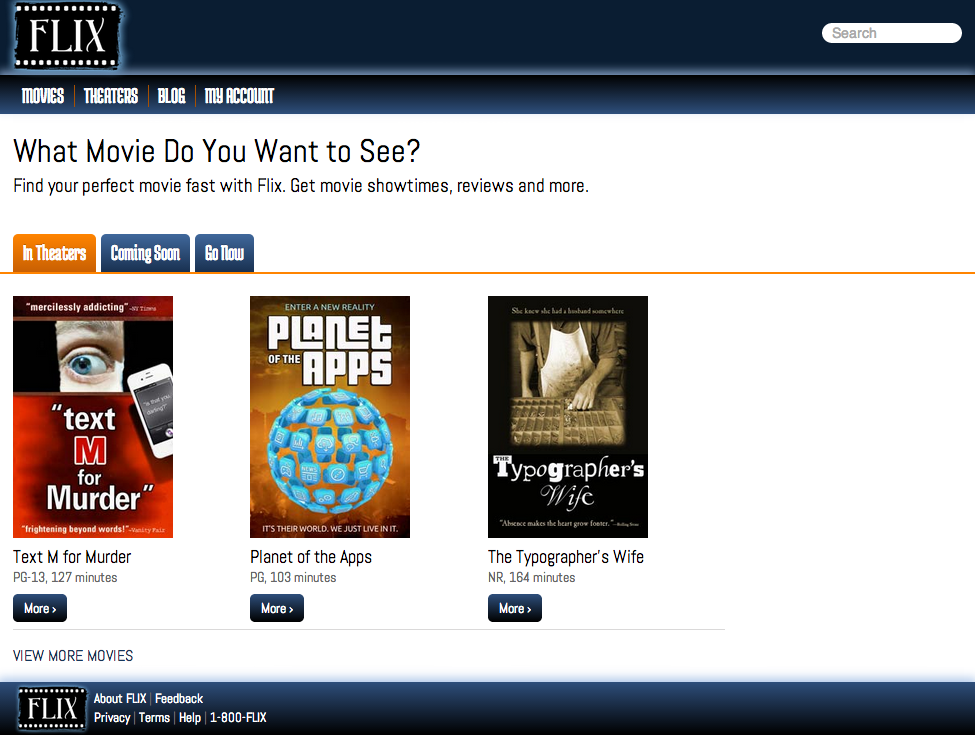
Success! The page now displays all three movies from your seed data.
The crucial element in our fix was the @ symbol, which creates an instance variable accessible outside the method scope—specifically, in the view template that Rails renders after the controller action completes.
Navigate to localhost:3000 to see Rails' default welcome page—let's make our movie index the application's home page.
Return to routes.rb in your editor.
Add a root route:
Flix::Application.routes.draw do
   get 'about' => 'movies#about'
   resources :movies
   root 'movies#index'
end
Controllers must assign instance variables (with @ symbol) to share data with views. Without @movies = Movie.all, the view cannot access movie data.
Controller-View Data Flow Checklist
Create the method that will handle the specific route request
Use @ to make variables accessible outside the controller method
Build ERB file in correct views subdirectory matching controller name
Use the same @variable names in ERB templates to display data