Topics Covered in This Ruby on Rails Tutorial:
Incorporating Designer HTML & CSS into Rails Applications, Integrating Images & Custom Fonts Through the Asset Pipeline
Exercise Preview
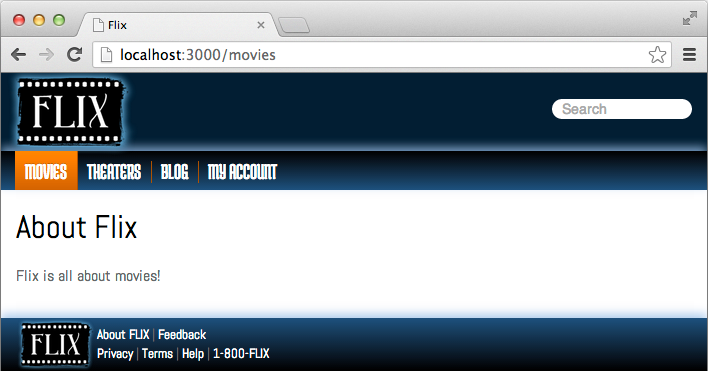
Photo courtesy of istockphoto, © Korhan Karacan, Image #15095805
Developing and testing will be much more pleasant once we get the site looking professional. Visual feedback helps identify issues faster and improves the development experience.
Exercise Overview
At this stage, our Rails application is functionally sound but visually bare-bones. This exercise focuses on bridging the gap between backend functionality and professional frontend design—a critical skill in modern web development. We'll integrate professionally crafted HTML mockups into our Rails architecture, transforming our basic site into a polished application that reflects contemporary design standards.
This integration process mirrors real-world development workflows where designers and developers collaborate to bring concepts to life. Understanding how to properly incorporate external design assets while maintaining Rails conventions is essential for building production-ready applications.
Getting Started
Professional development teams rely on structured design handoffs to ensure consistency and maintainability. Our fictional design team at Flix has provided comprehensive HTML mockups that demonstrate industry best practices for asset organization and file structure.
In the Finder, navigate to: yourname-Rails Class > flix snippets > Flix HTML
Examine the organized folder structure: css, fonts, img, js directories alongside the main index.html file. This organization reflects standard frontend development practices and helps maintain scalability as projects grow. We'll map each of these asset types to their corresponding locations within Rails' opinionated file structure.
Open index.html in any browser to preview the final design vision. This represents the target aesthetic we'll achieve by the end of this exercise—a modern, responsive interface that enhances user experience.
Switch to the Finder and navigate to Class Files > yourname-Rails Class
Open Terminal to begin server configuration.
Type
cdand a single space (do NOT press Return yet).To enter the path in Terminal, drag the flix folder from the Finder to the Terminal window and hit Return to change into the project directory.
Start the Rails development server:
rails server
Initial Setup Process
Locate Design Files
Navigate to the flix snippets folder containing HTML mockups with subfolders for css, fonts, img, and js components.
Preview the Design
Open index.html in a browser to see the final appearance of your Rails site after integration.
Start Rails Server
Use Terminal to navigate to your project folder and run 'rails server' to begin development.
Understanding the Application Layout Framework
Rails implements a sophisticated template hierarchy that separates global layout elements from page-specific content. This architectural decision promotes code reusability and maintains visual consistency across your entire application.
The Automatically Created File Application.html.erb
Every Rails application generates a master layout file that serves as the structural foundation for all views. This file, application.html.erb, contains the essential HTML skeleton and Rails-specific helper methods that enable dynamic content rendering and asset management.
Open the master layout file in your code editor: flix > app > views > layouts > application.html.erb
Rails automatically generates this minimal HTML5 structure with embedded Ruby (ERB) tags that handle dynamic functionality. While basic, this file contains four critical Rails helper methods that manage security, asset loading, and content rendering—all essential for production applications.
Examine line 11, which contains the most important piece of Ruby code:
<%= yield %>This
yieldstatement defines where controller-specific view content gets injected into the layout. Everything surrounding this tag remains static across all pages—your navigation, header, footer, and other persistent UI elements. This separation of concerns is fundamental to Rails' MVC architecture and enables efficient code organization as applications scale.Note the CSS asset helper on line 8:
<%= stylesheet_link_tag 'application', media: 'all', 'data-turbolinks-track': 'reload' %>This Rails helper automatically generates the appropriate HTML link tags for your stylesheets while managing asset fingerprinting, compression, and cache invalidation—critical features for production performance optimization.
Observe the JavaScript asset helper:
<%= javascript_pack_tag 'application', 'data-turbolinks-track': 'reload' %>Similar to the stylesheet helper, this manages JavaScript assets through Rails' Webpacker integration (or the newer import map system in Rails 7+), providing automatic bundling and optimization capabilities that rival dedicated frontend build tools.
Review the security helpers on lines 5 and 6:
<%= csrf_meta_tags %>
<%= csp_meta_tag %>
These Rails security features are non-negotiable in production applications. The CSRF protection prevents cross-site request forgery attacks by validating that form submissions and AJAX requests originate from your application. The CSP (Content Security Policy) meta tag helps prevent XSS attacks by controlling which resources the browser is allowed to load.
These four helper methods represent Rails' opinionated approach to web security and asset management—preserve them during any layout customization.
Essential Dynamic Data Tags
yield Tag
The most important Ruby code that determines where page-specific content loads within the global template structure.
stylesheet_link_tag
Replaces traditional CSS file calls and integrates with Rails asset pipeline for optimized stylesheet loading.
javascript_pack_tag
Handles JavaScript file integration similar to stylesheets but designed for Rails' modern JavaScript bundling.
Security Meta Tags
csrf_meta_tags and csp_meta_tag provide cross-site request forgery protection and secure form submissions.
These four dynamic data tags are unique to Rails and must be preserved when implementing designer HTML. They provide essential functionality for security, asset management, and content rendering.
Incorporating the Designer's HTML
Professional design integration requires careful preservation of Rails functionality while implementing custom HTML structure. The following process demonstrates how to merge external designs with Rails conventions effectively.
Open the designer's HTML file: yourname-Rails Class > flix snippets > Flix HTML > index.html
Notice the strategic comments indicating where Rails helpers should replace standard HTML tags. Professional design teams often include such annotations to facilitate developer integration, reducing miscommunication and implementation errors.
The
<!—begin cut here—>and<!—end cut here—>comments clearly delineate the content that belongs in the Rails layout file, streamlining the integration process.Review the pre-integrated file: yourname-Rails Class > flix snippets > application.html.erb
This file demonstrates proper integration technique—the designer's HTML structure combined with essential Rails helpers. Notice how
image_taghelpers replace standard<img>tags, enabling Rails' asset pipeline management while maintaining the original design intent.Close the file to proceed with installation.
Open Finder and arrange two windows side-by-side for efficient file management.
In the first window, navigate to the destination: flix > app > views > layouts
In the second window, locate the source file: yourname-Rails Class > flix snippets > application.html.erb
Copy application.html.erb and paste it into the layouts folder.
Click Replace to overwrite the default Rails layout with our integrated version.
Test the integration by navigating to localhost:3000/movies in your browser. Rails will display an asset error:
Sprockets::Rails::Helper::AssetNotFound in Movies#aboutThe specific error message:
The asset "logo-2x.png" is not present in the asset pipeline.This error confirms that Rails is attempting to load the design assets but can't locate them in the expected pipeline directories. This is the expected behavior and demonstrates Rails' strict asset management approach.
HTML Integration Workflow
Review Prepared Integration
Examine the pre-integrated application.html.erb file that combines designer HTML with essential Rails dynamic tags.
Replace Default Template
Copy the integrated file to flix > app > views > layouts, overwriting the automatically created application.html.erb.
Test Initial Integration
Navigate to localhost:3000/movies to identify missing assets that need to be added to the Rails pipeline.
Mastering the Rails Asset Pipeline
The Rails asset pipeline represents one of the framework's most powerful features, providing automatic asset optimization, fingerprinting, and CDN preparation. Understanding this system is crucial for building performant production applications.
Incorporating the Images
Rails treats all non-code files—images, stylesheets, fonts, and JavaScript—as assets that flow through its optimization pipeline. This system automatically handles compression, cache busting, and performance optimization that would otherwise require complex build tool configurations.
Navigate to the Rails image assets directory: flix > app > assets > images
This initially empty folder becomes the central repository for all image assets. Rails automatically processes files placed here, generating optimized versions for different environments and adding fingerprints for cache management.
In your second Finder window, navigate to: yourname-Rails Class > flix snippets > Flix HTML > img
Select all images (Cmd–A), copy them, and paste into flix > app > assets > images.
Refresh localhost:3000/movies to confirm the page loads without asset errors, though styling will still be incomplete until we address the CSS files.
Rails treats CSS, images, and other non-Ruby files as 'assets' that live in the app > assets folder. This system provides compression and combination for production environments.
Image Integration Process
Locate Image Destination
Navigate to flix > app > assets > images folder, which is initially empty in new Rails applications.
Copy Designer Images
Select all images from the designer's img folder and paste them into the Rails assets images directory.
Verify Integration
Reload the browser to confirm images load correctly, resolving the AssetNotFound error.
Implementing Professional Stylesheet Architecture
Modern web applications require sophisticated CSS organization to maintain scalability and performance. Rails provides an elegant solution through its asset pipeline integration with Sass preprocessing capabilities.
Incorporating the Stylesheets
Verify current styling status at localhost:3000/movies. You'll observe that structural elements are present but lack proper styling—the navigation, footer, and images appear unstyled due to missing CSS integration.
In Finder, navigate to your Rails stylesheets directory: flix > app > assets > stylesheets
In the second window, locate the designer's CSS files: yourname-Rails Class > flix snippets > Flix HTML > css
Copy all CSS files (Cmd–A) and paste them into flix > app > assets > stylesheets
Open flix > app > assets > stylesheets > application.css in your code editor to understand Rails' CSS management system.
This file serves as the master manifest for all stylesheets in your application. The key directive on line 13:
*= require_tree.instructs Rails to automatically include all CSS and SCSS files in the stylesheets directory. This convention-over-configuration approach simplifies asset management but requires understanding of load order implications.
The designer specified this CSS loading sequence:
<link rel="stylesheet" href="css/normalize.min.css">
<link rel="stylesheet" href="css/fonts.css">
<link rel="stylesheet" href="css/main.css">
CSS load order significantly impacts rendering behavior. The normalize.min.css file must load first to establish consistent cross-browser defaults before other styles take effect.
Add explicit load order control by inserting this directive:
*= require_tree.
*= require 'normalize.min'
*= require_self
This ensures normalize.min.css loads first, while Rails intelligently prevents duplicate loading when it processes the require_tree directive.
Save the file and rename main.css to main.scss to enable Sass preprocessing capabilities. Right-click the filename in your editor and select Rename.
Update the image references in main.scss to use Rails asset helpers. Locate these four lines:
background-image: url(../img/header-bg.png);
background-image: url(../img/header-bg-2x.png);
background: url(../img/star-rating-sprite.png) no-repeat;
background: url(../img/star-rating-sprite-2x.png) no-repeat;
Replace with Rails asset helpers:
background-image: image-url('header-bg.png');
background-image: image-url('header-bg-2x.png');
background: image-url('star-rating-sprite.png') no-repeat;
background: image-url('star-rating-sprite-2x.png') no-repeat;
The
image-url()helper automatically generates the correct asset paths, including fingerprints and CDN URLs in production environments, eliminating manual path management.
The order of CSS files matters significantly. normalize.min.css should load first to smooth out browser quirks before other stylesheets run.
Stylesheet Integration Steps
Copy CSS Files
Transfer all three CSS files from the designer's css folder to flix > app > assets > stylesheets.
Configure Loading Order
Modify application.css to require normalize.min.css first, overriding alphabetical loading with proper sequence.
Update Image References
Rename main.css to main.scss and replace url() calls with Rails image-url() helper for proper asset pipeline integration.
Required CSS File Updates
File Extension Change
Rename main.css to main.scss to enable Rails SCSS preprocessing and helper functions.
Image Path Updates
Replace four background-image url() references with image-url() helper for proper asset pipeline integration.
Integrating Custom Typography
Typography significantly impacts user experience and brand consistency. While Rails' asset pipeline can handle fonts, certain use cases benefit from alternative approaches that offer greater flexibility and simpler maintenance.
Incorporating the Fonts
Rails' public directory provides direct web access to static files, making it ideal for assets that don't require pipeline processing. This approach works particularly well for custom fonts that need predictable URLs for CSS references.
Navigate to flix > public in Finder.
This directory contains files that Rails serves directly without processing—error pages, robots.txt, and other static assets. The public folder functions identically to a traditional web server's document root, providing straightforward file access.
Test the direct access functionality by visiting localhost:3000/robots.txt in your browser. This demonstrates how public folder contents are immediately accessible via URL.
For fonts referenced in our CSS with /fonts paths, placing a fonts directory in the public folder creates the expected URL structure without additional configuration.
Navigate to the source fonts: yourname-Rails Class > flix snippets > Flix HTML
Copy the entire fonts folder and paste it into flix > public.
Reload localhost:3000/movies to see the complete integration. The custom typography should now render correctly, completing the professional design implementation. If fonts don't appear immediately, restart your browser to clear any cached font declarations.
Congratulations—you've successfully integrated a complete design system into your Rails application while maintaining the framework's architectural principles and performance optimizations.
The public folder corresponds to the root directory of a traditional website. Files placed here are directly accessible via URL paths like localhost:3000/robots.txt.
Font Integration Method
Explore Public Directory
Navigate to flix > public folder, which contains error pages and robots.txt, representing the website root.
Copy Font Directory
Copy the entire fonts folder from designer files directly into the public directory for direct URL access.
Verify Font Loading
Reload the browser to see improved typography. Restart browser if fonts don't immediately appear.