Topics Covered in This Photoshop Tutorial:
Resizing & Resampling, Soft Proofing, Image Compression (JPEG)
Exercise Preview
Exercise Overview
Web optimization requires a fundamentally different approach than print preparation. Where print work prioritizes maximum quality and color accuracy, web images demand a careful balance between visual fidelity and file performance. This exercise guides you through a professional web preparation workflow that ensures your images look crisp while loading quickly across all devices and connection speeds.
Web vs Print Image Preparation
| Feature | Web Preparation | Print Preparation |
|---|---|---|
| Color Space | sRGB | Adobe RGB/CMYK |
| Resolution | 72 PPI | 300+ PPI |
| File Size Priority | Minimal for speed | Maximum quality |
| Compression | Heavy JPEG | Minimal/None |
Prepping the Image for Use on the Web
From the Photoshop Adv Class folder, open East River-for web.psd.
Notice that no color management dialog appeared? This indicates the image has already been converted to our Adobe RGB workspace and is ready for processing. This streamlined workflow prevents unnecessary color space conversions that can degrade image quality.
Execute File > Save As and save it back into the Photoshop Adv Class folder as yourname-East River-for web.psd.
NOTE: If you've made compositional changes or have multiple layers, this is the critical point to flatten your image using Layer > Flatten Image. Flattening reduces file complexity and ensures consistent processing in subsequent steps.
Navigate to Image > Image Size to access the resizing controls.
Enable Resample and select Automatic. Hold off on clicking OK—we're setting up multiple parameters first.
Behind the scenes, Photoshop intelligently selects Bicubic Sharper when reducing image dimensions. This algorithm preserves edge definition better than standard Bicubic interpolation, crucial for maintaining crisp details in web images. This automatic selection has been a significant workflow improvement since CS6, eliminating the need for manual algorithm selection.
Configure the following parameters for optimal web delivery:
Resolution: 72 Pixels/Inch Width: 450 Pixels The 72 PPI resolution is standard for web display, while the 450-pixel width provides excellent clarity on both desktop and mobile devices without creating unnecessarily large file sizes.
Click OK to apply the resize operation.
If you're not already viewing at actual size, go to View > 100% to see exactly how the image will appear to web visitors.
This actual-size preview is crucial for quality assessment. What looks acceptable at 25% zoom may reveal compression artifacts or blur at 100%.
Apply appropriate sharpening using your preferred technique, such as Smart Sharpen or Unsharp Mask.
Resizing operations inherently soften images, making this sharpening step essential for professional results. Smart Sharpen typically provides more control and better results for web images, particularly for photographs with varied content.
Images already converted to Adobe RGB workspace eliminate color management dialogs and streamline your workflow, allowing immediate editing without conversion delays.
Image Size Optimization Workflow
Enable Resample with Automatic
Photoshop automatically selects Bicubic Sharper for size reduction, maintaining better sharpness than standard Bicubic resampling.
Set Web-Standard Resolution
Change resolution to 72 pixels per inch, the standard for web display that balances quality with file size.
Define Pixel Dimensions
Set width to 450 pixels or your target size, ensuring images fit properly within your web layout constraints.
Preview at Actual Size
View at 100% to see exactly how the image will appear to web visitors on their screens.
Saving the File Appropriately
With your image properly sized and sharpened, the final step involves exporting with optimal compression settings for web delivery.
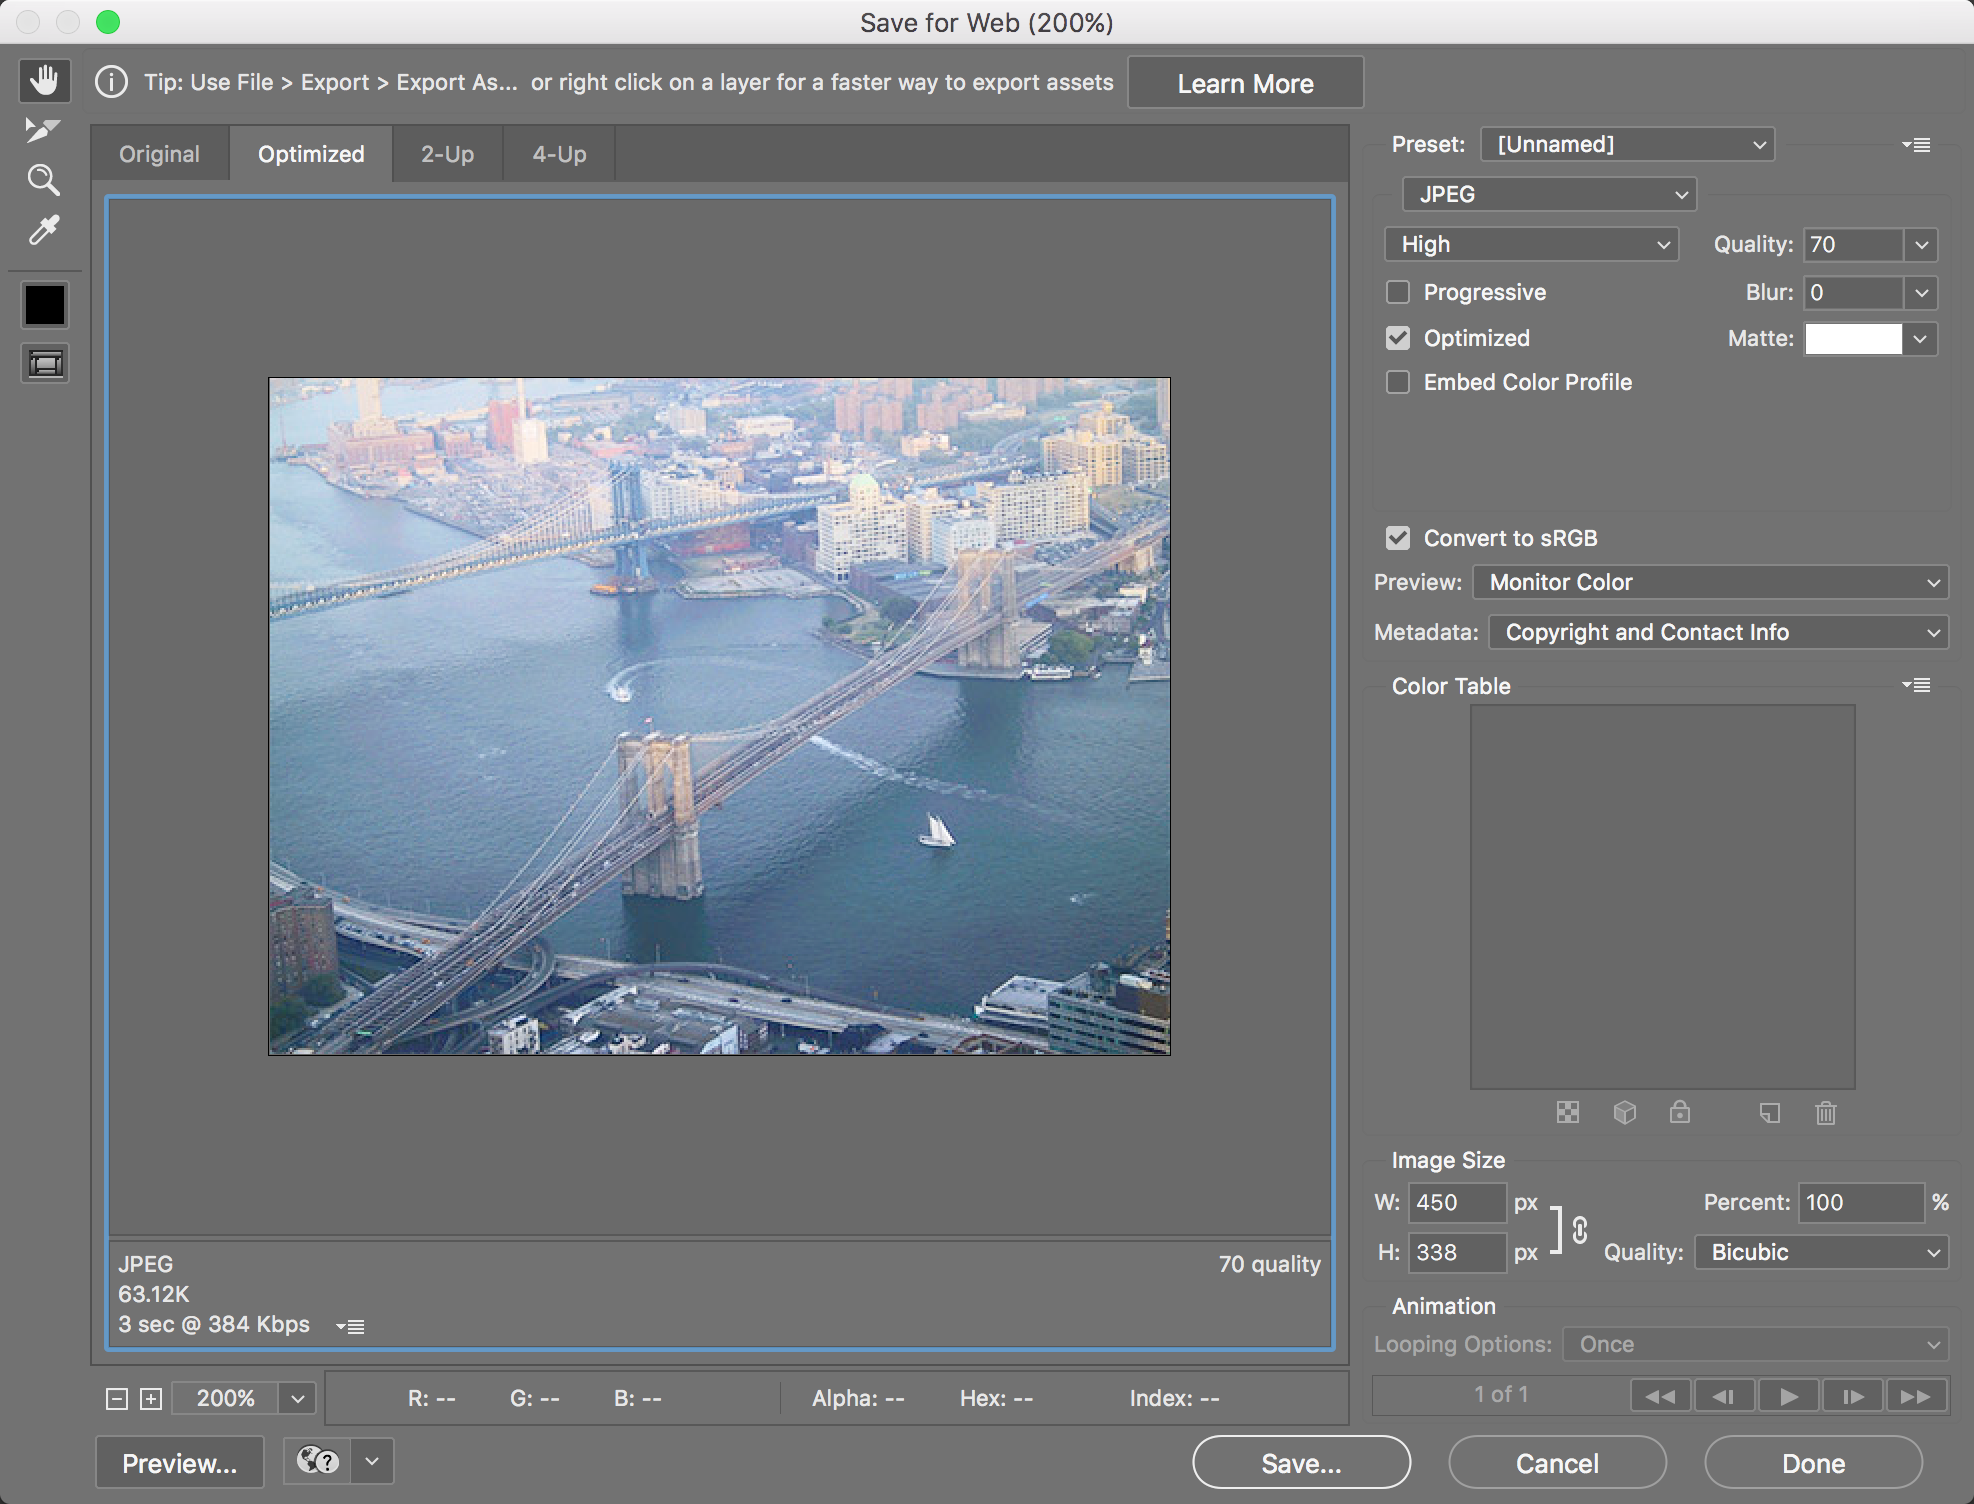
Execute File > Export > Save for Web (Legacy).
NOTE: While Adobe labeled this feature as "Legacy" and introduced newer export methods like Export As, Save for Web remains the gold standard for web optimization in 2026. The newer tools, while improved since their 2015 introduction, still lack some of the granular control and preview capabilities that make Save for Web indispensable for professional work. Adobe continues supporting this tool precisely because it provides unmatched precision for web image optimization.
In the upper right section below the Preset menu, select JPEG as your file format.
Set Quality to 70 as your starting point.
This quality setting typically provides the optimal balance between file size and visual quality for most photographic content. You can fine-tune this value based on your specific image—complex images with fine details may benefit from quality 75-80, while simpler graphics might work well at 60-65.
Verify that Convert to sRGB remains checked—this default setting is crucial for consistent web display.
While sRGB offers a smaller color gamut than Adobe RGB or ProPhoto RGB, it remains the universal standard for web display in 2026. This conversion ensures your images appear consistently across all browsers and devices.
Resist the temptation to embed color profiles for web images because:
- Color profiles add 3-5 kilobytes per image, and this overhead compounds quickly across websites with hundreds of images, measurably impacting page load speeds.
- Even in 2026, color management support remains inconsistent across browsers and devices, making profile embedding largely ineffective for web delivery.
Click Save and store the optimized file in your Photoshop Adv Class folder.
Close the original Photoshop file, saving any changes to preserve your work.
Always maintain your original PSD file with layers intact—it serves as your master file for future edits or alternative export requirements.
Save for Web (Legacy) vs New Export Methods
Recommended JPEG Quality Settings