Getting Started
- Navigate to File > Open.
Open DKNY-wrong profile (should be sRGB).tif from the Color Management Seminar Files folder.
Photoshop will display the following profile mismatch warning:

Select Use the embedded profile and click OK.
What's happening here: This image was originally captured on a digital camera, but the software used during download incorrectly assigned it a different profile—Generic RGB Profile. This profile mismatch causes Photoshop to interpret and display the image's colors incorrectly. When we assign the proper profile that accurately describes the camera's color characteristics, Photoshop will render the image as originally intended.
For this particular scenario, your choice between Use the embedded profile and Discard the embedded profile is inconsequential. Whether the image carries an incorrect profile or no profile at all doesn't matter—our next step involves assigning the accurate profile that will properly represent the image data.
While incorrect embedded profiles aren't encountered daily, they occur frequently enough in professional workflows that understanding this correction process is essential for maintaining color accuracy across your projects.
Opening Images with Profile Issues
Navigate to File Menu
Go to File > Open and locate your image file from the designated folder
Handle Profile Warning
When the profile mismatch dialog appears, select Use the embedded profile option
Confirm Selection
Click OK to proceed, knowing you will correct the profile assignment in the next steps
Whether you choose Use the embedded profile or Discard the embedded profile does not matter at this stage since you will be assigning the correct profile in the subsequent workflow steps.
Assigning the Proper Profile so Photoshop Displays the Image Properly
Now that we've opened the file, we need to correct the profile assignment to ensure accurate color representation.
Navigate to Edit > Assign Profile.
Most consumer and many professional digital cameras capture images in sRGB color space. As demonstrated below, select sRGB from the Profile dropdown menu, but wait before clicking OK—we want you to observe the preview first.

Watch carefully as Photoshop recalculates the display to accurately represent how the camera originally captured this dusk scene. Notice the building lights and vehicle illumination that indicate approaching darkness—the image should appear darker than before, which more accurately reflects the actual lighting conditions when photographed. Toggle the Preview checkbox on and off to clearly see this dramatic correction. The result now authentically represents what the camera sensor recorded.
Click OK to apply the correct profile assignment.
Profile Assignment Workflow
Access Assign Profile
Navigate to Edit > Assign Profile to open the profile assignment dialog
Select Correct Profile
Choose sRGB from the Profile menu to match the digital camera's color space
Preview Changes
Use the Preview checkbox to compare before and after results, then click OK when satisfied
Before vs After Profile Assignment
| Feature | Incorrect Generic RGB | Correct sRGB Assignment |
|---|---|---|
| Image Brightness | Too light for dusk scene | Properly darkened |
| Color Accuracy | Misrepresented tones | Camera-accurate display |
| Detail Visibility | Building/car lights unclear | Proper dusk lighting visible |
Converting into a Device-Independent Workspace for Image Editing
With the correct source profile now assigned, our next step involves optimizing the color space for professional editing workflows.
While this image originated from a digital camera using sRGB—a color space well-suited for web design and screen display—sRGB's relatively narrow gamut limits our editing flexibility, particularly for print reproduction. Converting to a broader, device-independent workspace frees us from the constraints of the original capture device and provides access to a wider range of colors for professional image enhancement.
Access Edit > Convert to Profile and configure the following settings:
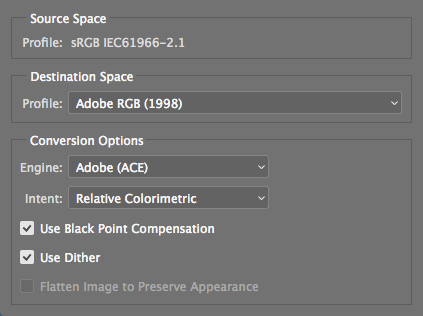
Important consideration: While Adobe RGB serves as an excellent general-purpose workspace with its expanded gamut, it's not universally optimal for every workflow. Professional photographers and designers should evaluate their specific output requirements—whether primarily web, offset printing, digital printing, or mixed media—to determine the most appropriate RGB working space. In 2026, many professionals also consider newer wide-gamut spaces like Display P3 or Rec. 2020 depending on their target viewing environments and output devices.
Click OK to execute the profile conversion.
You're now working within a robust device-independent color space that provides the flexibility and color range necessary for professional image editing, color correction, and output preparation across multiple media types.
Since this is a demonstration exercise, close the file without saving changes.
While sRGB works well for web design, its smaller color gamut makes it unsuitable for professional print work where broader color ranges are essential.
Converting to Professional Workspace
Open Convert to Profile
Go to Edit > Convert to Profile to access workspace conversion options
Select Target Profile
Choose Adobe RGB or another professional workspace suitable for your intended output
Complete Conversion
Click OK to convert the image into the device-independent color workspace
Device-Independent Workspace Benefits
Color Management Best Practices
Prevents display issues and ensures accurate color representation
Allows you to see changes before committing to profile assignment
Ensures optimal color range for intended final use case
Adobe RGB is not universally best for all professional applications