Topics Covered in This Photoshop Tutorial:
Converting to CMYK, Loading Color Profiles, Comparing Different CMYK Conversions
Exercise Preview
Exercise Overview
Selecting the appropriate CMYK profile for color conversion is one of the most critical—yet frequently overlooked—steps in professional print workflow. The difference between a mediocre print and exceptional output often hinges on this single decision. In this exercise, we'll conduct a side-by-side comparison of different CMYK profiles to demonstrate their profound impact on color separation and final print quality. Understanding these nuances will elevate your print preparation skills and help you deliver consistently superior results to clients.
Choosing the correct profile for CMYK conversion is often neglected but critically important. Different profiles can produce dramatically different color separations for the same image.
Getting Started
We'll begin by establishing our working environment and ensuring proper color profile handling from the outset.
Close all open files to avoid any color management conflicts, then open yourname-lifestyle.psd.
When the Profile Mismatch dialog appears, ensure Use the embedded profile is selected and click OK.

Professional insight: This image contains an embedded ColorMatch RGB profile. While we typically work in Adobe RGB for this course, ColorMatch RGB is equally robust as a device-independent workspace. Converting between high-quality RGB working spaces introduces unnecessary data loss and potential color shifts. The golden rule: when an image already exists in a professional-grade color space, preserve that original workspace to maintain maximum image integrity.
Save the file as yourname-lifestyle-flat4printer.psd to create our working copy.
Navigate to Layer > Flatten Image to prepare the file for CMYK conversion.
When an image has ColorMatch RGB embedded, avoid unnecessary conversions to Adobe RGB. Converting between colorspaces can cause quality loss even between good workspaces.
File Preparation Workflow
Close Existing Files
Clear workspace by closing all open files to avoid confusion during color profile operations
Open Target Image
Open yourname-lifestyle.psd and confirm Use the embedded profile option in dialog
Save Working Copy
Save as yourname-lifestyle-flat4printer.psd then flatten layers for print preparation
Checking for Profiles
Before proceeding, we need to verify that the specialized CMYK profiles required for this exercise are available on your system.
In professional print workflows, your commercial printer should provide custom ICC profiles that precisely characterize their specific press and paper combination. These profiles are essential for accurate color reproduction. For this exercise, we'll use two industry-standard profiles that may not be installed by default. Navigate to Edit > Color Settings to check their availability.
Under Working Spaces, click the CMYK dropdown menu and look for these profiles:
- Light GCR 280 UCR CMYK US Negative Proofing
- Light GCR 360 UCR CMYK US Negative Proofing
Click Cancel to close the dialog. If both profiles appear in the list, skip the next section and continue with "Making a Copy." If either profile is missing, proceed to the profile installation steps below.
Required CMYK Profiles Verification
Navigate to Working Spaces CMYK menu to check available profiles
First required profile for specialized printing workflows
Second required profile for comparison demonstration
Skip installation if profiles exist, otherwise continue to loading section
Loading Extra Profiles
Installing custom color profiles correctly ensures they're available system-wide and integrated properly with Adobe's color management engine.
Minimize Photoshop to access your desktop and file system.
Navigate to Class Files > Photoshop Adv Class, then open the extra_profiles folder.
Press Cmd–A (Mac) or Ctrl–A (Windows) to select both profile files.
Copy the files using Cmd–C (Mac) or Ctrl–C (Windows).
The installation location varies by operating system. Follow the appropriate steps below:
Mac Users
Hold the Option key and select Library from the Go menu in Finder.
Navigate to ColorSync > Profiles.
- Once inside the Profiles folder, paste the files using Cmd–V. macOS will automatically register these profiles with the ColorSync system.
Windows Users
Open File Explorer and navigate to C:\Windows\System32\spool\drivers\color.
- Paste the profile files using Ctrl–V. Windows will integrate them into the system color management framework.
Return to Photoshop. The profiles are now available for use in color conversions.
Profile Installation Paths by Operating System
| Feature | Mac Installation | Windows Installation |
|---|---|---|
| Access Method | Hold Opt + Go menu > Library | Navigate to C: drive |
| Profile Directory | ColorSync > Profiles | Windows > System32 > spool > drivers > color |
| Installation Action | Cmd-V to paste profiles | Ctrl-V to paste profiles |
Making a Copy so We Can Compare the Settings
To effectively demonstrate the impact of different CMYK profiles, we'll create a side-by-side comparison setup that allows for real-time evaluation.
Create a duplicate by going to Image > Duplicate and clicking OK. This gives us two identical starting points for our comparison.
Arrange the windows for optimal comparison by selecting Window > Arrange > 2-up Vertical
 .
.In either window, adjust the zoom level to display most of the image comfortably.
Synchronize both views by selecting Window > Arrange > Match All. Your workspace should now resemble the setup shown below, optimized for detailed comparison work.

Comparison Setup Process
Duplicate Image
Use Image > Duplicate to create identical copy for side-by-side comparison
Arrange Windows
Apply Window > Arrange > 2-up Vertical for optimal comparison layout
Match Zoom Levels
Zoom out in one pane, then use Window > Arrange > Match All for consistent viewing
Applying the Settings & Converting to CMYK
Now we'll apply different CMYK profiles to each image copy and observe how the choice of color space affects the conversion process.
Begin with the left image. Click to ensure it's the active document.
Access Edit > Color Settings to configure the first profile.
Under Working Spaces, select U.S. Web Coated (SWOP) v2 from the CMYK dropdown. This industry-standard profile simulates typical commercial web offset printing conditions.
Click OK to apply the settings.
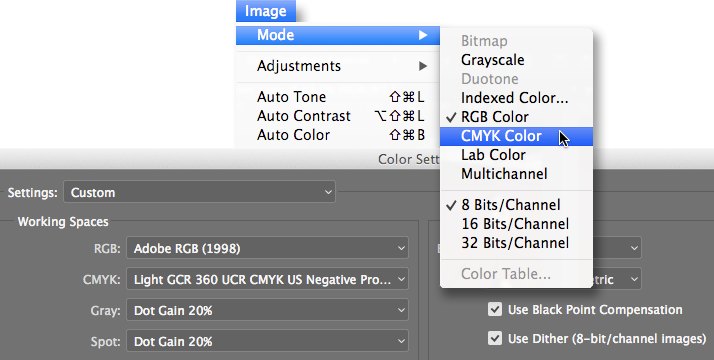
Execute the conversion via Image > Mode > CMYK Color.
If prompted about profile handling, check Don't show again and click OK to streamline future conversions.
Now activate the right image by clicking on it.
Open Edit > Color Settings again.
From the CMYK menu, select Light GCR 360 UCR CMYK US Negative Proofing. This profile uses advanced Gray Component Replacement (GCR) and Under Color Removal (UCR) techniques for superior shadow detail and ink density control.
Click OK to confirm the profile selection.
Convert this image using Image > Mode > CMYK Color.
CMYK Profile Conversion Settings
| Feature | Left Image Settings | Right Image Settings |
|---|---|---|
| Profile Selection | U.S. Web Coated (SWOP) v2 | Light GCR 360 UCR CMYK US Negative Proofing |
| Conversion Method | Image > Mode > CMYK Color | Image > Mode > CMYK Color |
| Profile Warnings | Check Don't show again | Check Don't show again |
Comparing Differences Between the Conversions
The real revelation comes when examining how different profiles separate colors into individual CMYK channels. This analysis reveals why profile selection is crucial for professional print work.
With both images now converted to CMYK, examine the composite images first. While the overall appearance should be relatively similar, the critical differences lie in how colors are distributed across individual ink channels—this affects print quality, ink usage, and press stability.
Let's examine the channel separations systematically. Select each image in turn and display only the Cyan channel so both images show their cyan separations simultaneously. Pay particular attention to the dark denim areas—notice how different profiles allocate cyan ink differently in shadow regions.
Repeat this process for the Magenta channel, comparing how each profile handles skin tones and warm colors. Professional profiles often show significant variation in magenta distribution, directly affecting flesh tone reproduction.
Continue your analysis with the Yellow and Black channels. The black channel differences are often the most dramatic, as different GCR/UCR strategies fundamentally alter how shadow detail is rendered.
The variations you're seeing demonstrate why professional printers invest heavily in custom profiles. Each CMYK profile represents a different strategy for ink separation, optimized for specific press conditions, paper stocks, and quality objectives. The "Light GCR" profile, for instance, uses more black ink in shadows while reducing CMY components—this approach often produces richer blacks and more stable press runs while using less expensive colored inks.
When you've completed your analysis, close both files without saving. This exercise demonstrates a fundamental principle: in professional print production, the CMYK profile you choose can be as important as the quality of your original image.
While composite CMYK images may appear similar, examining individual Cyan, Magenta, Yellow, and Black channels reveals significant separation differences between profiles.
Channel Comparison Analysis
Focus on dark areas like jeans to see separation differences
Different profiles handle magenta separation uniquely
Yellow separation affects overall color balance in print
Black generation differs significantly between GCR profiles
Choosing the correct CMYK profile based on your output device can create the right separations and color specifically for that device