Topics Covered in This InDesign Tutorial:
Tables, Color Swatches
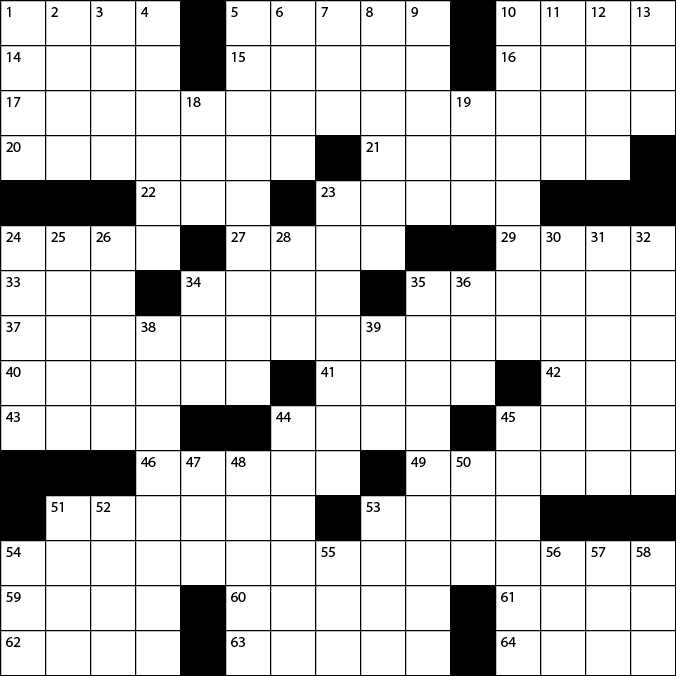
Exercise Preview
Project Specifications
Exercise Overview
InDesign's Table feature provides an elegant, efficient solution for creating structured layouts like crossword puzzles. While many designers overlook tables as merely functional elements, they're actually powerful design tools that can streamline complex grid-based projects. This exercise demonstrates advanced table manipulation techniques and color swatch workflows that will enhance your InDesign proficiency across multiple project types.
Getting Started
We'll begin by establishing a proper document foundation with precise measurements—a critical step that many designers rush through but which determines the success of grid-based layouts.
Navigate to File > New > Document and configure the following settings:
- Select the Print tab and click the Letter (8.5 X 11 in) preset for standard document sizing.
- Change the Units to Picas to the right of Width—picas provide more precise control for typography and grid-based layouts.
- Uncheck Facing Pages if it's currently selected, since we're creating a single-page layout.
- Expand the Margins section and set all margins to 6p (equivalent to 1 inch), providing clean breathing room around our puzzle.
Click Create to generate your new document.
Document Setup Process
Create New Document
Navigate to File > New > Document and select Print tab
Configure Layout
Choose Letter preset and set units to Picas for precision
Set Margins
Uncheck Facing Pages and apply 6p margins on all sides
Setting up the Table
Now we'll create the foundation grid using InDesign's table functionality. This approach offers superior control over individual cell properties compared to manual grid creation.
- Select the Type tool
 and create a text frame that precisely fills the margin guides. This ensures your table will be perfectly positioned within your layout boundaries.
 - With the cursor positioned in the frame, navigate to Table > Insert Table.
- Configure the table with 15 body rows by 15 columns, leaving header and footer rows unchecked since crosswords don't require these elements.
- Click OK to generate the table structure.
- Position your cursor in the first cell, then select the entire table by going to Table > Select > Table. This global selection allows us to apply consistent formatting across all cells simultaneously.
- Open the Table panel via Window > Type & Tables > Table to access precise table controls.
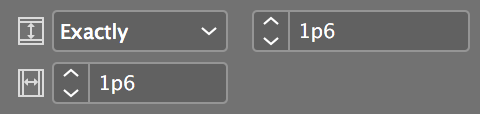
In the Table panel, apply these specifications for professional crossword proportions:
- Set Row Height to Exactly and enter 1p6 for consistent, square cells
Match the Column Width to 1p6 as well, ensuring perfect squares essential for crossword aesthetics.
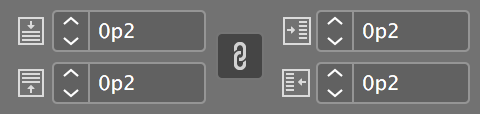
Configure all Cell Insets to 0p2 to provide subtle padding around numbers while maintaining the grid's visual integrity.
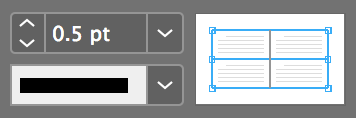
With the table still selected, locate the stroke weight control in the Control panel and adjust it to 0.5 pt for clean, professional grid lines:
Deselect the table by clicking outside it or using Edit > Deselect All to prepare for the next phase.
Table Creation Checklist
Ensures proper table positioning within layout boundaries
Provides perfect grid structure for crossword format
Creates uniform square cells essential for puzzle layout
Provides appropriate padding for number placement
Setting stroke weight to 0.5pt creates clean, professional grid lines that enhance readability without overwhelming the design structure.
Filling in the Black Boxes
Creating the blocked-out areas is where your crossword takes shape. InDesign offers multiple approaches for cell coloring—we'll explore both individual and batch methods for maximum efficiency.
Reference the Exercise Preview image above to identify which cells require black fills. Strategic blocking creates the word patterns that define crossword puzzles.
Open the Swatches panel and position it where it won't obstruct your view of the table.
For individual cells, use the drag-and-drop method: drag the [Black] swatch directly onto the target cell and release.
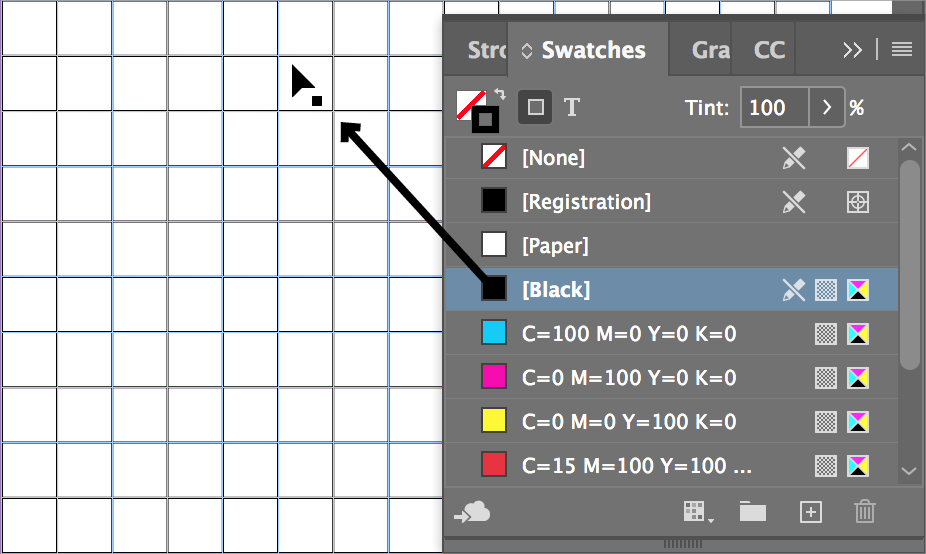
While effective for single cells, this method becomes inefficient for multiple adjacent cells. Let's explore a more productive approach.
Using the Type tool
, click and drag to select multiple adjacent cells that all require black fills.In the Swatches panel, ensure the Fill icon is active (not stroke) and click the [Black] swatch to apply the color to all selected cells simultaneously.
Continue filling the remaining black cells using whichever method feels most natural for each section. This flexibility in workflow is what separates efficient designers from those who rigidly follow single approaches.
Cell Filling Methods
| Feature | Drag Method | Select Method |
|---|---|---|
| Speed | Slower | Faster |
| Precision | High | Medium |
| Best For | Individual cells | Multiple adjacent cells |
Cell Coloring Workflow
Open Swatches Panel
Ensure panel visibility and access to color options
Apply Individual Colors
Drag Black swatch directly onto target cells for precise placement
Batch Color Selection
Select multiple adjacent cells and click Black swatch for efficiency
Adding the Numbers
The final step transforms your grid into a functional crossword by adding sequential numbering. We'll also create a reusable paragraph style to maintain consistency and enable quick global changes.
Enter numbers into the remaining white cells according to the reference image. Each number marks the beginning of either an across or down word entry.
TIP: Use the Arrow keys to navigate between cells rapidly—this keyboard shortcut dramatically speeds up data entry in tables.
Select any number you've entered and format it as 6 pt Myriad Pro Regular. This size provides excellent readability without overwhelming the cell space.
Convert this formatting into a reusable paragraph style for consistency. With the formatted number still selected, click the New style button
 in the Paragraph Styles panel.
Double-click the newly created style and rename it Crossword Numbers for clear identification in future projects.
Apply consistent formatting across the entire table by selecting all cells—either drag across the entire table or use Table > Select > Table.
In the Paragraph Styles panel, click Crossword Numbers to apply the style globally, ensuring perfect consistency across all numbered cells.
Excellent work! Your crossword puzzle grid is now complete and professionally formatted. The next logical step would be creating the accompanying clues using consistent typography. Save your document as yourname-Crossword to preserve this foundation for future crossword projects.
Utilize arrow keys for rapid cell-to-cell movement during number entry, significantly reducing time spent on precise cursor placement.
Text Styling and Automation
Format Sample Text
Apply 6pt Myriad Pro Regular to establish consistent typography
Create Paragraph Style
Convert formatting to reusable 'Crossword Numbers' style
Apply to Entire Table
Select full table and apply style for uniform appearance
Paragraph Style Benefits