Topics Covered in This InDesign Tutorial:
The Pen Tool, Segments, Anchor Points, & Curves
Core InDesign Tools You'll Master
Pen Tool Mastery
Learn to create precise vector paths with professional-grade accuracy. Essential for complex design work and custom shapes.
Anchor Point Control
Understand how anchor points define curve shapes and learn to manipulate them for perfect path creation.
Segment Techniques
Master the connection points between curves to create smooth, flowing paths for professional layouts.
Exercise Preview
When opening exercise files with modified links, always click Update Links to ensure InDesign automatically finds files in their expected folders.
Display Quality Optimization
Check Template Quality
If graphics appear pixelated or low quality, you're likely in preview mode
Switch to High Quality
Navigate to View > Display Performance > High Quality Display for crisp template graphics
Select Pen Tool
Activate the Pen tool to begin tracing the provided Bezier curve templates
Exercise Overview
Mastering Bézier curves is one of the most valuable skills you can develop as a design professional. In this exercise, you'll learn to draw precise curves that will enable you to create custom text paths, design sophisticated graphic elements, and craft unique layout shapes that set your work apart. While drawing Bézier curves can feel counterintuitive at first, the investment in practice pays dividends—these curves form the backbone of professional vector graphics and advanced page layout techniques. With consistent practice, what initially feels complex becomes second nature, opening up unlimited creative possibilities in your InDesign workflow.
Ready to dive in? Let's start with the fundamentals and build your confidence step by step.
From the InDesign Class folder, open the file Bezier.indd.
(If you encounter a message about modified links, click Update Links. This is standard behavior when opening exercise files created on different systems—InDesign intelligently locates and reconnects linked assets in their expected folder locations.)
If the template graphic appears pixelated or unclear, you're likely viewing it in InDesign's default low-resolution preview mode, which prioritizes performance over visual fidelity. Choose View > Display Performance > High Quality Display to render the template at full resolution for optimal tracing accuracy.
Select the Pen tool
 from the Tools panel. This precision instrument will become your primary tool for creating professional-quality vector paths.
This exercise uses a carefully designed tracing template that progressively builds your Bézier curve skills. As you work through each section, keep these essential techniques in mind:
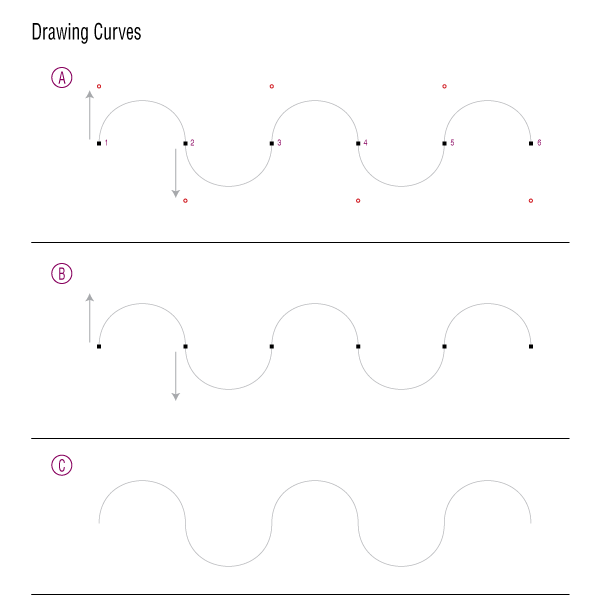
Critical Technique for Section A: You must drag from each numbered black point directly to its corresponding red circle in one continuous, fluid motion. This is not a two-step process—avoid clicking first, then dragging. The single click-and-drag motion is what creates the curve's direction handle, which determines the curve's shape and trajectory.
Don't worry about making mistakes—that's part of the learning process. Simply use Command+Z (Mac) or Ctrl+Z (Windows) to undo and try again.
Essential Workflow Tip: After completing each curve, you must deselect it before starting the next one. This prevents InDesign from attempting to connect your new curve to the previous path. Use any of these professional deselection methods:
- Choose Edit > Deselect All (or use the keyboard shortcut Command+Shift+A on Mac, Ctrl+Shift+A on Windows).
- Switch to the Selection tool
 and click on empty space to deselect the current path.
 - Hold Command (Mac) or Control (Windows) to temporarily access the Direct Selection tool, then click away from your path to deselect it—a time-saving technique preferred by many professionals.
Progressive Learning Design: Each section of this exercise systematically removes visual guides, challenging you to develop an intuitive sense for handle length and direction. This graduated approach mirrors how professional designers develop their expertise—moving from guided practice to independent mastery.
For comprehensive guidance on advanced path-drawing techniques, consult the Quick Reference for Drawing Paths section located in the appendix of your course materials. This resource provides troubleshooting tips and professional shortcuts that will accelerate your learning curve.
In part A, drag from numbered black points to red circles in ONE continuous motion. Never click then drag separately - this breaks the curve flow and requires undoing.
Path Deselection Methods
Quick menu method to clear all selections before drawing new paths
Visual method that gives you direct control over deselection
Keyboard shortcut for Direct Selection tool without switching tools
Progressive Learning Structure
Part A - Guided Practice
Full visual guidance with numbered points and target circles
Progressive Sections
Training wheels gradually removed to build confidence
Advanced Techniques
Complex curves requiring distance and direction judgment
Optional Bonus
Once you've mastered the basic curves and feel confident with the fundamental techniques, challenge yourself with the advanced exercises on the remaining pages of this file. These bonus sections introduce more complex curve combinations and real-world tracing scenarios that mirror professional design challenges. Simply follow the detailed on-screen instructions for each exercise.
However, it's important to maintain perspective on InDesign's role in your design toolkit. While InDesign's Pen tool shares functionality with Adobe Illustrator's Pen tool, remember that InDesign excels as a sophisticated page layout application. For complex vector illustrations, detailed logo creation, or extensive path editing, Illustrator remains the industry standard. InDesign's strength lies in integrating these vector elements into comprehensive layouts—combining typography, imagery, and graphics into polished, professional publications. Understanding when to use each tool is a hallmark of design expertise in today's collaborative creative environment.
InDesign vs Illustrator for Vector Work
| Feature | InDesign | Adobe Illustrator |
|---|---|---|
| Primary Purpose | Page Layout Program | Vector Drawing Program |
| Pen Tool Capability | Similar Functionality | Advanced Vector Tools |
| Best for Complex Illustrations | Basic Shapes & Paths | Professional Illustrations |
| Recommended Use | Text Paths & Layout | Detailed Vector Art |
Advancing to Bonus Exercises