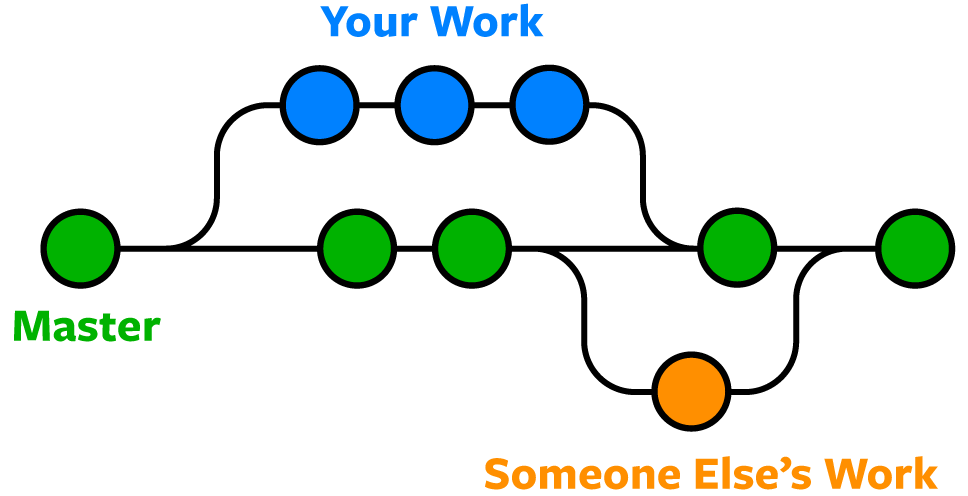
Here's a practical example of why Git branches are indispensable in professional development workflows. Imagine you're deep into building a complex new feature for a web application when an urgent bug fix request lands on your desk—something that needs to go live immediately. With Git branches, this scenario becomes manageable rather than chaotic. You simply create a new branch for your feature work, allowing you to switch back to the master branch whenever interruptions arise. After handling the urgent fix and deploying it, you seamlessly return to your feature branch to continue where you left off. When your feature is complete, you merge it into master, and both changes coexist perfectly. This flexibility is what makes Git branching essential for any serious development team.
For All the Commands Below
The commands below assume you've navigated to the folder containing your Git repository. If you're working in an IDE or terminal, ensure you're in the project's root directory before executing these commands.
See What Branch You're on
- Run this command to see your current branch along with any uncommitted changes:
- git status
Let's dive into the essential branch management commands that every developer should master.
The git status command not only shows your current branch but also displays staged changes, unstaged modifications, and untracked files in your working directory.
List All Branches
NOTE: The current local branch will be marked with an asterisk (*), making it easy to identify your active working branch.
- To see local branches, run this command:
- git branch
- To see remote branches, run this command:
- git branch -r
- To see all local and remote branches, run this command:
- git branch -a
Branch Listing Commands
| Feature | Command | What It Shows |
|---|---|---|
| git branch | Local branches only | Current branch marked with asterisk |
| git branch -r | Remote branches only | Shows origin/ prefixed branches |
| git branch -a | All branches | Both local and remote combined |
Create a New Branch
- Run this command (replacing my-branch-name with a descriptive name that reflects your feature or fix):
- git checkout -b my-branch-name
- This creates the branch and immediately switches to it, so you're ready to start committing changes.
Branch naming conventions matter in professional environments. Consider using prefixes like feature/, bugfix/, or hotfix/ followed by descriptive names (e.g., feature/user-authentication or bugfix/payment-validation).
Creating and Working with New Branch
Create and Switch
Use git checkout -b my-branch-name to create a new branch and immediately switch to it
Make Changes
Edit files, add features, or fix bugs in your new branch environment
Commit Work
Stage and commit your changes to the new branch using standard git add and git commit commands
Switch to a Branch in Your Local Repo
- Run this command:
- git checkout my-branch-name
In modern Git versions (2.23+), you can also use git switch my-branch-name, which provides clearer semantics for branch switching operations.
Ensure your working directory is clean before switching branches. Uncommitted changes may be lost or cause conflicts when switching between branches.
Switch to a Branch That Came from a Remote Repo
- To get a list of all branches from the remote, run this command:
- git pull
- Run this command to switch to the branch:
- git checkout --track origin/my-branch-name
This creates a local tracking branch that maintains a connection to its remote counterpart, enabling seamless push and pull operations.
Working with Remote Branches
Fetch Remote Changes
Run git pull to get the latest list of all branches from the remote repository
Track Remote Branch
Use git checkout --track origin/my-branch-name to create a local branch that tracks the remote
Start Working
You now have a local copy of the remote branch that you can modify and push back
Push to a Branch
- If your local branch does not exist on the remote, run either of these commands:
- git push -u origin my-branch-name
- git push -u origin HEAD
NOTE: HEAD is a reference to the top of the current branch, so it's an efficient way to push to a branch of the same name on the remote. This saves you from having to type out the exact name of the branch and reduces the chance of typos!
- If your local branch already exists on the remote, run this command:
- git push
Understanding when and how to merge branches is crucial for maintaining a clean project history.
Push Command Options
| Feature | Scenario | Command to Use |
|---|---|---|
| New local branch | git push -u origin my-branch-name | Sets upstream tracking |
| New branch (easy way) | git push -u origin HEAD | Uses current branch name |
| Existing remote branch | git push | Simple push to tracked branch |
HEAD is a reference to the top of the current branch, making it an easy way to push to a branch of the same name on the remote without typing the exact branch name.
Merge a Branch
- You'll want to make sure your working tree is clean and see what branch you're on. Run this command:
- git status
- First, you must check out the branch that you want to merge another branch into (changes will be merged into this branch). If you're not already on the desired branch, run this command:
- git checkout master
- NOTE: Replace master with another branch name as needed. Many teams now use main as their default branch name.
- Now you can merge another branch into the current branch. Run this command:
- git merge my-branch-name
- NOTE: When you merge, there may be a conflict if the same files were modified in different ways. Refer to Handling Merge Conflicts (the next exercise) to learn what to do.
In professional environments, consider using git merge --no-ff to create a merge commit even for fast-forward merges, as this preserves the branch history and makes it clear when features were integrated.
Safe Merge Process
Check Status
Run git status to ensure your working tree is clean and see what branch you're on
Switch to Target
Checkout the branch that will receive the changes (typically master or main)
Merge Source
Run git merge my-branch-name to merge the feature branch into the current branch
Resolve Conflicts
Handle any merge conflicts that arise during the merge process
Changes are always merged INTO the current branch. Make sure you're on the correct target branch before running the merge command.
Delete Branches
- To delete a remote branch, run this command:
- git push origin --delete my-branch-name
- To delete a local branch, run either of these commands:
- git branch -d my-branch-name
- git branch -D my-branch-name
- NOTE: The -d option only deletes the branch if it has already been merged, providing a safety net against accidental data loss. The -D option is a shortcut for --delete --force, which deletes the branch irrespective of its merged status—use this with caution.
Regular branch cleanup is a good practice that keeps your repository organized and prevents confusion among team members.
Branch Deletion Options
| Feature | Command | Behavior |
|---|---|---|
| git branch -d | Safe delete | Only if already merged |
| git branch -D | Force delete | Deletes regardless of merge status |
| git push origin --delete | Remote delete | Removes branch from origin |
Grow Your Skills with Hands-on Classes
Master Git and advanced development techniques through practical, hands-on training designed for working professionals:
Next Steps for Git Mastery
Apply these commands in actual development scenarios
Understand how to handle conflicts when branches diverge
Study Git Flow, GitHub Flow, and other branching models
Learn pull requests, code reviews, and team workflows