Topics Covered in This Figma Tutorial:
Opening Sketch Files in Figma, Handling Missing Fonts, Creating, Editing, & Organizing Text Styles
Core Skills You'll Develop
File Management
Learn to import Sketch files and handle missing font issues seamlessly in Figma.
Style Creation
Master the process of creating reusable text styles for consistent design systems.
Organization Methods
Implement prefix-based grouping strategies to keep your text styles well-organized.
Exercise Preview
Exercise Overview
In this exercise, you'll master the creation and management of text styles in Figma—a fundamental skill for maintaining design consistency and establishing scalable design systems. Text styles serve as the backbone of professional design workflows, enabling teams to maintain visual hierarchy and brand consistency across complex projects while dramatically reducing the time spent on repetitive formatting tasks.
Tutorial Progression
Setup Phase
Import Sketch files and resolve font conflicts
Creation Phase
Build and apply your first text styles
Management Phase
Edit styles and organize using prefix groups
Opening Sketch Files & Handling Missing Fonts
One of Figma's most valuable features is its ability to seamlessly import Sketch files, making team migrations and collaborative workflows significantly smoother. Let's start by importing a Sketch file and addressing the common challenge of font compatibility.
In Figma, if you're not on the homescreen (file browser), navigate there using the appropriate method for your platform:
- In the Desktop app: Click the
 Home tab (Mac users can also choose File > Open File Browser).
 - In the Web app: Click the Main menu button
 and choose Back to files.
- In the Desktop app: Click the
- To import a local file, click
 Import file (located in the top right area of your interface).
 Navigate to Desktop > Class Files > Figma Class and double–click on iTastify Design Done.sketch to select it.
Once the file uploads successfully, click Done and double–click the file to open it.
Professional Insight: Notice that this is a Sketch file, and Figma handles the conversion automatically—a game-changer for teams transitioning between platforms. While Figma's conversion capabilities are robust, always conduct thorough quality checks when migrating files, as complex layer effects, custom plugins, or specific typography settings may require manual adjustment.
When you encounter the missing fonts dialog (a common occurrence when sharing files across different systems), configure your font replacements as shown below, then click Replace fonts:
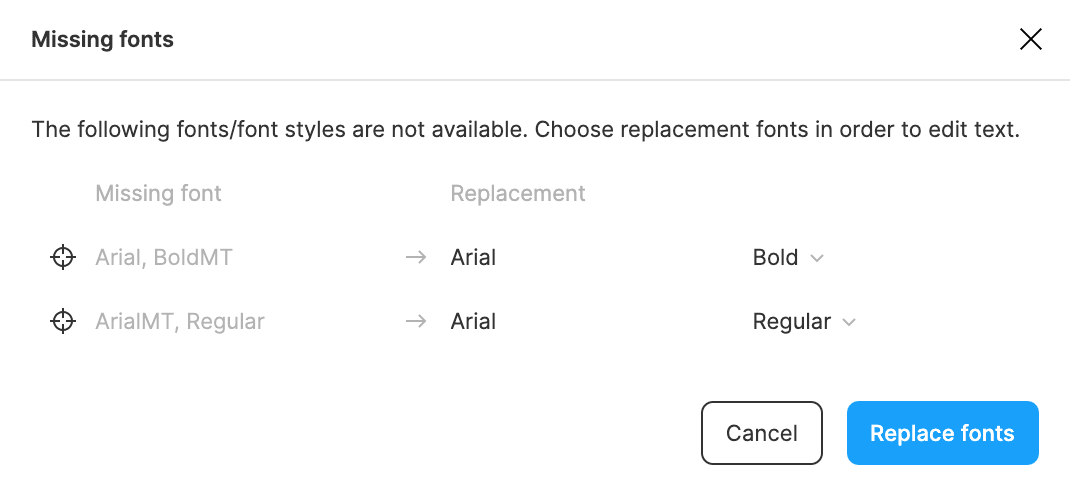
Pro Tip: If you accidentally close this dialog, you can always return to it by clicking the Missing fonts button
 in the top right corner. For professional projects, establish a standard font library early to minimize these compatibility issues across your team.
File Import Process
Navigate to File Browser
Access the home screen through the Home tab in desktop app or Main menu in web app
Import Local File
Click Import file and navigate to Desktop > Class Files > Figma Class to select iTastify Design Done.sketch
Handle Font Issues
Replace missing fonts when prompted or use the Missing fonts button to access replacements later
While Figma can open Sketch files, the conversion may not be perfect. Always inspect your files closely when converting between design tools to ensure accuracy.
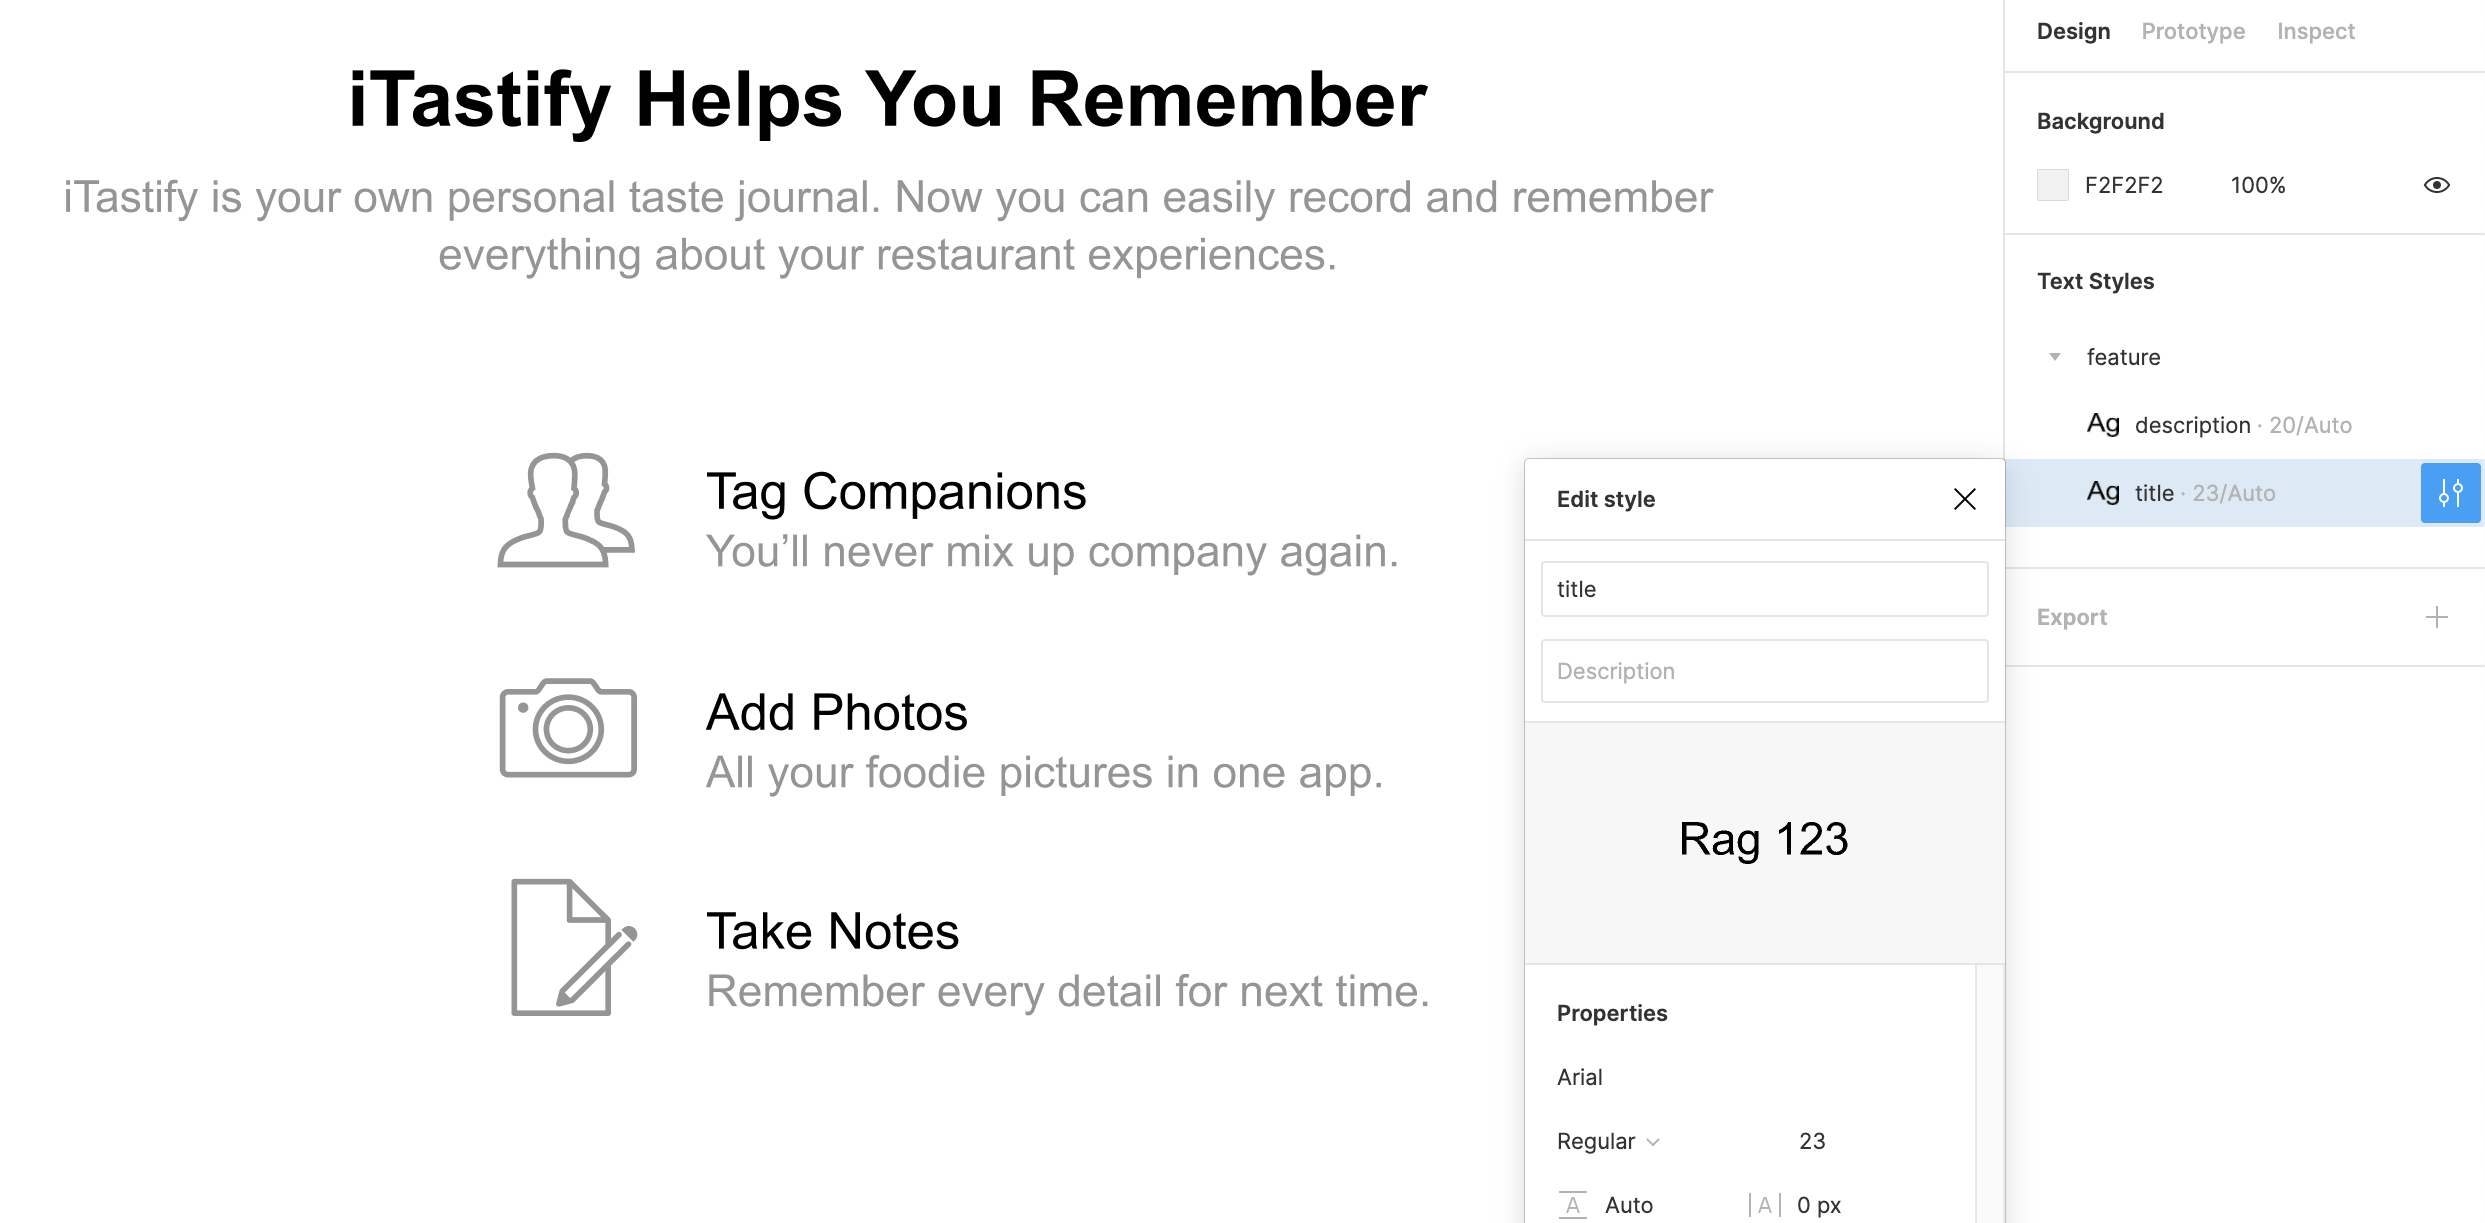
Creating Text Styles
Now that we have our file properly imported, let's dive into creating reusable text styles—the foundation of any professional design system.
- Zoom in on the iTastify Helps You Remember section (located below the hand holding an iPhone). Use Cmd/Ctrl + scroll wheel for precise zoom control.
- You'll notice 3 feature blocks, each containing an icon and 2 lines of text. Click on any of them to observe that the entire section is currently grouped—a common organization pattern in Sketch imports.
- Ctrl–click (Mac) or Right–click (Windows) on any feature block and choose Ungroup. This will give us access to individual text elements.
- Click in an empty area to deselect all elements, ensuring clean selection for the next step.
- Select the Tag Companions heading of the first feature block.
- In the Design panel (Properties panel), locate the Text section and click the Style button
 to the right of it.
 - In the Text Styles panel that opens, click the Plus (+) button in the top right corner.
- Name the text style feature title and click Create style. This creates your first reusable text style component.
Text Style Creation Workflow
Select Target Text
Choose the text element you want to convert into a reusable style, such as the Tag Companions heading
Access Style Panel
Click the Style button next to Text in the Design panel to open the Text Styles panel
Create New Style
Click the Plus button and name your style descriptively, like 'feature title' for headings
Applying Text Styles
With your first text style created, let's apply it to similar elements to maintain consistency—a core principle of professional design systems.
- Click on the second heading Add Photos to select it.
- Hold Shift and click on the third heading Take Notes to select both headings simultaneously. This multi-selection technique is essential for efficient batch operations.
- In the Design panel, click the Style button next to the Text section.
- In the Text Styles panel, click the feature title style you created. Watch as both selected headings instantly adopt the consistent formatting—this is the power of design systems in action.
Use Shift+click to select multiple text elements simultaneously, then apply the same text style to all selected items at once for efficient workflow.
Application Best Practices
Saves time by applying styles to multiple headings or text blocks simultaneously
Makes it easier to find and apply the correct style later in your design process
Verify that the style appears correctly on all selected text elements
Editing Text Styles
One of the most powerful aspects of text styles is their ability to propagate changes across your entire design. Let's explore this capability by modifying our existing style.
- Click in an empty area to deselect all elements.
- In the Design panel, locate the Text Styles section where your created styles are now listed.
- Hover over the feature title style and click the Edit Style button
 that appears on the right.
 In the Edit style panel that opens, make the following adjustments:
- Change the font weight from Bold to Regular for a more subtle hierarchy.
- Click on the font size value (currently 21, located to the right of the font name).
- Press the Up Arrow key twice to increase the size, and observe how all instances of this style update in real-time across your design—this immediate feedback is what makes Figma's design system capabilities so powerful.
Important Note: Text color operates independently from text styles in Figma. Instead, color styles can be created and applied separately, allowing for more flexible design system management (as covered in previous exercises).
- Close the Edit text style panel to complete your changes.
When you edit a text style, all instances using that style throughout your design automatically update, ensuring consistency across your entire project.
Style Modification Process
Access Edit Mode
Hover over the style in the Text Styles list and click the Edit Style button
Adjust Properties
Modify font weight, size, and other properties while seeing real-time changes in your design
Use Keyboard Shortcuts
Utilize arrow keys for precise adjustments, like increasing font size incrementally
Managing Text Styles (Using Prefixes to Create Groups)
As your design system grows, organization becomes critical. Figma's prefix system allows you to create hierarchical groups, making large style libraries manageable and intuitive for entire design teams.
- Ensure nothing is selected by clicking in an empty area.
- Select the descriptive text You'll never mix up company again. located below the Tag Companions heading.
- In the Design panel, click the Style button next to Text.
- In the Text Styles panel, click the Plus (+) button in the top right.
- Name this text style feature/description and click Create style. The forward slash is the key—this creates a hierarchical structure that Figma automatically recognizes.
- Click in an empty area to deselect all elements.
- In the Design panel under Text Styles, notice that Figma has automatically created a feature group. This organizational system scales beautifully for complex projects with dozens or hundreds of text styles.
- Drag the existing feature title style into the newly created feature group to consolidate related styles.
- Hover over the feature title style and click the Edit Style button .
- Rename the style from feature title to simply title. Since it's now within the feature group, the shorter name maintains clarity while reducing redundancy.
- Close the panel to finalize your organized text style system.
You've now established a foundation for scalable design system management in Figma. These organizational principles become invaluable when working on enterprise-level projects where consistent typography can make or break user experience and brand cohesion.
Organization Strategies
Prefix Grouping
Use forward slashes in style names to create automatic groups, like 'feature/title' and 'feature/description'.
Drag and Drop
Reorganize existing styles by dragging them into appropriate groups for better project structure.
Prefixes create automatic groups in Figma, turning 'feature/description' into organized style categories