Topics Covered in This Figma Tutorial:
Master the fundamentals of Smart Animate and explore different easing techniques to create polished, professional animations that elevate your design work.
Exercise Preview
Exercise Overview
In this hands-on exercise, you'll master Figma's Smart Animate feature to create smooth, engaging transitions that bring your designs to life. Smart Animate is one of Figma's most powerful prototyping tools, allowing you to create sophisticated animations without complex coding or external plugins. By the end of this tutorial, you'll understand how to leverage different easing types to create animations that feel natural and professional—a critical skill for modern UX/UI designers working in 2026's competitive landscape.
Smart Animate requires frames for each visual state. Layers that animate must exist on both frames, even if hidden, to create smooth transitions.
Opening the File
Let's start by accessing the exercise files and setting up your workspace properly.
In Figma, if you're not currently viewing the homescreen (file browser), navigate there using one of these methods:
- In the Desktop app: Click the
 Home tab (Mac users can also choose File > Open File Browser).
 - In the Web app: At the top left, click the Main menu button
 and choose Back to files.
- In the Desktop app: Click the
- To import the exercise file from your local system, click
 Import file (this button appears as an icon near the top right of the interface).
 Navigate to Desktop > Class Files > Figma Class and double-click on Smart Animate.fig to select it for import.
Once Figma has processed and uploaded the file, click Done and double-click on the newly imported file to open it in the editor.
Setting Things up
Before we can create our Smart Animate transition, we need to understand a fundamental principle: Smart Animate works by comparing two or more frames and automatically animating the differences between them. For our sliding menu effect, we'll need two distinct states—one with the menu hidden and another with it visible.
The key to successful Smart Animate implementation is ensuring that animated elements exist in both frames, even when they're not visible. This allows Figma to track and animate the changes smoothly. Let's prepare our menu animation by positioning the elements correctly.
- Click on the red menu to select it.
In the Design panel on the right, locate the positioning controls and set the X value to 320 (this matches the frame width, effectively hiding the menu off-screen).
NOTE: We're using precise numerical positioning rather than dragging because manual dragging can easily move layers outside their parent frame boundaries. Maintaining proper structural hierarchy in the Layers panel is crucial for Smart Animate to function correctly—elements must remain structurally within their frames, even when positioned outside the visible area.
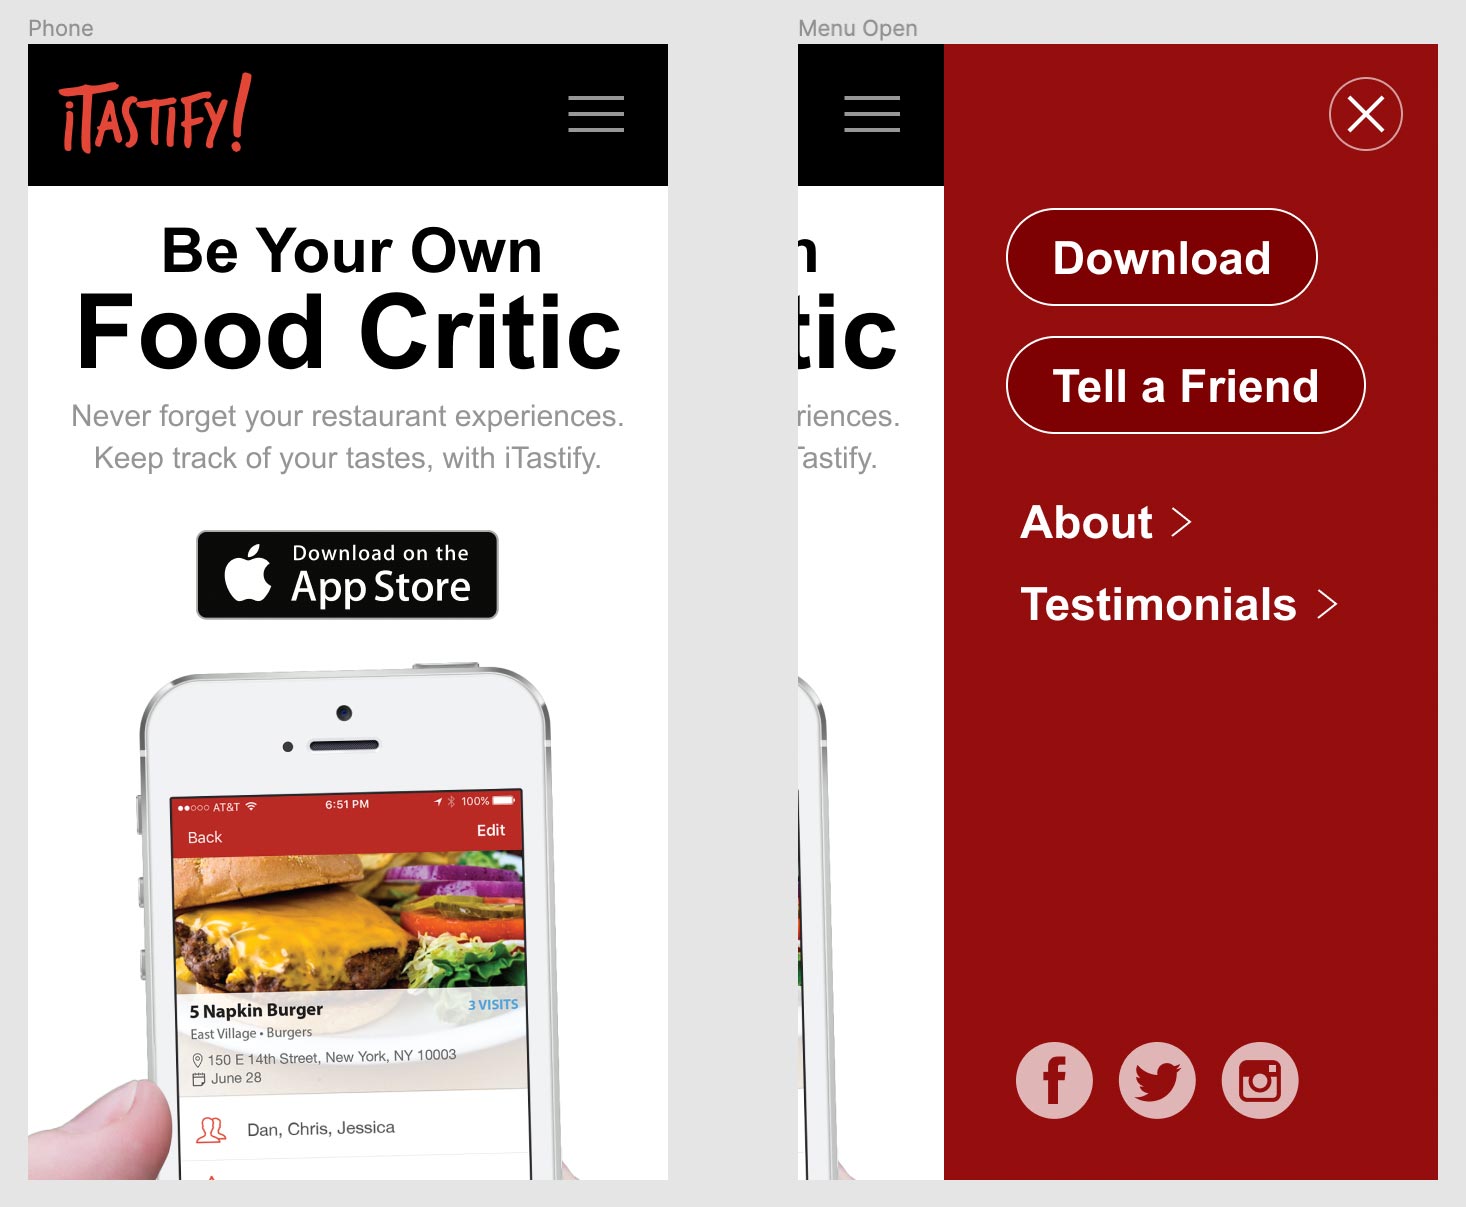
- Select the entire frame by clicking on its name Phone (located at the top left of the frame).
- Duplicate this frame by pressing Cmd–D (Mac) or Ctrl–D (Windows).
- Rename the duplicated frame for clarity: double-click on the frame name (Phone) in the right frame, change it to Menu Open, and press Return (Mac) or Enter (Windows) to confirm.
Organize your workspace by dragging the Menu Open frame (by its title bar) to position it below the original Phone frame.
- Click once on any element within the Menu Open frame to focus on that frame's contents.
- Select all elements within this frame by pressing Cmd–A (Mac) or Ctrl–A (Windows). This selects frame contents without selecting the frame itself.
Now comes the critical positioning step: starting from the right edge of the frame, drag the selected content leftward until the red menu becomes fully visible and properly aligned to the right side of the frame, as demonstrated in the image below.
PROFESSIONAL TIP: Hold the Spacebar while dragging (begin dragging first, then hold spacebar) to constrain movement and prevent elements from accidentally moving outside their parent frame boundaries. This technique is invaluable for maintaining clean, organized file structures.

Frame Setup Process
Position Menu Off-Screen
Move the red menu to X position 320 to hide it outside the frame boundaries while keeping it structurally inside.
Duplicate Frame
Create a copy of the Phone frame using Cmd-D (Mac) or Ctrl-D (Windows) and rename it to Menu Open.
Reveal Menu
In the Menu Open frame, drag all elements left until the red menu is fully visible and aligned to the right.
Hold the Spacebar while dragging to prevent items from coming out of the frame boundaries.
Adding Smart Animate
Now that our frames are properly configured, we'll create the interactive connection between them and apply Smart Animate. This is where the magic happens—Figma will automatically calculate the smoothest path between the two states.
- Switch to prototyping mode by clicking on Prototype in the right panel's top navigation.
- Locate and select the three-line menu icon (hamburger menu) at the top right of the Phone frame.
- Create an interaction by dragging the blue connection point that appears on the right side of the menu icon directly to the Menu Open frame.
When the Interaction details panel appears, locate the Animation dropdown and change it from Instant to Smart animate. This tells Figma to automatically animate the differences between the two frames rather than simply switching between them.
- Test your animation by entering presentation mode: click Present
 at the top right of the window, or use the keyboard shortcut Cmd–Option–Return (Mac) or Ctrl–Alt–Enter (Windows).
 - Click the three-line menu icon to trigger your first Smart Animate transition.
To test again, use the Left Arrow key to return to the previous frame (we haven't created the close button functionality yet).
Creating Smart Animate Interactions
Switch to Prototype Mode
Click on Prototype in the right panel to access interaction settings and animation controls.
Connect Frames
Drag the blue circle from the menu icon to the Menu Open frame to create the interaction connection.
Enable Smart Animate
Change the animation type from Instant to Smart animate in the interaction details popup.
Different Kinds of Easing
Easing is what separates amateur animations from professional ones. It's the difference between mechanical, robotic movement and natural, organic motion that feels intuitive to users. Let's explore how different easing types can dramatically change the character and feel of your animations.
Pay careful attention to the animation's rhythm as you click the menu icon again.
Currently, the animation uses Ease out, which means it starts quickly and gradually slows down toward the end. This creates a natural deceleration effect similar to how objects move in the physical world when friction is applied. Understanding easing is fundamental to creating animations that feel polished and professional.
Easing Explained
Easing controls the acceleration and deceleration of animations over time, making them feel more natural and engaging. The term "easing" refers to gradually transitioning into or out of motion, rather than maintaining constant speed. Here are the essential easing types you'll encounter in Figma:
- Ease in starts slowly and accelerates, like a car gradually speeding up from a stop.
- Ease out starts quickly and decelerates, like a car gradually coming to a stop.
- Ease in and out starts slowly, accelerates through the middle, then decelerates at the end, creating smooth, organic motion.
- Back easing adds anticipation by briefly moving in the opposite direction before proceeding, creating a spring-like or bouncy effect that can add personality to interactions.
In professional UX design, ease out is often preferred for interface elements appearing on screen, while ease in works well for elements disappearing, as these patterns align with users' natural expectations of how objects should behave.
.Click the menu icon and observe the new animation behavior.
Notice how the back easing adds a subtle bounce at the end—this creates a more playful, dynamic feel that can work well for consumer apps or brands with a more casual personality.
Exit presentation mode again.
.Trigger the animation by clicking the menu icon.
Now you'll see bounce effects at both the beginning (anticipation) and end (overshoot) of the animation. This creates a very dynamic, almost springy feel that can be effective for certain brand personalities, though it should be used judiciously in professional interfaces.
Close the presentation tab or window when you're ready to continue.
In the Interaction details panel that appears, verify the settings:
- Animation should automatically be set to Smart animate.
- Easing should inherit the Ease in and out back setting from our previous configuration.
Click on an empty area of the canvas to deselect all elements.
Enter presentation mode by clicking the Present button .
Click the close button to return to the original state.
Excellent! Your bidirectional animation is now functional. However, you may notice a small visual issue: the bounce effect from the back easing reveals white gaps at certain points in the animation:- To the left of the black navigation bar at the start of the animation.
- To the right of the red menu at the end of the animation.
This is a common issue when using back easing with elements that move to the edge of frames. We can solve this with a simple but important technique.
Exit presentation mode to return to the editor.
Easing Types in Figma
Ease In
Animation starts slowly and speeds up. Creates anticipation at the beginning of the movement.
Ease Out
Animation starts fast and slows down at the end. Provides a gentle settling motion.
Ease In and Out
Combines both effects with slow start, fast middle, and slow end for natural movement.
Back Ease
Creates a bounce effect by pulling back at start or end, adding playful character to animations.
Extending Objects to Make the Ease Back Look Better
This final step demonstrates a professional technique for handling edge cases in animation design. By strategically extending background elements beyond the visible frame boundaries, we can ensure smooth visual continuity even with dramatic easing effects.
- Switch back to design mode by clicking on Design at the top of the right panel.
In the original Phone frame, we need to extend the navigation background:
- Double-click on the black navbar background to select it directly.
- Drag the left edge of the navbar beyond the frame boundary, making it wider. This extra area will fill the white gap that becomes visible during the bounce animation.
Apply the same technique to the Menu Open frame:
- Double-click on the red menu background to select it.
- Drag the right edge of the menu background beyond the frame boundary to eliminate potential white space on the other side.
Test your refined animation by clicking the Present button
.Open and close the menu several times to verify that the white gaps are eliminated and the animation appears seamless and professional.
The ease back bounce can reveal white gaps where backgrounds don't extend far enough. Extend colored backgrounds outside frame boundaries to fix this.
Background Extension Fix
Prevents white space from showing during the bounce animation start
Fills gaps that appear during the bounce animation end
Smart Animate & the Importance of Names
Here's a critical technical detail that can make or break your Smart Animate effects: layer naming consistency. Smart Animate identifies which elements to animate between frames by matching layer names exactly. If you rename a layer in one frame, you must update it identically across all frames in your animation sequence. Even small differences—like extra spaces or capitalization changes—will cause Smart Animate to treat them as completely different elements, resulting in fade transitions instead of smooth animations. This naming discipline becomes especially important in complex prototypes with multiple animation states and shared component libraries.
Smart animate requires layers to have identical names across all frames. Changing a name on one frame requires updating it on all other frames to maintain animation functionality.