Topics Covered in This After Effects Tutorial:
Master the art of vector-based masking by using Illustrator to create precise masks for After Effects. You'll learn essential techniques for repositioning and resizing masks with pixel-perfect accuracy, plus advanced animation methods to create sequentially animated photo stripes that arrive with professional timing and easing.
Exercise Preview

Exercise Overview
Masking is one of After Effects' most powerful compositing tools, allowing you to selectively reveal or hide portions of any layer with surgical precision. While After Effects includes basic shape tools, professional motion graphics artists know that complex masks demand the vector expertise of Adobe Illustrator. This exercise demonstrates industry-standard workflow by importing vector masks from Illustrator and transforming a static black-and-white image into five dynamically animated stripes.
This technique is foundational for countless motion graphics applications—from revealing text behind moving shapes to creating complex transitions between scenes. By the end of this exercise, you'll understand not just how to import and position Illustrator masks, but why this cross-application workflow has become essential for professional After Effects artists working on everything from broadcast graphics to social media content.
Project Workflow Overview
Setup Black & White Freeze Frame
Import and position the motorboat-BW.jpg still image at the correct timeline position with proper layer organization
Import Vector Masks from Illustrator
Copy precisely drawn masks from Adobe Illustrator and paste them into After Effects with proper clipboard settings
Configure and Distribute Masks
Duplicate layers, assign individual masks, and adjust positioning for five separate animated stripes
Animate Sequential Arrival
Create staggered timing with custom velocity curves for professional-looking stripe animations
Previewing What You'll Make in This Exercise
Before diving into the technical steps, let's examine the finished animation to understand our creative objectives and timing requirements.
You should still have yourname-Island Vacation.aep open in After Effects. If you closed it, re-open it now by going to File > Open Project then Class Files > After Effects Level 2 Class > Vacation Stripes. We recommend you finish the previous exercise (1B) before starting this one. If you haven't finished it, do the following sidebar.
If You Did Not Do the Previous Exercise (1B)
- If a project is open in After Effects, go to File > Save, then File > Close Project.
- Go to File > Open Project and navigate to Class Files > After Effects Level 2 Class > Vacation Stripes > Finished AE Projects.
- Double–click on Island Vacation-Ready for AI Masks.aep.
- Do a File > Save As > Save As. Name the file yourname-Island Vacation.aep and save it back into the Vacation Stripes folder.
On the Desktop, navigate to Class Files > After Effects Level 2 Class > Vacation Stripes > Finished Clips and double–click Vacation-Stripes-AI-Masks.mov.
Play the video and analyze the following animation elements (scrub the playhead slowly for detailed examination):
- The title text establishes the scene before being elegantly replaced by five vertical slices of a black-and-white photograph that slide in from the bottom edge.
- Each slice animates independently with carefully orchestrated timing, creating visual rhythm that matches the underlying audio track.
- Notice the subtle easing as each slice decelerates toward its final position—this polish separates professional work from amateur animations.
- The sequence culminates as the static black-and-white freeze frame seamlessly transitions into the corresponding color video footage, creating narrative continuity.
Study this reference video multiple times to internalize the timing and visual flow—we'll be recreating every nuance in this exercise. Keep it open throughout your work for constant reference.
Setting up the Black & White Freeze Frame
Our first task involves preparing the source imagery that will be divided into animated segments. This black-and-white still serves as the foundation for our entire masking sequence.
Switch to After Effects, where yourname-Island Vacation.aep should remain open from your previous session.
In the Timeline, ensure you're working in the Vacation-MAIN composition tab. If you aren't, look at the top left of the Timeline panel. If you see the Vacation-MAIN tab, click on its name to activate this comp. If this tab isn't visible, navigate to the Project panel and double–click on the Vacation-MAIN comp to open it in a new Timeline tab.

The black-and-white freeze frame serves as a visual bridge between our animated title and the color footage. Navigate to the Project panel and use the disclosure arrows
 to expand the Assets > Stills folder if it isn't already visible.
Drag motorboat-BW.jpg from the Stills folder directly into the Timeline, positioning it below the audio layer and above the [01-title-PC] pre-comp layer. This layer order ensures proper compositing hierarchy.
For precise timing control, we need to display the In column in our Timeline. Navigate to the right side of the Timeline panel. If the In column isn't visible to the left of the colored layer bars:
- Near the left side of the Timeline, CTRL–click (Mac) or Right–click (Windows) on either the Layer Name or Source Name column header.
- From the contextual menu, navigate to Columns and check In to enable this essential timing reference.
In the [motorboat-BW.jpg] layer row, locate the In column and click on its current timecode value to modify it.
In the Layer In Time dialog, type 225 and click OK. This timing positions our motorboat slices to arrive precisely on the musical phrase that follows the title sequence, creating audiovisual synchronization.
Press the I key to jump the playhead to this layer's in point at 2;25, allowing you to preview the timing context.
For better visual organization during animation, click on the colored label square to the left of [motorboat-BW.jpg]'s layer number. From the Label Color menu, choose Yellow.
This color coding makes the layer easier to track during complex animations and is a professional habit that scales well to larger projects. Notice how both the selection handles in the Composition panel and the layer bar in the Timeline update to reflect this change.
Always enable the In column in your Timeline to track layer start times precisely. Right-click on column headers and check 'In' from the Columns menu for better project management.
Layer Setup Process
Import Still Image
Drag motorboat-BW.jpg from Assets > Stills folder to Timeline, positioning below audio and above title pre-comp
Set Layer Timing
Click In column value, type 225 in Layer In Time dialog to position at 2 seconds 25 frames
Apply Visual Organization
Change layer label color to Yellow for easier identification during animation process
Using Illustrator to Create Masks in After Effects
Professional motion graphics workflows leverage the strengths of each Adobe application. While After Effects excels at animation and compositing, Illustrator's vector tools provide superior precision for creating complex mask shapes. This cross-application approach has become industry standard for good reason.
The masks we'll import were created using Illustrator's precise path tools, ensuring clean edges and perfect alignment. This workflow not only saves time but delivers results that would be difficult to achieve using After Effects' native drawing tools alone.
Keep After Effects running and switch to the Desktop to access our Illustrator assets.
Navigate to After Effects Level 2 Class > Vacation Stripes > Assets > Vectors and double–click motorboat-masks.ai to launch it in Adobe Illustrator.
Once Illustrator loads the file, examine the Layers panel in the docked panels on the right side of the screen. If the Layers panel isn't visible, click its tab or access it via Window > Layers.
This file contains a single layer with multiple
<Path>sublayers and a locked<Image>sublayer at the bottom. The image layer serves solely as a visual reference for mask positioning—a common practice in professional vector workflows.
Click on the selection circle next to the topmost
<Path>to select it and reveal its outline in the artboard. A selected path displays a blue square indicator as shown below: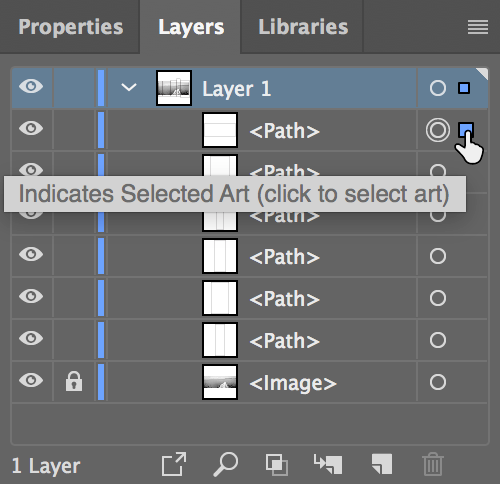
This rectangular path matches the exact dimensions of the artboard and will serve as our "reference mask" in After Effects. When working with imported vectors, having a reference shape that matches your composition boundaries ensures perfect alignment and eliminates guesswork.
Before transferring vectors between Adobe applications, we must configure the clipboard preferences for optimal compatibility. Navigate to Illustrator CC (Mac) or Edit (Windows) > Preferences > File Handling & Clipboard.
In the Clipboard section at the bottom, configure the settings next to On Quit:
- Ensure AICB (no transparency support) is checked—this maintains vector path integrity during transfer.
- Verify that Preserve Paths is selected—this is crucial for maintaining editable vector shapes in After Effects.
Click OK to confirm these settings. These preferences ensure that vector data transfers cleanly between applications without losing essential path information.
Select all paths by going to Select > All, or use the keyboard shortcut Cmd–A (Mac) or CTRL–A (Windows).
Copy the selected paths using Edit > Copy, or press Cmd–C (Mac) or CTRL–C (Windows).
Return to After Effects while keeping Illustrator open—you may need to reference the original file during the alignment process.
With the [motorboat-BW.jpg] layer still selected, execute Edit > Paste to import the vector paths as After Effects masks.
If the mask outlines aren't immediately visible, locate the Toggle Mask and Shape Path Visibility button
 at the bottom of the Composition panel and click it until it turns blue, making all mask paths visible.
Press the M key to reveal the mask properties in the Timeline. You'll see that the Illustrator paths have been converted to Masks 1–6, each maintaining its original vector precision.
To examine the current masking effect, zoom in using the period (
.) key and temporarily disable Toggle Mask and Shape Path Visibility by clicking it until it becomes gray. You should see several narrow vertical stripes of the black-and-white image, with the masks currently blocking most areas and revealing the title card layer beneath.The masks are currently set to subtract from the layer visibility. To reveal the masked areas instead, select all masks and locate the mask mode dropdown (currently showing Difference). Change this to Add for all selected masks:

Understanding mask modes is crucial for professional compositing. Add mode reveals the masked areas and combines multiple masks additively, while Difference creates more complex interactions where overlapping masks subtract from each other. For comprehensive mask mode reference, consult Adobe's documentation at tinyurl.com/ae-mask-modes
Now we need to align our imported masks to the composition boundaries. Unlike layers, masks cannot use the Align panel, so precise visual alignment is essential. Ensure the Toggle Mask and Shape Path Visibility button
is active (blue) so you can see the mask outlines clearly.In the Composition panel, select the reference mask (the rectangular outline that matches the comp dimensions) and use the Arrow keys to align it precisely to the composition edges. Use the period (
.) key to zoom in for pixel-perfect alignment, or the comma (,) key to zoom out for better overview. When properly aligned, your mask arrangement should match this configuration:
Deselect all elements by clicking in an empty area of the Timeline or using Edit > Deselect All.
With our stripe masks properly positioned, we can remove the reference mask. In the [motorboat-BW.jpg] layer, select Mask 6 (the reference rectangle) and press Delete.
For our animation to work effectively, each mask needs to exist on its own layer, allowing independent animation of each stripe. This separation is fundamental to creating the sequential reveal effect we're building.
To streamline the duplication process, rename the current layer to establish a numbering pattern. Select the [motorboat-BW.jpg] layer and press Return (Mac) or Enter (Windows) to enter rename mode.
Type boat1 and press Return (Mac) or Enter (Windows) to confirm. After Effects will use this naming convention to automatically number subsequent duplicates.
Create the first duplicate using Edit > Duplicate or the keyboard shortcut Cmd–D (Mac) or CTRL–D (Windows).
Notice that After Effects automatically creates boat2—this intelligent naming saves time in complex projects with multiple duplicate layers.
Continue duplicating (Edit > Duplicate or shortcut) three more times until you have five sequential boat layers numbered boat1 through boat5.
Now we'll clean up the masks so each layer contains only its corresponding mask. Select the boat1 layer and press M if the masks aren't still visible.
To isolate Mask 1 on the boat1 layer, select the unwanted masks:
- Click on Mask 2 and Shift–click on Mask 5 to select the range of masks we want to delete.
- Press Delete to remove these masks, leaving only Mask 1.
Select the boat2 layer and press M to reveal its mask properties.
For boat2, we want to keep only Mask 2. Use this efficient selection technique:
- Click on Mask 1 and Shift–click on Mask 5 to select all masks.
- Hold Command (Mac) or Control (Windows) and click on Mask 2 to remove it from the selection.
- Press Delete to remove all selected masks, preserving only Mask 2.
Continue this process for the remaining layers, ensuring each boat layer retains only its corresponding mask number. This one-to-one relationship between layer numbers and mask numbers maintains organization and makes the animation logic clear.
Pro tip: For efficiency, select all unwanted masks first using Shift–click, then use Cmd–click (Mac) or CTRL–click (Windows) to deselect the mask you want to preserve before deleting.
After Effects works seamlessly with Adobe Illustrator through the clipboard. Proper preferences ensure vector paths transfer accurately while maintaining their precision and editability.
Illustrator to After Effects Transfer Checklist
Contains pre-drawn vector paths and reference image for alignment
Locate Path sublayers and locked Image reference layer
Enable AICB with no transparency support and Preserve Paths option
Use Select > All then Edit > Copy to transfer all vector masks
Masks automatically appear as Mask 1-6 properties
Resizing Masks
Even with careful preparation in Illustrator, imported masks sometimes require fine-tuning to achieve perfect edge alignment. Let's examine and correct any gaps between our mask boundaries.
Select the boat5 layer in the Timeline if it isn't already active.
Click directly on the text Mask 5 in the Timeline to highlight this specific mask and display its outline in the Composition panel.
In the Tools panel at the top of the interface, ensure the Selection tool
 is active (highlighted).
Double–click on any corner of the mask rectangle in the Composition panel. This action switches the mask into transform mode, indicated by the outline changing to gray and the appearance of corner and edge resize handles (small squares).
Position your cursor over the left edge resize handle until you see the horizontal resize cursor
 . Click and drag left by a few pixels to create a slight overlap with the adjacent mask, eliminating any potential gap between stripes.
Professional tip: For precision work, zoom to at least 400% using the period (
.) key and temporarily disable Toggle Mask and Shape Path Visibility to see the actual masked content. Re-enable path visibility when you need to see the mask boundaries again.Return to full composition view by selecting Fit from the Magnification ratio popup menu at the bottom left of the Composition panel.
Double-click any corner of a mask to enter transform mode. The outline turns gray and resize handles appear, allowing precise adjustments without affecting the underlying layer.
Layer Duplication and Mask Distribution
Rename Base Layer
Rename motorboat-BW.jpg to boat1 - After Effects will auto-number duplicates as boat2, boat3, etc.
Create Four Duplicates
Use Edit > Duplicate or Cmd-D/Ctrl-D to create boat2 through boat5 layers
Isolate Individual Masks
Each boat layer should retain only its corresponding mask number - delete all others using Shift-click selection
Animating the Five Stripes to Arrive Sequentially
The final phase involves creating the sequential animation that brings each stripe into view with professional timing and easing. We'll start with the most visually important element—the boat itself—and build the sequence around it.
Select the boat4 layer (which contains the boat, our focal point) and press the P key to reveal its Position property.
Stripe Animation Sequence
2:25boat4 (Center Stripe)
First stripe animates from 2:25 to 3:25 - focal point arrives first
2:27boat5 (Rightmost)
Second stripe begins animation with slight offset
2:28boat3 (Left-Center)
Third stripe continues the sequential pattern
3:00boat2 (Second from Left)
Fourth stripe adds to the cascading effect
3:02boat1 (Leftmost)
Final stripe completes the sequence
Custom Velocity Curve Setup
1Set Start and End Keyframes
Y Position 1129 at layer in-point (off-screen), Y Position 373 at final position (3:25)
2Apply Easy Ease
Select both keyframes and use F9 or Animation > Keyframe Assistant > Easy Ease
3Customize Outgoing Velocity
First keyframe: Set Outgoing Velocity Influence to 20% for minimal initial slowdown
4Adjust Incoming Velocity
Second keyframe: Set Incoming Velocity Influence to 90% for dramatic slow-down at end
The Mask Path Property
Understanding why we animate Position rather than Mask Path is crucial for mastering professional After Effects workflows. Each mask includes a Mask Path property that controls the shape and position of the mask itself—useful for effects where the mask boundary changes over time, such as expanding reveals or morphing shapes.
However, in our stripe animation, we're physically moving the masked artwork into position, not changing the mask boundaries. Think of it as sliding pre-cut pieces of a photograph into frame, rather than using a moving window to reveal a static image.
Additionally, Position properties offer several technical advantages: layers have anchor points that provide precise coordinate reference, Position can be separated into X and Y dimensions for independent control, and Position keyframes work seamlessly with the Graph Editor for sophisticated easing curves.
Mask Path animations, conversely, lack coordinate systems and cannot be separated into dimensions, limiting your control options. When you need shape-based reveals in future projects, Mask Path animation becomes essential—but for physical movement of masked elements, Position is the professional choice.
For maximum animation control, we'll separate the Position property into independent X and Y components. CTRL–click (Mac) or Right–click (Windows) on the word Position in the Timeline and select Separate Dimensions from the contextual menu.
Click in an empty area of the Timeline to deselect the separated properties, providing a cleaner workspace.
Navigate the playhead to 3;25—the moment when this stripe should reach its final position and completely cover the title card beneath.
Click the stopwatch icon  next to Y Position (currently showing 373) to create the ending position keyframe.
Since we want each stripe animation to span exactly one second, press the I key to jump back to the layer's in point at 2;25.
Change the Y Position value to 1129. This positions the entire stripe completely below the visible composition area, creating a clean off-screen starting position for the slide-in animation.
Select both keyframes by drawing a selection rectangle around them in the Timeline, or by clicking on one keyframe and Shift-clicking on the other.
Position vs Mask Path Animation
This exercise uses Position animation instead of Mask Path because we're moving masked artwork panels, not revealing static content. Think of it as sliding artwork panels versus rolling wallpaper.