Topics Covered in This AutoCAD Tutorial:
Intro to Object Snap, Object Snap Settings
Learning Path for Object Snap Mastery
Understand Object Snap Basics
Learn how Object Snap allows you to snap to specific points without manual coordinate entry, improving accuracy and speed.
Master Individual Object Snaps
Explore each Object Snap type including Endpoint, Midpoint, Center, and specialized snaps for different drawing scenarios.
Use Override Functions
Apply temporary Object Snap overrides for single-use situations without changing your default settings.
Intro to Object Snap
Professional CAD work demands precision that the human eye simply cannot achieve. Just as Polar Tracking eliminates guesswork when specifying angles, Object Snap ensures you connect to exact points without manually entering coordinates. This fundamental AutoCAD feature transforms your workflow from approximate to absolute—making your drawings not just faster to create, but mathematically precise.
The cardinal rule of professional drafting is simple: never "eyeball" placement. Visual approximation introduces errors that compound throughout a project, potentially costing time, materials, and credibility. Object Snap eliminates this risk by magnetically pulling your cursor to precise geometric points on existing objects. The more complex your drawing becomes, the more indispensable this feature proves—turning a dense network of lines, arcs, and shapes into a precise foundation for your next moves.
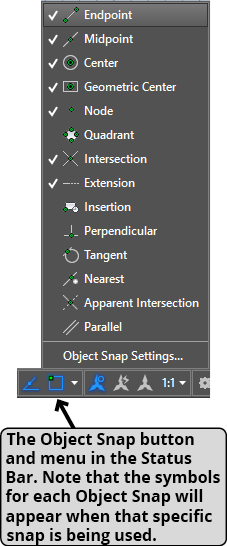
AutoCAD offers multiple Object Snap types, each targeting specific geometric features with distinct visual symbols for instant recognition. These snaps activate only during active commands, giving you real-time precision exactly when you need it. The intelligent approach is to customize your active snap combination based on your current task—some snaps complement each other perfectly, while others can create interference that leads to unintended connections. Toggle Object Snaps on or off instantly by pressing F3 or clicking the Object Snap button  in the Status Bar. The dropdown arrow reveals the full Object Snap menu, where you can activate specific snaps for your current workflow.
Understanding each Object Snap type and its optimal use cases will dramatically improve your drafting efficiency and accuracy.
Object Snap vs Manual Placement
Use F3 to quickly toggle Object Snaps on/off, or click the Status Bar button. The arrow next to the button opens the menu to select specific snaps.
Object Snaps
Endpoint: Targets the precise start or end points of lines, arcs, and polyline segments. Essential for connecting elements seamlessly, including the corner vertices of rectangles and polylines where segments meet. This is your most frequently used snap for creating connected geometry.
Midpoint: Locates the exact center of any line, arc, or polyline segment. Invaluable for symmetrical designs and bisecting elements. Center: Identifies the center point of circles and arcs—critical for concentric designs and radial layouts.
Geometric Center: Calculates the centroid of closed polylines, including complex irregular shapes. Particularly useful for balanced layouts and center-point references on custom forms.
Node: Connects to points created with Point, Divide, or Measure commands. Essential when working with precisely spaced reference points or construction geometry.
Quadrant: Targets the four cardinal points (top, bottom, left, right) of circles and arcs. Perfect for orthogonal connections to curved elements and maintaining clean geometric relationships.
Intersection: Finds where lines and curves cross, and can generate virtual intersections where polar tracking lines meet existing objects. Note that tracking line intersections require active Polar Tracking—a powerful combination for precise positioning.
Extension: Enables precise point placement at specified distances from existing snap points. Hover over a snap point, pull your cursor along the implied extension line, then type a distance value. This advanced technique maintains geometric relationships while extending beyond existing elements.
Insertion: Targets the base point of blocks and external references. Critical for precise block placement and maintaining coordinate relationships in complex assemblies.
Perpendicular: Creates or connects to perpendicular relationships with existing geometry. Especially valuable in Ortho mode, where it provides perpendicular connections that Polar Tracking's intersection snap cannot achieve.
Tangent: Establishes smooth, tangent connections between lines and curved elements. Essential for creating flowing transitions without sharp corners—fundamental in mechanical design and architectural curves.
Nearest: Connects to the closest point along any object's path. While useful for positioning elements against boundaries, use this snap judiciously—its convenience can lead to imprecise placement. Activate it temporarily when needed, rather than keeping it always on.
Apparent Intersection: Identifies where non-intersecting lines would meet if extended. Invaluable for maintaining implied geometric relationships and creating construction points for complex layouts.
Parallel: Generates tracking lines parallel to any existing line, regardless of your Polar Tracking angle settings. When using the Line command, hover over any line to activate the parallel reference, then move to your desired start point—AutoCAD will display a parallel tracking line for precise alignment.
Beyond the standard Object Snap workflow, AutoCAD provides override functionality for those moments when you need a specific snap for just one operation.
Essential Object Snap Types
Endpoint
Snaps to start or end points of lines, arcs, and polyline segments including rectangle corners. Most commonly used snap for precise connections.
Midpoint
Targets the exact center of any line, arc, or segment. Perfect for creating balanced designs and symmetrical layouts.
Center
Locates center points of circles and arcs. Essential for creating concentric shapes and radial patterns.
Intersection
Finds where lines and arcs meet. Can create virtual intersections with polar tracking lines for advanced placement.
Specialized Object Snap Types
Quadrant
Snaps to top, bottom, left, and right points of circles and arcs. Useful for creating tangent lines and geometric constructions.
Perpendicular
Creates or snaps to perpendicular intersections. Particularly valuable in Ortho Tracking mode for precise 90-degree angles.
Tangent
Enables smooth Line tool transitions to circles and arcs without sharp corners. Creates professional curved connections.
Extension
Places points at specific distances from object snaps using tracking lines. Advanced technique for precise measurements.
The Nearest snap can place objects at random points along any object. Only activate when specifically needed, as it easily causes incorrect placement.
When to Use Different Object Snaps
| Feature | Best For | Avoid When |
|---|---|---|
| Endpoint | Connecting lines precisely | Working with dense geometry |
| Midpoint | Creating symmetrical designs | Need quarter or third points |
| Center | Radial patterns, concentric shapes | No circles or arcs present |
| Nearest | Placing against walls or surfaces | Precision work required |
Object Snap Override
Object Snap Overrides provide surgical precision—activating a specific snap for a single use, then automatically disabling it when your command completes. This prevents the need to constantly toggle your snap settings for one-off requirements. Access overrides by right-clicking during any snap-compatible command to reveal the context menu. Important caveat: the Line command's first click establishes a starting point, so if you right-click before setting this initial point, AutoCAD will continue from the previous line endpoint rather than displaying the override menu. For consistent access to overrides, consider using the Object Snap toolbar, which remains available regardless of command state. This workflow proves especially valuable when working with complex drawings where your standard snap combination might create unwanted connections or when you need a specialized snap like Tangent or Apparent Intersection for a specific geometric relationship.
Using Object Snap Overrides Effectively
Provides temporary access to any Object Snap without changing default settings
Alternative method that doesn't require right-click menu navigation
Right-click before establishing first point starts at previous endpoint instead of showing menu
Ensures temporary snaps don't interfere with subsequent operations
Use overrides when you need a specific Object Snap for just one operation, avoiding the need to constantly toggle your default snap settings.