Topics Covered in This Ruby on Rails Tutorial:
The Has_one Relationship, the Has_and_belongs_to_many Relationship
Exercise Overview
In this comprehensive exercise, we'll implement a fully functional shopping cart with item management capabilities. Building on the fundamental model relationships you explored in Rails Level 1 with has_many and belongs_to, we'll now tackle more sophisticated relationships between model objects that reflect real-world e-commerce scenarios.
Understanding these advanced relationships is crucial for building scalable Rails applications. The cart functionality we're implementing mirrors patterns you'll encounter in production applications, where users need to manage collections of items across sessions while maintaining data integrity and user authentication.
If you completed the previous exercises (8A–8D), you can skip the following sidebar and proceed directly to the Setup section. We strongly recommend finishing those foundational exercises before starting this one, as they establish the authentication system and product models we'll be extending. If you haven't completed them, follow the instructions in the sidebar below.
If You Did Not Do the Previous Exercises (8A–8D)
- Close any files you may have open.
- Open the Finder and navigate to Class Files > yourname-Rails Class
- Open Terminal.
- Type
cdand a single space (do NOT press Return yet). - Drag the yourname-Rails Class folder from the Finder to the Terminal window and press ENTER.
- Run
rm -rf nuttyto delete your copy of the nutty site. - Run
Git clone https://bitbucket.org/Noble Desktop/nutty.Gitto copy the That Nutty Guy Git repository. - Type
cd nuttyto enter the new directory. - Type
Git checkout 8Dto bring the site up to the end of the previous exercise. - Run
bundleto install any necessary gems. - Run
yarn install—check-filesto install JavaScript dependencies.
Quick Setup Process
Clean Previous Work
Remove existing nutty directory and navigate to your Rails class folder using Terminal commands.
Clone Repository
Use Git to clone the Nutty Guy repository and checkout the 8D branch to get the latest exercise state.
Install Dependencies
Run bundle and yarn install commands to ensure all gems and JavaScript dependencies are properly installed.
Setup
Before diving into the cart implementation, let's examine our target functionality and prepare our development environment. This setup process ensures we have all the necessary components in place for building a professional-grade shopping cart.
On the Desktop, navigate to Class Files > yourname-Rails Level 2 Class > That Nutty Guy HTML
Open cart.html in a browser. This represents our target implementation—a fully functional shopping cart where customers can add products, adjust quantities, and proceed to checkout. Take a moment to explore the interface and note the user experience we're building toward.
For this exercise, we'll continue working with the nutty folder located in Desktop > Class Files > yourname-Rails Class > nutty
If you haven't already done so, we strongly recommend opening the entire nutty folder in your code editor (Sublime Text, VS Code, or similar) to enable quick navigation between files and leverage your editor's Rails-specific features.
Launch Terminal to begin our server setup.
In Terminal, type
cdand a space, then do the following:- Drag the nutty folder from Desktop > Class Files > yourname-Rails Class onto the Terminal window (this automatically types out the full path).
- In Terminal, hit Return to change directory.
Start the Rails development server by typing the following:
rails sIn a browser, navigate to: localhost:3000 Take a moment to explore the current site functionality. All products should display their own images, and their specifications should appear as properly formatted, bulleted lists. This existing functionality provides the foundation for our cart implementation.
Development Environment Setup
Understanding the end goal helps guide implementation decisions
Essential for testing changes in real-time during development
Confirms all previous exercises are working correctly before proceeding
The Cart Controller
Now we'll create the controller that will handle all cart-related actions. In Rails, controllers serve as the coordination layer between your models and views, processing user requests and preparing data for display.
Switch to Terminal and hit Cmd–T to open a new tab while keeping your server running.
Generate a new cart controller by typing the following:
rails g controller cartIn your code editor, open nutty > config > routes.rb
Add the cart routes by inserting the following bold code a few lines above the
endkeyword:resources :products, only: [:index, :show] resources :cart, only: [:index, :create] root 'products#index'This configuration restricts our cart to only the actions we need:
indexfor displaying cart contents andcreatefor adding items.Save the file, then close it.
In your code editor, open nutty > app > controllers > cart_controller.rb.
Implement the basic cart controller methods by adding the following bold code:
class CartController < ApplicationController
   def index
      @title = "Your Cart"
   end

   def create
   end
end
Save the file.
With our controller in place, the next logical step is creating the corresponding view to display cart contents.
Open a Finder window and navigate to: Desktop > Class Files > yourname-Rails Class > That Nutty Guy HTML
Open the cart.html file, select all of the code between
<!—begin cut here—>and<!—end cut here—>, and hit Cmd–C to copy it.Create nutty > app > views > cart > index.html.erb and open it in your editor.
Paste the copied code to establish our cart view template.
In a browser, go to: localhost:3000/cart You should see our cart interface displaying successfully!
Click the Cart link at the top right. Notice that this currently takes us to cart.html instead of our Rails route. We need to update this link to use our new controller.
In your code editor, open nutty > app > views > layouts > application.html.erb
Around line 43, locate the cart link and update it to point to our Rails route as shown below:
<a id="cart" href="/cart">Save the file, then close it.
In a browser, go to localhost:3000 (or reload if you're already there).
Click the Cart link and verify it now takes you to localhost:3000/cart
Excellent! We've established the basic cart infrastructure. The cart currently displays static data, but we'll soon connect it to our Rails models for dynamic content management.
The rails g controller command automatically creates the controller file, updates routes, and sets up the basic structure for handling HTTP requests.
Controller Setup Process
Generate Controller
Create cart controller using Rails generator with proper naming conventions.
Configure Routes
Add cart resources to routes.rb with only index and create actions enabled.
Create View Template
Copy HTML structure from static files and create index.html.erb view file.
Making the Cart Visible Only to Registered Users
Security and user experience considerations require that shopping carts are associated with specific customer accounts. This approach ensures data privacy, enables persistent cart storage, and provides a foundation for order processing. Let's implement the cart model with proper customer authentication.
Switch to Terminal and create a cart model with customer association by typing:
rails g model cart customer:referencesThe
customer:referencesparameter automatically creates a foreign key relationship, ensuring each cart belongs to a specific customer account. This approach maintains data integrity and enables us to display cart contents only to the rightful owner.Apply the migration to update your database schema:
rails db:migrateIn your code editor, open nutty > app > models > customer.rb
Establish the customer-cart relationship by adding the bold code:
devise :database_authenticatable, :registerable,
     :recoverable, :rememberable, :validatable

   has_one :cart
end
The
has_onerelationship defines a one-to-one connection between customers and carts, as illustrated in the diagram below. This relationship indicates that the foreign key (customer_id) resides in the Cart model, while the Customer model references it through the association.
NOTE: The entity-relationship diagram above illustrates the connection between models. The
has_onerelationship is represented by the line . In subsequent diagrams throughout this workbook, you'll encounter the line
  representing
 has_manyrelationships.Save the file, then close it. Now we'll implement the controller logic to handle cart loading and authentication.
In your code editor, open nutty > app > controllers > cart_controller.rb
Implement authentication and cart initialization by adding the bold code to handle both signed-in and non-authenticated users:
class CartController < ApplicationController
   def index
      @title = "Your Cart"
      if customer_signed_in?
         current_customer.create_cart if current_customer.cart.nil?
         @cart = current_customer.cart
      else
         redirect_to new_customer_session_path, alert: "Please sign in to access your cart." and return
      end
   end
This implementation first verifies customer authentication. For authenticated users, it ensures a cart exists (creating one if necessary) and loads it for display. Non-authenticated users are redirected to the sign-in page with a helpful message. The
and returnstatement is crucial—it prevents further code execution after the redirect, avoiding potential errors or unexpected behavior.Save the file to implement our authentication logic.
In a browser, navigate to: localhost:3000
Click on the Cart link at the upper right to test our authentication system.
To create an account for testing, click the Sign up link on the authentication page.
Enter a valid email address and secure password, then click Sign Up.
After successful sign-in, navigate to the Cart page. You should now have full access to your personalized cart interface.
Using customer:references in the model generator automatically creates the foreign key relationship and sets up the belongs_to association in the Cart model.
Has_one Relationship Benefits
Clear Ownership
Each customer has exactly one cart, preventing confusion and ensuring data integrity in the application.
Foreign Key Placement
The customer_id foreign key lives in the Cart model, following Rails conventions for one-to-one relationships.
Many-to-Many Relationships
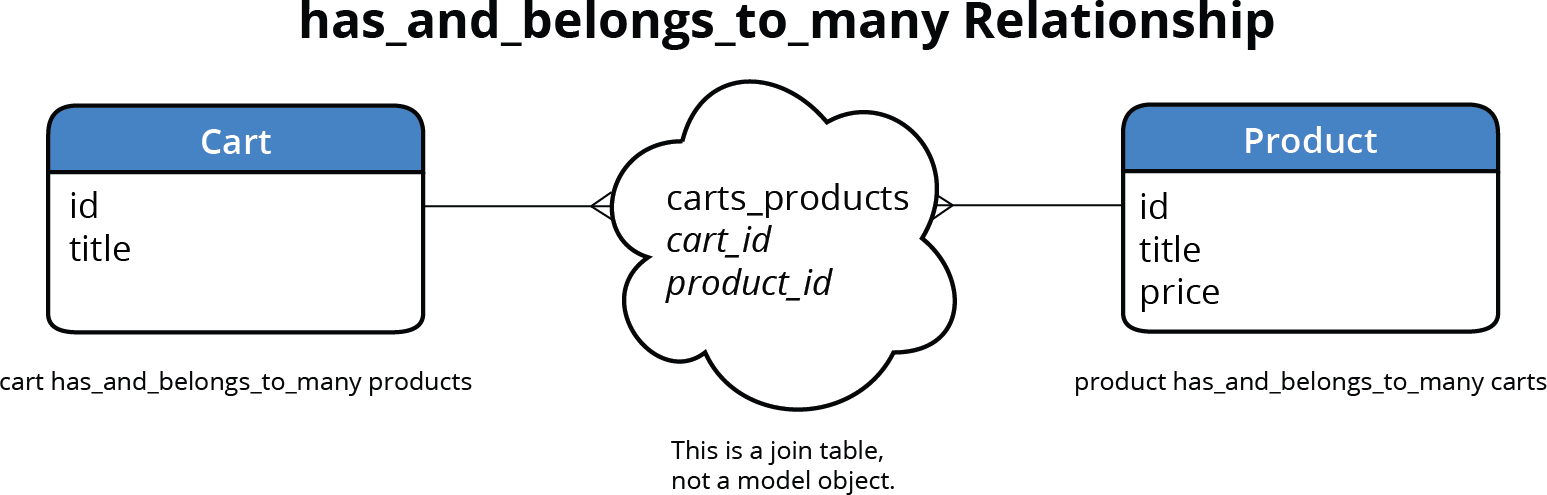
The current model structure lacks a crucial component: the ability to associate products with carts. Traditional has_many and belongs_to relationships are insufficient for this scenario due to the complex nature of shopping cart requirements.
Consider the foreign key dilemma: placing a cart_id on the products table would restrict each product to a single cart—clearly impractical for an e-commerce system where multiple customers might want the same product. Conversely, adding a product_id to the Cart model would limit each customer to just one product per cart. Neither approach supports the real-world requirement where customers need multiple products in their carts, and products must be available to multiple customers simultaneously.
Rails addresses this challenge through many-to-many relationships, with has_and_belongs_to_many being the most straightforward implementation. This relationship enables each Product to exist in multiple carts while allowing each Cart to contain multiple products—exactly what modern e-commerce demands.
The implementation requires a join table—a specialized database table that manages the associations between products and carts without duplicating data or creating restrictive one-to-one relationships.
Let's create the necessary migration for our join table. In Terminal, type:
rails g migration create_carts_products cart:references product:referencesNOTE: Rails convention dictates that join tables follow alphabetical naming: the models are listed alphabetically and pluralized. For cart and product, "c" precedes "p", so we get "carts_products"—always in plural form.
Apply the migration to create the join table:
rails db:migrateIn your code editor, open nutty > app > models > cart.rb.
Establish the many-to-many relationship by adding the following bold code:
class Cart < ActiveRecord::Base
   belongs_to :customer

   has_and_belongs_to_many :products
end
Save the file, then close it.
In your code editor, open nutty > app > models > product.rb.
Complete the bidirectional relationship by adding the corresponding association:
validates :price, numericality: true

has_and_belongs_to_many :carts

has_one_attached :image
With these associations in place, we've established a robust many-to-many relationship that supports complex e-commerce scenarios while maintaining data integrity and flexibility.
Save the file and then close it.
Relationship Types Comparison
| Feature | Has_many/Belongs_to | Has_and_belongs_to_many |
|---|---|---|
| Foreign Key Location | In related model | Separate join table |
| Relationship Type | One-to-many | Many-to-many |
| Use Case | Product belongs to category | Product can be in many carts |
Rails requires join tables to be named alphabetically by model in plural form. For Cart and Product models, the table must be named carts_products.
Making the Add to Cart Button Functional
Now we'll transform the static "Add To Cart" button into a dynamic form that actually adds products to customer carts. This implementation uses Rails form helpers to create a seamless user experience while maintaining security and data integrity.
In a browser, navigate to: localhost:3000
Click on Tinfoil Hat to view a product detail page.
Examine the current Add To Cart button. While it's currently non-functional, we're about to transform it into a fully operational form component.
During our Flix application development, we utilized Rails's
form_with model: @moviehelper to build model-based forms. However, our current situation differs—we may not have an existing cart, and user authentication status is uncertain. Rails provides an elegant solution through theform_with url:helper, which creates forms without requiring a model object.In your code editor, open nutty > app > views > products > show.html.erb
Around line 25, add the form wrapper by inserting the following bold code:
<p class="star-rating-large five ir">Star Rating</p>
<%= form_with url: '/cart', method: :post do %>

<% end %>

<input type="number" name="quantity" min="1" max="100" value="1">
This form configuration directs submissions to '/cart' using the POST method, which Rails automatically routes to the
createmethod in our cart_controller.IMPORTANT TO UNDERSTAND: When you POST to a controller's root route, Rails invokes the
createaction. This is why we configured both:indexand:createmethods in ourroutes.rbfile earlier.Replace the form content with proper Rails form helpers by adding the following bold code:
<%= form_with url: '/cart', method: :post do %>
   <%= hidden_field_tag :product_id, @product.id %>
   <%= number_field_tag :quantity, 1, min: 1, max: 100 %>
   <%= button_tag id: 'add-cart', class: 'btn-red btn-md' do %>
      <span class="glyphicon-shopping-cart"></span> Add to Cart
   <% end %>
<% end %>
NOTE: The
hidden_field_tagsecurely transmits the product ID to identify which item should be added to the cart. Thenumber_field_tagprovides a user-friendly quantity selector with built-in validation. Thebutton_tagcreates our styled submit button with the appropriate visual elements.Remove the outdated HTML cart button code (around lines 32–37):
<input type="number" name="quantity" min="1" max="100" value="1">
<a href="cart.html">
   <button type="button" id="add-cart" class="btn-red btn-md">
      <span class="glyphicon-shopping-cart"></span> Add to Cart
   </button>
</a>
Save the file to implement our new form-based cart functionality.
Form Helper Options in Rails
form_with model:
Used when you have an existing model object to build the form around, like editing a movie or product.
form_with url:
Used when you don't have a model object but need to POST data to a specific endpoint, like adding to cart.
POSTing to the root of a controller's route automatically calls the create method. This is why we enabled :create in routes.rb earlier.
Making Sure Customers Are Signed in
Before customers can add items to their cart, we must ensure proper authentication and cart initialization. Rather than duplicating authentication logic across multiple controller methods, we'll implement a DRY (Don't Repeat Yourself) solution using Rails controller filters.
In your code editor, open nutty > app > controllers > cart_controller.rb
While we could add authentication checks directly to the
createmethod, this approach would violate the DRY principle and create maintenance challenges as we add more cart-related actions.Extract the authentication logic by cutting (Cmd–X) the following bold code from the index method:
class CartController < ApplicationController
   def index
      @title = "Your Cart"
      if customer_signed_in?
         current_customer.create_cart if current_customer.cart.nil?
         @cart = current_customer.cart
      else
         redirect_to new_customer_session_path, alert: "Please sign in to access your cart." and return
      end
   end
Create a reusable private method by adding the following structure between the
createmethod and the finalendkeyword:def create end private def load_cart_or_redirect_customer end endPaste (Cmd–V) the extracted authentication logic into your new private method:
private
   def load_cart_or_redirect_customer
      if customer_signed_in?
         current_customer.create_cart if current_customer.cart.nil?
         @cart = current_customer.cart
      else
         redirect_to new_customer_session_path, alert: "Please sign in to access your cart." and return
      end
   end
NOTE: Private controller methods serve internal purposes only—they don't correspond to routes or pages but provide reusable functionality across controller actions.
Implement the before_action filter to ensure authentication runs before any cart operations:
class CartController < ApplicationController
   before_action :load_cart_or_redirect_customer

   def index
This filter automatically executes our authentication method before both
indexandcreateactions, ensuring customers are properly authenticated and have initialized carts before accessing any cart functionality.
Using before_action with a private method prevents code duplication when multiple controller actions need the same authentication check.
Controller Refactoring Process
Extract Common Logic
Move authentication and cart loading logic into a private method for reuse across multiple actions.
Implement Before Action
Use before_action callback to ensure authentication runs before any cart operations.
Handle Return Conditions
Use 'and return' to prevent further code execution after redirects to avoid unexpected behavior.
Adding Products to the Cart
With authentication and cart initialization in place, we can now implement the core functionality: adding products to customer carts. This process involves finding the requested product, adding it to the cart, and providing user feedback.
Implement the cart creation logic by adding the following code to the create method around line 9:
def create
   product = Product.find(params[:product_id])
   @cart.products << product
   @cart.save
   redirect_to '/cart', notice: "#{product.title} was added to your cart." and return
end
NOTE: The product ID comes from the hidden field in our form and arrives in the
paramshash. The<<operator adds the product to the cart's products collection through our many-to-many relationship. After saving the cart, we redirect users to the cart page with a success message confirming the addition.Save the file to implement our product addition functionality.
Test the implementation by navigating back to the Tinfoil Hat page in your browser and reload it to ensure you have the updated form.
Click Add To Cart to test the functionality.
Success! The system is working, though our cart still displays sample data instead of actual cart contents. Let's fix that by implementing dynamic cart display.
In your code editor, open nutty > app > views > cart > index.html.erb
Replace the static cart display with dynamic content by wrapping the existing table rows (around lines 20 and 36) in the following bold tags:
<tbody>
   <% @cart.products.each do |product| %>
      <tr>
         <td id="thumbnail-div" class="hidden-xs">
Code Omitted To Save Space
<td class="hidden-xs">$19.99</td>
         <td class="total-price">$19.99</td>
      </tr>
   <% end %>
      <td id="thumbnail-div" class="hidden-xs">
We only need one row to make the cart display properly. Let's continue implementing the dynamic product display with actual product data instead of static values.
Cart Addition Process
Find Product
Use Product.find with the product_id from params to locate the specific product being added.
Associate with Cart
Use the << operator to add the product to the cart's products collection through the join table.
Save and Redirect
Save the cart to persist changes and redirect with a success notice to provide user feedback.