Topics Covered in This Ruby on Rails Tutorial:
Getting Started with Rails Development Environment, Generating Professional Scaffolds, Adding and Managing Content
Exercise Preview
Rails vs Other Web Frameworks
| Feature | Rails Scaffolding | Traditional Development |
|---|---|---|
| Setup Time | Minutes | Hours/Days |
| Database Creation | Automated | Manual Configuration |
| CRUD Operations | Generated | Hand-coded |
| Web Server | Built-in | Separate Installation |
Exercise Overview
In this comprehensive exercise, you'll master one of Rails' most powerful productivity features: scaffolding. This automated code generation system enables rapid application development by creating complete CRUD (Create, Read, Update, Delete) interfaces with minimal manual coding. While our example focuses on a recipe management application, the principles you'll learn apply universally—whether you're building content management systems, corporate intranets, e-commerce platforms, or data dashboards.
Rails distinguishes itself from other web frameworks like Django, Express.js, or traditional Java servlets through its convention-over-configuration philosophy and comprehensive command-line toolchain. These tools automate repetitive development tasks, from file generation to database schema management, enabling developers to focus on business logic rather than boilerplate code. This approach has made Rails a cornerstone technology for startups and enterprises seeking rapid time-to-market.
Getting Started
Before diving into Rails development, we'll establish a proper workspace and navigate the command-line environment that powers modern web development workflows.
Ensure you're working from the Finder (macOS Desktop environment) with a clean workspace.
From the Finder menu, select Hide Others to eliminate visual distractions and focus on the development environment.
Navigate to and open the Class Files folder on your Desktop.
Enter the yourname-Rails Class directory. Take note of the provided starter files and folders—these represent common project assets you'll encounter in real-world development. Currently, no cookbook folder exists because we'll generate the entire application structure using Rails' automated tools, demonstrating the framework's scaffolding capabilities.
Return to the Class Files directory level so the yourname-Rails Class folder remains visible. We'll reference this location shortly when setting up our terminal navigation.
Keep this Finder window accessible—you'll need it for drag-and-drop functionality in the upcoming steps.
Professional Rails development relies heavily on command-line interfaces. Launch Terminal.app from Applications > Utilities. The Terminal provides direct access to Unix commands, package managers, and Rails' comprehensive CLI tools that streamline development workflows.
Arrange your Terminal and Class Files windows in a split-screen configuration. This dual-pane setup allows you to monitor file system changes in real-time as Rails generates code—a valuable debugging and learning technique.
We'll use Unix navigation commands to position ourselves in the correct directory structure. The
cd(change directory) command functions like clicking through folders in the GUI, but offers greater precision and scriptability. Typecdfollowed by a single space in Terminal, but don't press Enter yet.Here's a professional tip to avoid path typos: drag the yourname-Rails Class folder from Finder directly onto the Terminal window. This automatically generates the complete file path. Your command should now display:
cd /Users/yourUserName/Desktop/Class\ Files/yourname-Rails\ ClassNote the path structure conventions:
yourUserNamereflects your system's user account- Forward slashes (
/) separate directory levels in Unix systems - Backslashes (
\) escape spaces in directory names, converting "Class Files" toClass\ Files
Execute the command by pressing Return in Terminal.
Verify successful navigation by checking your command prompt. It should display the current directory: yourname-Rails Class appears to the left of your
username$prompt, following the pattern:yourComputerName:currentFolder userName$Open the yourname-Rails Class folder in Finder to create a visual monitoring setup. Position this window alongside Terminal—you'll observe Rails' file generation process in real-time, providing insight into the framework's organizational structure.
Now we'll create your first Rails application using the framework's project generator. Type the following command:
rails new cookbook- Execute the command with Return. Observe the parallel processes:
- Finder displays the new cookbook folder appearing with its complete directory structure
- Terminal streams detailed output showing every file Rails creates, dependencies installed, and configuration applied
Once Rails completes the application generation and returns to the command prompt, navigate into your new project directory:
cd cookbookNOTE: From this point forward, assume all Terminal commands require pressing Return to execute unless explicitly noted otherwise.
Examine your project structure using the list command:
lsThe
lscommand (using lowercase L) displays directory contents. You'll see Rails' standardized application structure: app/ for your application code, config/ for settings, db/ for database files, public/ for static assets, and more. This consistent organization enables any Rails developer to quickly navigate and understand your project.Compare the Terminal output with the Finder view by opening the cookbook folder graphically. This demonstrates how Terminal and Finder provide different interfaces to the same underlying file system—Terminal offers power and precision, while Finder provides visual context.
Terminal Navigation Setup
Open Required Applications
Launch Terminal from Applications > Utilities and arrange windows so you can see both Terminal and Finder simultaneously
Navigate to Project Directory
Use the cd command followed by dragging the yourname-Rails Class folder to Terminal to avoid typing errors
Verify Current Location
Check that the Terminal prompt shows yourname-Rails Class folder to confirm you're in the correct directory
Drag folders directly from Finder to Terminal after typing 'cd ' to automatically insert the complete file path and prevent typos in directory navigation.
Testing in a Browser
Before proceeding with application development, we'll verify your Rails installation and development environment by launching the built-in server—a crucial step in professional development workflows.
Start Rails' integrated development server with this command:
rails serverThis launches Puma, Rails' default application server, configured for development use. Unlike traditional web development that requires separate server installation and configuration (Apache, Nginx, etc.), Rails includes everything needed for immediate development. This integrated approach significantly reduces setup complexity and accelerates development cycles.
Confirm successful server launch by reading the final output lines in Terminal, which should display information similar to:
=> Booting Puma
=> Rails 7.1.0 application starting in development
=> Run `rails server—help` for more startup options
Puma starting in single mode…
- Version 6.4.0 (ruby 3.2.0), codename: The Eagle of Durango
- Min threads: 5, max threads: 5
- Environment: development
- Listening on tcp://localhost:3000
Use CTRL C to stop
The process identifier (
pid) will differ with each server instance, as these are system-unique identifiers.Launch your preferred web browser.
Navigate to localhost:3000 in the address bar.
Understanding the URL structure: localhost refers to your local machine, while :3000 specifies the port number. Production applications typically run on standard ports (80 for HTTP, 443 for HTTPS), but development servers use alternative ports like 3000 to avoid conflicts with other services.
The Welcome to Rails page confirms successful installation and server operation. This milestone represents a fully functional Rails development environment. The page content suggests using
rails generatecommands to create application components—precisely our next step.Close the browser window to return focus to development.
In Terminal, stop the server using Control–C (the Control key, not Command). This keyboard interrupt gracefully shuts down the server process, freeing system resources for our upcoming development tasks.
Local Server Testing Process
Start Rails Server
Execute 'rails server' command to boot the bundled web server that comes with Ruby on Rails
Access Development Site
Navigate to localhost:3000 in your browser to view the Rails welcome page and verify installation
Stop Server Process
Use Control-C in Terminal to stop the server when you need to make changes or run other commands
Rails uses port 3000 for development servers to avoid conflicts with standard web ports (80 for HTTP, 443 for HTTPS) that may be used by other processes.
Generating a Scaffold
Rails scaffolding represents one of the framework's most compelling features for rapid application development. In minutes, you'll generate a complete web application with database integration, user interface, and full CRUD functionality—work that would require hours of manual coding in other frameworks.
We'll build our scaffold command incrementally to ensure accuracy. Do not execute until instructed. Begin typing:
rails generate scaffold recipeCommand breakdown:
rails generate scaffoldinvokes Rails' scaffold generatorrecipedefines the model name (Rails will automatically create Recipe class, recipes table, etc.)
Continue building the command by adding the database schema definition (enter as one continuous line):
rails generate scaffold recipe title:string description:text prep_time:string ingredients:text directions:textThis schema defines our recipe data structure:
stringfields create single-line inputs suitable for titles and short datatextfields generate multi-line textarea inputs for longer content like descriptions and instructions- Rails automatically adds id, created_at, and updated_at fields to every model
Review your command carefully for syntax errors—typos here will propagate throughout the generated code.
Execute the command with Return. Watch as Rails generates:
- Model files for data handling
- Controller files for application logic
- View templates for user interface
- Database migration files for schema management
- Test files for quality assurance
- Route configurations for URL handling
The migration file created represents a database change request. Rails migrations provide version control for database schemas, enabling team collaboration and deployment automation.
Apply the database migration to create the recipes table:
rails db:migrateThis command executes the migration, physically creating the database table with your specified fields. Rails tracks migration status to prevent duplicate executions and enable rollbacks when necessary.
Launch the development server to test your new application:
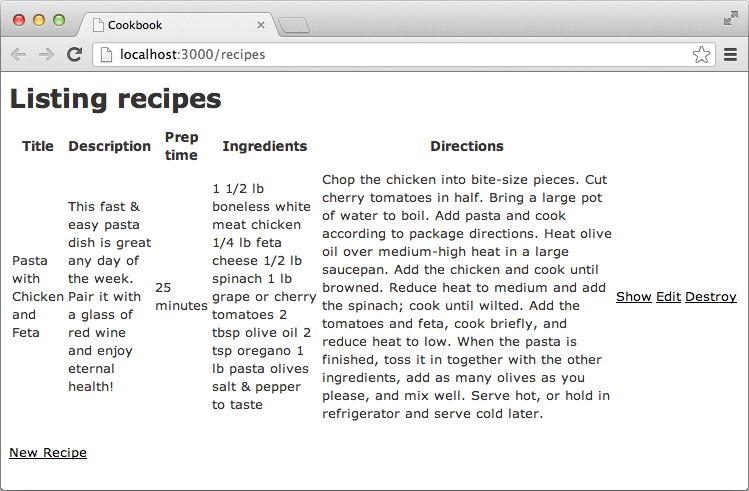
rails serverOpen your browser and navigate to localhost:3000/recipes
You'll see a complete web application interface displaying your recipe database schema. Click the New Recipe link to access the creation form. The professional-grade interface includes form validation, error handling, and responsive design—all generated automatically from your simple command.
Recipe Database Fields
String Fields
Title and prep_time use string data type for single-line text input fields in forms.
Text Fields
Description, ingredients, and directions use text data type for larger multi-line text areas.
The complete scaffold command must be entered as a single line: 'rails generate scaffold recipe title:string description:text prep_time:string ingredients:text directions:text'
Database Migration Process
Generate Scaffold Structure
Run the scaffold command to create models, views, controllers, and migration files automatically
Execute Database Migration
Use 'rails db:migrate' to apply the migration and create the recipes table in the database
Verify Table Creation
Check Terminal output to confirm the recipes table was successfully created with all specified fields
Adding a Recipe
Now we'll populate your application with content, demonstrating the complete workflow from data entry to management that your users will experience.
We've prepared sample content to accelerate the testing process. Keep your browser window open and switch to Finder.
Navigate to Class Files > yourname-Rails Class and double-click recipe.txt to open the prepared content.
Copy each section of the recipe data and paste it into the corresponding form fields in your web application. This process simulates real user interaction with your interface.
- Click Create Recipe to save your first database entry.
- Rails displays a confirmation message indicating successful creation
- Notice the URL change to localhost:3000/recipes/1—Rails automatically assigns unique identifiers and creates RESTful URLs
Test the editing functionality by clicking the Edit link. This demonstrates your application's update capabilities.
Modify the prep time to 25 minutes to test data persistence.
Save changes with Update Recipe—Rails handles form processing, validation, and database updates automatically.
Use the Back link to return to the index view, which displays all recipes in a tabular format.
Examine the action links: Show (detailed view), Edit (modification interface), and Destroy (deletion with confirmation). These represent the complete CRUD (Create, Read, Update, Delete) functionality essential to most web applications.
Leave your development environment running for the next exercise—we'll build upon this foundation.
You've accomplished remarkable productivity: with fewer than ten commands, you've created a complete web application with database backend, user interface, server infrastructure, and full content management capabilities. This demonstrates Rails' power for rapid prototyping and MVP development—capabilities that have made it the framework of choice for countless successful startups and enterprise applications.
NOTE: For comprehensive documentation of your application's file structure and architectural patterns, reference the Basic Structure of Scaffolding guide at the end of this workbook.
Recipe Management Workflow
Access Recipe Form
Navigate to localhost:3000/recipes and click New Recipe link
Input Recipe Data
Copy content from recipe.txt file and paste into corresponding form fields
Create and Edit
Click Create Recipe, then use Edit link to modify prep time to 25 minutes
View All Recipes
Use Back link to see table view with Show, Edit, and Destroy options
Rails Scaffolding Assessment