Topics Covered in This Ruby on Rails Tutorial:
Making the Form Work: Defining a Create Method, Making an Edit Form, Optional Bonus: DRYing up the Code Even More
Exercise Preview
Exercise Overview
In the previous exercise we created a form, but it remains functionally incomplete—it cannot submit data yet. A critical component in the controller must be ready to receive the form data, process it systematically, and create a new movie object based on that information. In Rails' RESTful routing architecture, this essential method is called Create.
This exercise builds directly on form fundamentals by implementing the server-side logic that transforms user input into persistent database records. You'll learn how Rails handles form submissions through strong parameters—a security feature that has become standard practice in modern Rails applications since version 4.0.
If you completed the previous exercises, you can skip the following sidebar. We strongly recommend finishing the previous exercises before starting this one, as each builds essential knowledge for professional Rails development. If you haven't finished them, follow the setup instructions below.
Form Processing Workflow
1Create Method
Define controller method to receive and process form data with strong parameters validation
2Edit Form
Build edit functionality with pre-populated fields and update method for existing records
3DRY Implementation
Refactor code using partials and private methods to eliminate redundancy and improve maintainability
If You Did Not Do the Previous Exercises (3A–4A)
- Close any files you may have open.
- Open the Finder and navigate to Class Files > yourname-Rails Class
- Open Terminal.
- Type
cdand a single space (do NOT press Return yet). - Drag the yourname-Rails Class folder from the Finder to the Terminal window and press ENTER.
- Run
rm -rf flixto delete your copy of the Flix site. - Run
Git clone https://bitbucket.org/Noble Desktop/flix.Gitto copy the Flix Git repository. - Type
cd flixto enter the new directory. - Type
Git checkout 4Ato bring the site up to the end of the previous exercise. - Run
bundleto install any necessary gems. - Run
yarn install—check-filesto install JavaScript dependencies.
This exercise builds on previous work. If you haven't completed exercises 3A-4A, follow the Git checkout process to get the required starting files before proceeding.
Getting Started
Before diving into form processing logic, let's ensure your development environment is properly configured and running smoothly.
Open the Finder and navigate to Class Files > yourname-Rails Class
Open Terminal.
Type
cdand a single space (do NOT press Return yet).Drag the flix folder from the Finder to the Terminal window.
Make sure you're in Terminal and hit Return to change into the new folder.
Type the following to launch the server:
rails serverOpen a browser and navigate to localhost:3000 to verify everything is running correctly. You should see the Flix website loading without errors.
We recommend opening the entire flix folder in your code editor if it supports project-wide file management (like Sublime Text, VS Code, or RubyMine).
Environment Setup
Verify the Flix website loads correctly before starting development
Provides easy access to all project files and improves development workflow
Primary location where form processing logic will be implemented
Making the Form Work: Defining a Create Method
Now we'll implement the server-side logic that processes form submissions. The create method represents the cornerstone of Rails' CRUD operations, transforming user input into database records while maintaining security through parameter filtering.
In your code editor open flix > app > controllers > movies_controller.rb
Create a new method right before the final
endin the document as follows:def create end endInside this create method we will receive and process what are called the parameters from the form submission. Rails receives and processes form data in a hash called
params. An essential security feature in Rails called strong parameters requires us to explicitly whitelist the parameters we expect to receive through each form. This feature serves as a critical safeguard against mass assignment vulnerabilities and parameter injection attacks that could allow malicious users to modify data inappropriately.The practical implementation of this security measure means controllers must declare which parameters they will accept using a method called
params.permitfollowed by an explicit list of expected parameters. This approach has been standard practice since Rails 4.0 and remains a fundamental security principle in modern Rails applications.Add the following bold code:
def create
   movie_params = params.require(:movie).permit()
end
Complete the list of expected parameters by adding the following bold code (on a single line):
movie_params=params.require(:movie).permit(:title,:description,:has_subtitles,:placement,:mpaa_rating,:release_date,:ticket_price,:runtime,:poster_image)Take a moment to carefully verify your work. While this parameter listing is admittedly tedious to type, it provides essential security protection that has prevented countless security breaches in production Rails applications. This explicit parameter definition ensures that only the data you expect can be processed by your application.
After the parameters line (some code omitted to save space), add the following bold code to create the new movie object:
def create
   movie_params = params.require(:movie).permit(…)
   @movie = Movie.new(movie_params)
end
The elegance of Rails' Active Record pattern shines through here. To create a new movie object from form data, we simply set the instance variable
@movieequal toMovie.newand pass themovie_paramsobject directly into the constructor. Rails automatically maps the parameter names to the corresponding model attributes, eliminating the need for manual field-by-field assignment.If we stopped at this point, a new movie would be created in memory but only temporarily—we need to persist this information to the database! Add the following bold code to the
createmethod:@movie = Movie.new(movie_params) if @movie.save redirect_to @movie else render action: 'new' end endProfessional web applications must provide clear feedback about the success or failure of user actions. This
if/elseconditional implements a standard Rails pattern: if the movie saves successfully to the database, redirect the user to view their newly created movie; if validation fails or another error occurs, render the form again with the data they've already entered, allowing them to correct any issues without losing their work.Save the file.
Open flix > app > views > layouts > application.html.erb
Around line 52 notice this piece of code:
<% if flash[:alert] %>
   <div id="flash" class="alert"><%= flash[:alert] %></div>
<% elsif flash[:notice] %>
   <div id="flash" class="notice"><%= flash[:notice] %></div>
<% end %>
We've implemented this flash message system in advance to streamline your development process. Through carefully crafted CSS classes,
noticemessages display with a professional green background to indicate success, whilealertmessages appear with a red background to signal errors or warnings. This visual feedback system is essential for creating intuitive user experiences.Now we need to configure Rails to display a success message in this notice area. Switch back to movies_controller.rb
Add the following bold code:
if @movie.save
   redirect_to @movie, notice: 'Movie was created successfully.'
else
Save the file.
Switch to the browser and navigate to localhost:3000/movies/new
Let's test our form with actual movie data! We've prepared a text file with complete movie information to save you time on data entry. Switch to the Finder.
Navigate into Class Files > yourname-Rails Class > flix snippets and double–click on gone_with_the_windows.txt to open it (it will likely open in TextEdit).
Arrange your windows so gone_with_the_windows.txt and the browser window are visible side-by-side for efficient data entry.
Copy and paste all of the information from gone_with_the_windows.txt into the corresponding form fields. For the dropdown fields, set the Placement to In Theaters, MPAA Rating to PG, and Release Date to any future date as specified in the text file.
When complete, click Create Movie.
You should be redirected to localhost:3000/movies/4 where you can view the new movie page for Gone With the Windows along with a professional green success banner confirming the successful creation of your new movie record.
Rails receives and processes form permissions in a hash called params. Strong parameters requires us to white-list those parameters we expect to receive through each form.Movie Form Parameters
Making an Edit Form
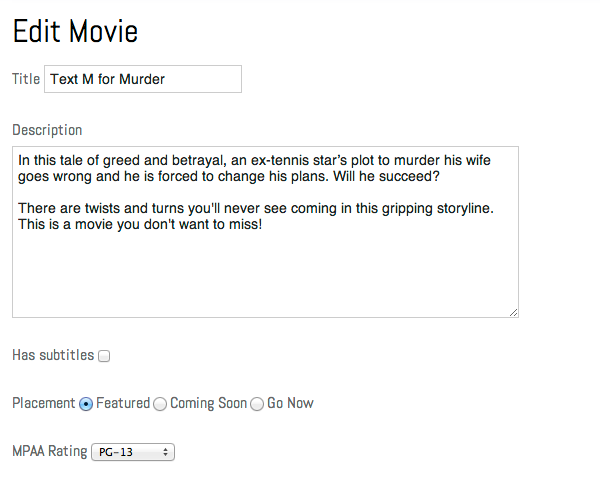
Forms that only create new records represent just half of a complete CRUD interface. Professional applications require robust editing capabilities. Let's imagine the PR Department has identified errors in our Text M for Murder movie: the rating should be R instead of PG, and the description incorrectly refers to an ex-golfer rather than an ex-tennis star.
Rather than starting from scratch, we'll leverage our existing form infrastructure as a foundation for building edit functionality—a practical approach that demonstrates Rails' commitment to code reusability.
Switch to movies_controller.rb in your code editor.
Add the following
editmethod directly above the finalendof the document, around line 36:def edit @movie = Movie.find(params[:id]) end endSave the file.
Open flix > app > views > movies > new.html.erb in your code editor.
Choose File > Save As.
Name the file edit.html.erb and ensure it's saved in: flix > app > views > movies (it should default to this location, but always verify the file path).
Find the header on the first line of the document:
<h1>Add Movie</h1>Edit the line to read:
<h1>Edit Movie</h1>Following Rails conventions, we'll need a corresponding
updatemethod to process the edited form data. Just as thecreatemethod processes data from the new page, theupdatemethod handles data from the edit page, completing the CRUD cycle.Save the file.
Switch to movies_controller.rb
Around line 40 add the following bold code:
def update

   end
end
Copy the contents of the
editmethod above and paste the code in theupdatemethod as shown below:def update @movie = Movie.find(params[:id]) endFind the following piece of code from earlier in the file (around line 27):
movie_params=params.require(:movie).permit(:title,:description,:has_subtitles,:placement,:mpaa_rating,:release_date,:ticket_price,:runtime,:poster_image)Copy this parameter definition code.
Paste the code inside the
updatemethod:def update @movie = Movie.find(params[:id]) movie_params = params.require(:movie).permit(…) endAdd the following bold code to complete the
updatemethod:@movie = Movie.find(params[:id]) movie_params = params.require(:movie).permit(…) if @movie.update(movie_params) redirect_to @movie, notice: 'Movie was successfully updated.' else render action: 'edit' end endSave the file.
In a browser navigate to localhost:3000/movies/1/edit
The edit form should be displaying properly with all existing data pre-populated! In the Description text area, change ex-golfer to ex-tennis star.
Change the MPAA Rating to R. (You may notice that the dropdown menu appears empty instead of showing the current rating—we'll address this interface issue momentarily.)
Click Update Movie.
You should be redirected to localhost:3000/movies/1 with a professional green success banner displaying: Movie was successfully updated.
The efficiency of this implementation showcases Rails' intelligent form helpers. By copying and adapting the existing form with minimal modifications to the heading, and leveraging the
@movieinstance variable, Rails automatically pre-populated all form fields with the existing movie's information—no additional configuration required.
Create vs Edit Methods
| Feature | Create | Edit |
|---|---|---|
| Data Source | New form input | Existing database record |
| Instance Variable | Movie.new(params) | Movie.find(params[:id]) |
| Success Action | redirect_to @movie | redirect_to @movie |
| Failure Action | render 'new' | render 'edit' |
DRYing up the Code with Partials
While our rapid development approach achieved functional results, the current implementation violates a fundamental principle of professional software development. We now have identical form code duplicated across two separate files—the new and edit views. As we add new fields to the movie form (and we'll be implementing several enhancements!), we'll face the maintenance nightmare of updating both forms identically, creating opportunities for bugs and inconsistencies.
A cornerstone principle in Rails development is DRY (Don't Repeat Yourself). Code duplication—like our current approach with two identical forms—creates significant maintenance challenges, introduces bugs, and violates professional development standards. Fortunately, Rails provides sophisticated tools to maintain DRY code, and we'll implement one of the most powerful: partials.
A partial functions as a reusable sub-view that can be rendered from within other views. Unlike standard views, partials aren't typically called directly by controllers—they're designed for inclusion and reuse. You can instantly identify partial files by their naming convention: they always begin with an underscore, like _partial_name.html.erb.
Switch to edit.html.erb in your code editor.
Perform a File > Save As.
Save the new file as
_form.html.erb(the underscore prefix is crucial—it designates this as a partial!) and verify it's saved in flix > app > views > movies (this should be the default location).Delete the heading on the first line. (This heading needs to be context-specific, changing based on whether you're editing an existing movie or creating a new one.)
Save the file.
Re-open edit.html.erb (located in flix > app > views > movies).
Delete everything except the first line (the heading).
Add the following bold code:
<h1>Edit Movie</h1>
<%= render 'form' %>
Save the file.
Open new.html.erb (located in flix > app > views > movies).
Delete everything except the first line (the heading).
Add the following bold code:
<h1>Add Movie</h1>
<%= render 'form' %>
Save the file.
Both view files now reference the same form partial, implementing true code reuse instead of duplication. Test this implementation by navigating to localhost:3000/movies/new in your browser—the form for creating movies should function identically to before, despite now being rendered as a partial.
Navigate to localhost:3000/movies/4/edit/ and verify that the edit form displays correctly as well. Our code now adheres to DRY principles while maintaining full functionality. However, if you examine the MPAA Rating field on the edit page, you'll notice it appears blank—it's not displaying the existing rating for this movie because we haven't configured the
options_for_selecthelper to remember selected values. Let's resolve this user interface issue.Switch to
_form.html.erbin your code editor.Locate the following line of code, around line 24:
<% mpaa_ratings = options_for_select ["G", "PG", "R", "NR"] %>Add the following bold code—pay careful attention to the comma placement!
<% mpaa_ratings = options_for_select ["G", "PG", "R", "NR"], selected: @movie.mpaa_rating %>Save the file.
Return to your browser, reload localhost:3000/movies/4/edit and confirm that the MPAA Rating field now correctly displays the existing rating!
In Terminal, press CTRL–C to gracefully shut down the development server.
Partials always start with an underscore (_form.html.erb) but are rendered without it using render 'form'. This convention helps identify reusable view components.
Benefits of Using Partials
Optional Bonus: DRYing up the Code Even More
Professional Rails developers recognize that DRY principles extend beyond views into controller logic. Our current controller contains several instances of code repetition that, while functional, don't meet enterprise-level standards for maintainability and organization.
Switch to movies_controller.rb in your code editor.
Directly before the final
endat the bottom, add the following bold private method:end private def movie_params end endPrivate methods can only be invoked from within the controller itself, never from external sources or routes. The methods we're implementing here serve as non-action helper methods. Rails best practices dictate that non-action methods should be private, creating a clear architectural distinction between methods accessible via routing and internal helper methods that support controller functionality.
Navigate up a few lines to the
updatemethod around line 42 and locate this line of code:movie_params=params.require(:movie).permit(:title,:description,:has_subtitles,:placement,:mpaa_rating,:release_date,:ticket_price,:runtime,:poster_image)Select this complete line and cut it (Cmd–X).
Paste it into the
private movie_paramsmethod:private def movie_params movie_params = params.require(:movie).permit(…) endRemove the variable assignment movie_params = so the method returns the parameters directly:
private
      def movie_params
      params.require(:movie).permit(…)
   end
Find the
createmethod around line 26 and delete the identicalmovie_paramsline. From this point forward, whenmovie_paramsis invoked anywhere in the controller, Rails will automatically call our private method, eliminating code duplication.Our controller also contains unnecessary repetition with multiple instances of
@movie = Movie.find(params[:id]). Let's create another private method to eliminate this duplication. Above themovie_paramsmethod, create a new private method:private def set_movie end def movie_paramsLocate the
editmethod around line 35:def edit @movie = Movie.find(params[:id]) endCut (Cmd–X) the
@movie = Movie.find(params[:id])line, leaving the method empty:def edit endPaste this code into the private
set_moviemethod:private def set_movie @movie = Movie.find(params[:id]) end
Advanced DRY Techniques
Private Methods
Extract repeated parameter handling into private movie_params method for controller-only access
Before Actions
Use before_action callback to automatically set @movie for show, edit, and update methods
Method Specification
Apply callbacks only to specific methods using the 'only' parameter with method name array
Private methods differentiate helper functions from route-accessible actions. This separation follows Rails best practices and improves code security and maintainability.