Getting the Project Files
- Download the project files.
- After the download completes, extract the ZIP file if your system hasn't done so automatically. You should see a Premiere Pro VHS Effect folder containing all necessary assets and a pre-configured project file.
Project Overview
In this comprehensive tutorial, we'll transform modern digital footage into authentic-looking VHS tape material—a technique that's experiencing a remarkable resurgence in 2026 as creators embrace retro aesthetics for everything from music videos to brand campaigns. The project file includes pre-configured black bars to establish the classic 4:3 VHS aspect ratio, saving you setup time.
Our workflow follows three strategic phases: First, we'll create an Adjustment Layer enhanced with Wave Warp and Noise effects to replicate the characteristic grain and distortion of analog magnetic tape. Next, we'll implement chromatic aberration using Color Balance effects across multiple footage layers—this technique simulates the RGB channel separation that plagued consumer-grade VHS equipment. Finally, we'll composite a period-appropriate VHS overlay to add those unmistakable timestamp and playback interface elements that sell the complete illusion.
VHS Effect Workflow Overview
Setup Foundation
Create black bars for proper VHS aspect ratio and prepare adjustment layers
Add Distortion
Apply Wave Warp and Noise effects for grainy, distorted visual characteristics
Create Chromatic Aberration
Use Color Balance on three footage layers to simulate RGB channel distortion
Apply VHS Overlay
Add timestamp and tape details using Screen blend mode for authenticity
Creating the Foundation Effects
We'll begin by establishing the core visual characteristics that define VHS footage—the subtle warp and grain that immediately signals analog origins to viewers.
1. In the Effects panel, type Wave Warp to quickly locate this distortion effect.
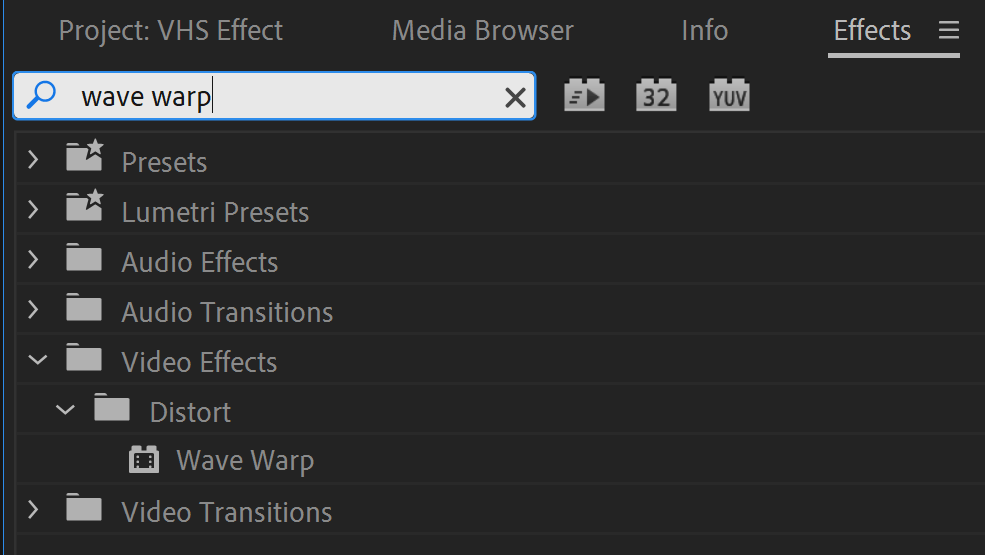
2. Drag the Wave Warp effect onto the Adjustment Layer that's already positioned above your footage in the timeline. Using an adjustment layer ensures these effects apply uniformly across all underlying video content.
3. Search for Noise in the Effects panel—this will add the essential grain texture.
4. Apply the Noise effect to the same Adjustment Layer, stacking it with Wave Warp for compound processing.
5. Navigate to the Effect Controls panel (typically docked in the top-left workspace) and locate the Wave Warp parameters.

6. Set the Wave Type to Square—this creates the rigid, mechanical distortion characteristic of tape tracking issues.
7. Adjust the Wave Width to 600, establishing a subtle but noticeable horizontal distortion.
8. Configure the Direction to 180° for proper horizontal wave orientation.
9. Set Wave Speed to 0.1, creating a gentle, almost imperceptible movement that mimics tape speed variations.
10. Scroll down to the Noise effect parameters within the same Effect Controls panel.
11. Increase the Amount of Noise to 45—this level provides visible grain without overwhelming the underlying image detail.
12. Press Spacebar to preview your work. You should see the characteristic grainy, slightly unstable look that defined consumer camcorders of the 1990s. This foundation establishes the analog feel that modern audiences associate with authentic period footage.
Chromatic Aberration
Now we'll create one of VHS's most distinctive visual artifacts: chromatic aberration. This effect occurs when the RGB color channels separate slightly, creating colored fringing that was endemic to consumer-grade analog equipment.
1. Shift-click to select all three Winter layers in your timeline—these identical footage layers will become separate color channels.
2. Type Color Balance in the Effects panel to locate this essential color manipulation tool.
3. Drag the Color Balance effect onto any selected Winter layer—since all three are selected, Premiere Pro will apply the effect to each layer simultaneously.
4. Deselect the layers by clicking elsewhere in the timeline, then select only the top Winter layer.
5. In the Effect Controls panel, locate the Color Balance parameters.
6. Set Green to 0 and Blue to 0, leaving only the red channel active.
7. In the same panel, find the Opacity settings and change the Blend Mode to Screen—this additive blend mode will combine the color channels naturally.
8. Select the middle Winter footage layer and access its Color Balance effect.
9. Set both Red and Blue to 0, isolating the green channel.
10. Change this layer's Blend Mode to Screen as well.
11. Locate the Scale parameter for this middle layer and adjust it to 105—this slight size increase creates the spatial offset between color channels that produces visible chromatic aberration.
12. Select the bottom Winter footage layer for the final color channel configuration.
13. In its Color Balance effect, set Red to 0 and Green to 0, leaving only the blue channel.
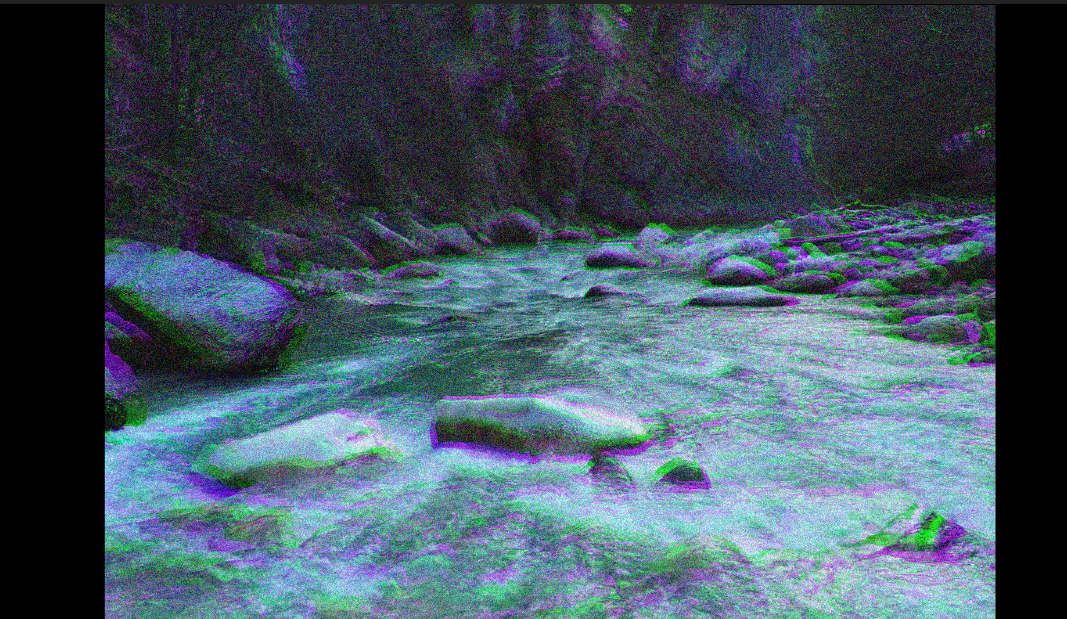
14. This creates chromatic aberration—a visual artifact where RGB channels display slight spatial separation, producing the characteristic color fringing that plagued analog video systems. This effect was particularly pronounced in VHS tapes due to the format's bandwidth limitations and mechanical instability.
Color Channel Configuration
| Feature | Top Layer | Middle Layer | Bottom Layer |
|---|---|---|---|
| Red Channel | 100 | 0 | 0 |
| Green Channel | 0 | 100 | 0 |
| Blue Channel | 0 | 0 | 100 |
| Scale Setting | 100% | 105% | 100% |
| Blend Mode | Screen | Screen | Normal |
This effect simulates how VHS tapes would separate RGB color channels, creating colored fringes around objects - a common artifact in analog video.
VHS Overlay
The final step adds period-specific interface elements that complete the authentic VHS experience. These overlays provide crucial visual context that immediately communicates the analog source to viewers.
1. Locate the Blank VHS Tape layer in your timeline—this contains the timestamp and playback interface graphics.
2. Enable layer visibility by clicking the eye icon. 
3. In the Effect Controls panel, set the layer's Blend Mode to Screen. This blend mode allows the timestamp and interface elements to appear naturally over your footage while maintaining appropriate transparency. You now have a convincing timestamp overlay that sells the complete VHS effect illusion.
Final Overlay Steps
This layer contains the authentic timestamp and tape interface elements
Make the overlay visible in your composition
Screen mode allows the overlay to blend naturally while preserving bright details
Conclusion
Congratulations—you've successfully mastered a professional-grade VHS effect that would fool even discerning viewers. This technique represents more than nostalgic styling; it's a valuable skill set for modern content creators working in music videos, commercials, and branded content where retro aesthetics command premium rates.
The beauty of this approach lies in its technical authenticity. Rather than relying on simple filters, you've recreated the actual optical and electronic phenomena that created VHS's distinctive look: analog noise, mechanical instability, chromatic aberration, and period-appropriate interface elements. This attention to detail separates professional-grade effects from amateur attempts.
Consider experimenting with variations: adjust the noise levels for different tape conditions, modify the wave warp parameters to simulate specific playback issues, or create multiple overlay versions representing different VHS camera manufacturers. The technique scales beautifully for both subtle period touches and dramatic retro transformations, making it an essential tool for contemporary video professionals.
VHS tape with play overlay used from anfx, modified with a Screen overlay. License viewable here.
VHS Effect Technique Analysis
This technique works excellent for music videos, retro commercials, nostalgic documentaries, and any project requiring authentic 90s aesthetic.
Go Beyond Premiere Pro
We offer industry-leading motion graphics courses designed for working professionals in New York City. Our expert instructors bring decades of real-world experience from major studios and agencies, providing the practical skills and industry connections essential for advancing your career. With deliberately small class sizes, you'll receive personalized attention and detailed feedback on your work.