Topics Covered in This Premiere Pro Tutorial:
Resizing Video (Changing the Aspect Ratio), Reframing Video Clips, Setting Pinning Options
Exercise Preview

Project Specifications
Exercise Overview
In this exercise, you'll transform a standard widescreen video sequence into a square format—the dominant aspect ratio for social media platforms like Instagram, TikTok, and LinkedIn. This skill has become essential for modern video professionals who need to repurpose content across multiple channels efficiently. By mastering sequence resizing and the Auto Reframe feature, you'll streamline your social media content creation workflow significantly.
Getting Started
First, we'll prepare your workspace by opening the project files and creating a working copy to preserve your original work.
- If a project is open in Premiere Pro, go to File > Save, then File > Close Project.
- In Premiere Pro, go to File > Open Project and navigate to Desktop > Class Files > Premiere Pro Class > The Interview.
- Double–click on The Interview—Done.prproj.
- Go to File > Save As. Name the file Your Name—The Interview version 2.prproj and save it to Desktop > Class Files > Premiere Pro Class > The Interview.
File Setup Checklist
Ensures clean workspace for new project
Loads the base project with all required assets
Creates working copy to preserve original file
Duplicating & Resizing a Sequence
While the traditional rule in video editing has been to work at your footage's native settings, today's multi-platform content strategy demands flexibility. Modern editors routinely create multiple versions of the same content optimized for different platforms. This approach maximizes reach while maintaining professional quality standards across all deliverables.
Now we'll convert this horizontal sequence into a square format suitable for social media distribution.
In the Project panel, CTRL–click (Mac) or Right–click (Windows) on the Interview—Dan Rodney sequence and choose Duplicate.
CTRL–click (Mac) or Right–click (Windows) on the duplicate sequence Interview—Dan Rodney Copy 01 and choose Rename.
Change the name of this sequence to Interview—Dan Rodney—Square and click on any empty area of the Project panel to finalize the name change.
Double–click on the icon for the Interview—Dan Rodney—Square to open the sequence in the Timeline panel.
NOTE: You can have multiple sequences open simultaneously. They display as tabbed windows, similar to a web browser, allowing for efficient project management and comparison between versions.
- Move the Timeline playhead to 03:15
Click on the title graphic on the Video 2 track.
Before resizing the sequence, we need to configure how the title graphic will behave. Without proper pinning settings, graphics can distort unpredictably when aspect ratios change.
Choose Window > Workspaces > Captions Graphics.
At the top of the Essential Graphics panel, select the Edit tab if it's not already active.
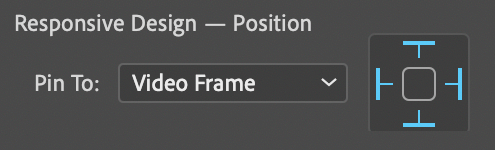
At the top of the Essential Graphics panel, click on the background layer to select it.
- Ensure the Pin To menu is set to Video Frame.
- Click on all 4 pins in the edge selection icon to anchor the background to all frame edges:
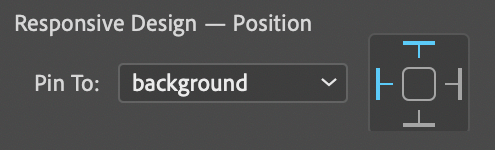
At the top of the Essential Graphics panel, click on the Dan Rodney layer to select it.
- Set this layer's Pin To menu to background.
- Click on the top and left pins on the edge selection icon to maintain consistent positioning:
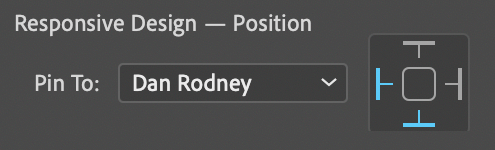
At the top of the Essential Graphics panel, click on the Designer and Instructor layer to select it.
- Set this layer's Pin To menu to Dan Rodney.
- Click on the bottom and left pins on the edge selection icon to maintain proper hierarchy:
- In the Timeline, click on the Interview—Dan Rodney—Square sequence to make it active.
- Choose Sequence > Sequence Settings.
In the Video section, change Frame Size: horizontal from 1920 to 1080.
This creates a perfectly square 1080 × 1080 format with a 1:1 aspect ratio—the optimal dimensions for most social media platforms in 2026.
Click OK to resize the sequence.
If you receive a message about preview files, click OK to proceed.
The automatic resizing applied to the title may appear overly aggressive, so we'll fine-tune it for better visual balance.
At the top of the Essential Graphics panel, click on the Dan Rodney layer to select it.
In the Align and Transform section below, change Scale
 to 80.
At the top of the Essential Graphics panel, select the Designer and Instructor layer.
In the Align and Transform section, configure the following settings:
- Scale to 80
- Position
 set the second value to 45 (vertical position)
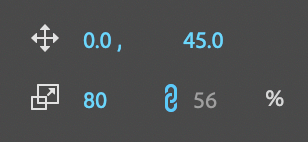
- Scale
Choose Window > Workspaces > Editing.
Choose File > Save or press Cmd–S (Mac) or CTRL–S (Windows).
Always work at the native settings of your video first, then create duplicate sequences for different export formats. This workflow preserves quality and maintains flexibility.
Graphics Pinning Configuration
Background Layer Setup
Set Pin To Video Frame and activate all 4 edge pins for consistent background behavior
Main Title Configuration
Set Dan Rodney layer to pin to background with top and left pins active
Subtitle Positioning
Configure Designer and Instructor layer to pin to Dan Rodney with bottom and left pins
Reframing Video Clips
Sequence resizing creates framing challenges, particularly with interview footage originally composed for landscape viewing. Content that works beautifully in widescreen often loses impact when constrained to a square frame. While manual adjustment of each clip remains an option, Premiere Pro's Auto Reframe feature uses AI-powered analysis to intelligently reposition content, dramatically reducing post-production time while maintaining professional results.
In the Tools panel, select the Track Select Forward tool
 .
.Hold Shift and click on the first interview clip on the Video 1 track to select all clips on that track.
NOTE: The Shift modifier is crucial here. Without it, the Track Select tools will select clips across all unlocked tracks, potentially applying effects where they're not wanted.
- Open the Effects panel (Window > Effects).
- In the Effects panel's search field, type auto reframe
Double–click on the Auto Reframe effect to apply it to all selected clips.
A progress indicator will appear at the bottom right of the Timeline as Premiere Pro analyzes each frame. This AI-powered effect examines facial recognition, motion patterns, and composition rules to determine optimal framing for each moment. Processing time varies based on clip duration and system performance.
NOTE: Auto Reframe works exceptionally well on talking head footage but may produce inconsistent results with complex B-roll content, which is why we'll manually adjust those clips next.
Once Auto Reframe processing completes, scrub through several speaker clips to evaluate the results. The effect typically delivers impressive automatic framing that maintains subject focus.
Select the Selection tool
 .
.Move the Timeline playhead to 58:00 and perform the following adjustments:
- Select the Photoshop Demo clip.
- Open the Effect Controls panel (located at the top left, adjacent to the Source panel's tab).
- Change the first Position value to 120 to better center the screen content.
Move the playhead to 46:05 and adjust the animated graphic:
Select the Dan with Software image (the animated element from your previous exercise).
- In the Effect Controls panel, position the mini-timeline playhead at the clip's beginning.
Change the first Position value to 55.
Click the Go to Next Keyframe button
 located to the right of Position to advance to the next keyframe.
Change the first Position value to 1820 to maintain the animation's visual flow.
Play through your edited sequence to review the reframing work.
While additional refinements could be made, you now understand the core workflow. These techniques form the foundation for efficient multi-format content creation.
Hold Shift when using Track Select Forward tool to select clips only on the target track. Without Shift, it selects clips on all unlocked tracks.
Manual vs Auto Reframe
| Feature | Auto Reframe | Manual Adjustment |
|---|---|---|
| Speed | Automated processing | Individual clip setup |
| Best Use Case | Interview clips | B-Roll footage |
| Precision | AI-powered analysis | Frame-perfect control |
Optional Bonus: More Practice
For those seeking additional hands-on experience with manual reframing techniques, these optional exercises will deepen your understanding of position adjustments across various content types.
Move the playhead to 01:10:00 and refine the Illustrator demonstration:
- Select the Illustrator Demo clip.
- In the Effect Controls panel, change the first Position value to 960 for optimal centering.
Move the playhead to 01:15:00 and adjust the InDesign content:
- Select the InDesign Demo clip.
- In the Effect Controls panel, change the first Position value to 960.
Move the playhead to 01:20:00 and reframe the Premiere Pro demonstration:
- Select the Premiere Pro Demo clip.
- In the Effect Controls panel, change the first Position value to 400 to showcase the interface effectively.
Conduct a final review of your sequence, making additional adjustments based on your creative judgment and brand requirements.
Choose File > Save or press Cmd–S (Mac) or CTRL–S (Windows). Your square-format sequence is now optimized and ready for social media export.
Manual Position Adjustments Timeline
Illustrator Demo
Position first value set to 960 for centered framing
InDesign Demo
Position first value set to 960 for optimal composition
Premiere Pro Demo
Position first value set to 400 for left-aligned focus