Topics Covered in This Premiere Pro Tutorial:
Warp Stabilizer Effect, Time Reversing Footage, Masking an Effect
Exercise Preview
Exercise Overview
In this exercise, you'll elevate your promotional video from rough cut to polished final product by mastering three essential post-production techniques. You'll learn to rescue shaky handheld footage using Adobe's powerful Warp Stabilizer, manipulate time and motion through speed and direction adjustments, and selectively apply effects using precision masking. These skills are fundamental to professional video editing workflows and will transform your promotional content from amateur to broadcast-ready quality.
Tutorial Workflow
Setup Project
Open provided project file and save your working version
Stabilize Footage
Apply Warp Stabilizer to shaky handheld clips
Adjust Timing
Reverse and speed-adjust clips for better flow
Apply Selective Effects
Use masking to blur specific screen areas
Previewing the Final Video
Before diving into the editing process, let's examine the polished final result to understand our creative goals.
On the Desktop, navigate to Class Files > Premiere Pro Intermediate > Noble Promotional Ad and double–click Noble Promo.mp4
Pay close attention to these professional refinements:
- The Coding on a Laptop video exhibits smooth, stable motion—a dramatic improvement over the distracting shake you encountered in the previous exercise.
- The Classroom Pan video plays in reverse, creating a sophisticated visual flow that enhances narrative continuity.
Close the video when you've absorbed these key improvements. These subtle enhancements separate amateur content from professional-grade promotional materials.
Getting Started
Project continuity is crucial for maintaining your creative momentum. If you completed the optional bonus section of exercise 4C, you can seamlessly continue with that project file. Otherwise, we'll establish a solid foundation using our provided template:
If you have a project open in Premiere, choose File > Close All Projects to ensure a clean workspace.
In Premiere Pro, choose File > Open Project or hit Cmd–O (Mac) or CTRL–O (Windows).
Navigate to Desktop > Class Files > Premiere Pro Intermediate > Noble Promotional Ad > Finished Projects.
Double–click on Noble Promo Ad—All Clips on Timeline.prproj to open it.
NOTE: If you encounter a dialog about Converting Project (from a prior version) refer to the Fixing Version Compatibility Issues section in Exercise 1A. Should the Link Media dialog appear, consult Locating Missing Media in Exercise 1A. These compatibility steps ensure seamless integration with Premiere Pro 2026's enhanced features.
Go to File > Save As to create your personalized working copy.
Name the file Noble Promo Ad—Your Name and save it to Desktop > Class Files > Premiere Pro Intermediate > Noble Promotional Ad
Project Setup Checklist
Prevents conflicts and ensures clean workspace
Desktop > Class Files > Premiere Pro Intermediate > Noble Promotional Ad
Use the All Clips on Timeline version for this exercise
Create your working copy to preserve original files
Stabilizing Shaky Footage
Handheld footage captures authentic energy but often suffers from distracting camera shake that undermines professional credibility. Modern audiences expect smooth, intentional camera movement—even slight shakiness can signal amateur production values. Adobe's Warp Stabilizer leverages advanced motion analysis algorithms to rescue otherwise unusable footage, transforming shaky clips into smooth, professional content without sacrificing the natural feel of handheld cinematography.
Choose Window > Workspaces > Editing to optimize your interface for precision editing work.
On the Timeline, move the playhead to 11:01 to locate our problematic footage.
TIP: Streamline your workflow by activating the Timeline and hitting Cmd–F (Mac) or CTRL–F (Windows). Type the clip name into the Find field and press Return (Mac) or Enter (Windows) for instant navigation to any clip.
Press the Spacebar to preview the Coding on a Laptop clip. Notice how the excessive handheld shake creates visual noise that competes with your message, drawing attention away from content toward technical flaws.
Position the Playhead to display a clear frame of the Coding on a Laptop clip in the Program panel for optimal effect monitoring.
Ensure the Coding on a Laptop clip is selected in the Timeline before applying effects.
In the Effects panel, search for Warp to quickly locate Adobe's most powerful stabilization tool.
Double–click the Warp Stabilizer effect to apply it to the selected clip.
NOTE: Warp Stabilizer employs a sophisticated two-phase process: initial motion analysis (indicated by the blue progress ribbon) followed by stabilization rendering (orange ribbon). This background processing architecture allows you to continue editing other sequences while stabilization completes—a significant workflow advantage in professional environments.
Once processing completes, navigate to the clip's beginning and press Spacebar to evaluate the transformation.
The default 50% motion reduction setting provides an excellent starting point, instantly converting unusable shaky footage into broadcast-quality content while preserving natural camera movement characteristics.
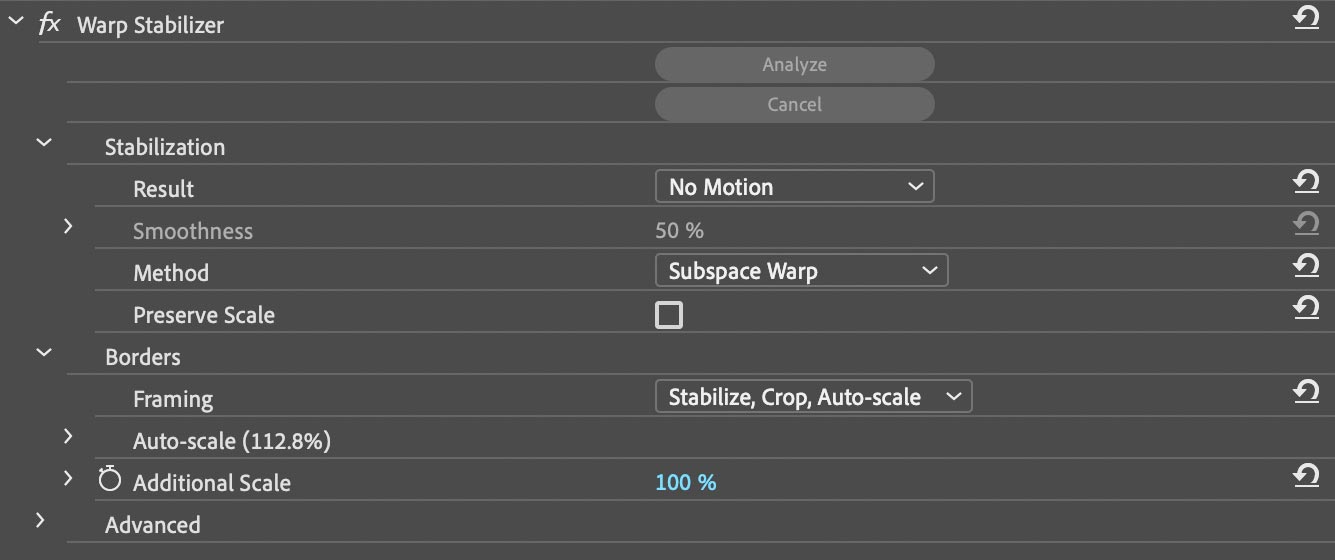
With the Coding on a Laptop clip selected, access the Effect Controls panel and expand the Warp Stabilizer parameters.
Under Stabilization, change Result to No Motion for maximum stability.
NOTE: While the default analysis delivers excellent results for most footage, enable Detailed Analysis in the Advanced settings for challenging material with complex motion patterns. Though processing time increases substantially, the superior results justify the investment for critical shots.
Move the playhead to the One on One Help clip at 22:24 to address secondary stability issues.
Select the One on One Help clip to prepare for effect application.
In the Effects panel, double–click Warp Stabilizer to apply stabilization. The default settings should effectively smooth this clip's minor shake while maintaining natural movement dynamics.
The Warp Stabilizer runs a two-step background process: first analysis (blue ribbon), then stabilization (orange ribbon). You can continue working while it processes.
Applying Warp Stabilizer
Position and Preview
Move playhead to shaky clip at 11:01 and preview the Coding on a Laptop footage to assess shakiness
Apply Effect
Select the clip, search for Warp in Effects panel, and double-click Warp Stabilizer to apply
Adjust Settings
In Effect Controls, change Result to No Motion for complete stabilization of severely shaky footage
Repeat Process
Apply Warp Stabilizer to One on One Help clip at 22:24 using default settings
Time Reversing Footage
Temporal manipulation represents one of video editing's most powerful creative tools, enabling editors to craft sophisticated visual narratives through speed and direction control. Strategic use of reverse motion and timing adjustments can transform jarring cuts into seamless transitions while adding professional polish to your storytelling.
Position the Timeline playhead at 14:09, marking the beginning of the classroom Pan 01 clip where we'll demonstrate advanced timing techniques.
Press Spacebar to preview the current sequence. Observe how the two clips—Classroom Pan and Instructor Teaching—create a disorienting ping-pong effect that disrupts visual flow and undermines professional presentation quality.
CTRL–click (Mac) or Right–click (Windows) on the classroom Pan 01 clip and select Speed/Duration to access temporal controls.
- Adjust Speed to 80% to create more deliberate pacing
- Verify the link between Speed and Duration remains enabled for proportional adjustments
- Enable Reverse Speed to create sophisticated directional flow
- Click OK to apply these transformative changes.
Preview this Timeline section to witness the remarkable transformation. The reversed clip now flows naturally into the subsequent footage while the reduced speed creates more contemplative pacing that better matches professional educational content standards.
Navigate the playhead to the Timeline's conclusion, positioning it over the final Instructor Teaching clip to create bookend symmetry.
CTRL–click (Mac) or Right–click (Windows) on this concluding clip and choose Speed/Duration.
Enable Reverse Speed and click OK to create a sophisticated circular narrative structure that enhances viewer engagement through subtle visual psychology.
Premiere Pro allows simultaneous speed adjustment and direction reversal. The link between Speed and Duration ensures proper timing calculations.
Reversing Classroom Pan Clip
Identify Problem
Preview timeline at 14:09 to see ping-pong effect between Classroom Pan and Instructor Teaching clips
Access Speed Controls
Right-click on Classroom Pan 01 clip and select Speed/Duration from context menu
Adjust Parameters
Set Speed to 80%, ensure Speed/Duration link is enabled, and check Reverse Speed option
Apply to Final Clip
Repeat process for last Instructor Teaching clip, enabling only Reverse Speed
Masking an Effect
Selective effect application through masking represents advanced editorial craftsmanship, allowing precise control over visual elements within individual frames. This technique proves indispensable for maintaining viewer focus, protecting sensitive information, or creating sophisticated visual emphasis—skills essential for contemporary content creation where privacy and visual hierarchy demand professional attention.
Move the Timeline playhead to 5:07, positioning at the Designing a Web Page clip where we'll demonstrate precision masking techniques.
Select the Designing a Web Page clip to prepare for targeted effect application.
In the Effects panel, search for gaus to quickly locate Adobe's industry-standard blur effect.
Double–click the Gaussian Blur effect to apply it to the selected clip, initially affecting the entire frame.
In the Effect Controls panel, fine-tune the blur parameters:
- Set Blurriness to 40 for substantial content obscuration while maintaining recognizable screen presence
- Ensure Repeat Edge Pixels remains enabled to prevent unwanted edge artifacts that could compromise professional appearance.
Within the Effect Controls panel, click the 4–point polygon mask button
 to add precision masking capability.
In the Program panel, carefully drag each of the four corner points to align precisely with the computer screen's corners, creating a perfect boundary for selective effect application.

NOTE: Achieve surgical precision by clicking the mask outline to add adjustment points where needed. Remove unnecessary points by holding Cmd (Mac) or CTRL (Windows) while clicking unwanted points—essential for maintaining clean, efficient masks.
To ensure consistent screen coverage despite camera movement, locate Mask (1) in the Effect Controls panel and click the Track Mask Forward button
 . This automated tracking maintains mask accuracy throughout camera motion—a crucial feature for dynamic footage.
Enhance the professional appearance by setting Mask Feather to 20 in the Effect Controls panel, creating natural edge transitions that eliminate harsh boundaries.
Preview this Timeline section to evaluate the tracked mask performance and ensure seamless integration throughout the clip duration.
Preserve your professional editing work by choosing File > Save or hitting Cmd–S (Mac) or CTRL–S (Windows). Regular saving protects your creative investment and maintains workflow continuity.
Creating Tracked Blur Mask
Apply Gaussian Blur
Select Designing a Web Page clip at 5:07, apply Gaussian Blur effect with 40 Blurriness and Repeat Edge Pixels enabled
Create Mask Shape
Add 4-point polygon mask in Effect Controls, then drag corner points to match computer screen corners in Program panel
Enable Tracking
Click Track Mask Forward button to make mask follow screen movement automatically
Refine Edges
Set Mask Feather to 20 for smooth edge blending and natural appearance
Click on mask outline to add new points. Remove unwanted points by holding Cmd (Mac) or Ctrl (Windows) and clicking on the point.