Before diving into image editing, you must assign color profiles to any images that lack embedded profiles. This critical step ensures accurate color representation throughout your workflow. Professional photographers and designers have two distinct approaches at their disposal: a streamlined method for high-volume work, and a preview-enabled technique that's invaluable when you need to make educated decisions about profile assignment. Understanding both methods will significantly improve your color management precision and workflow efficiency.
Technique #1: the Fast Way
- Go to File > Open.
Open Smiling Baby-no profile (should be sRGB).tif from the Color Management Seminar Files folder.
When the missing profile dialog appears, assign the sRGB profile and check convert document to working RGB as shown below. This ensures immediate conversion to your established workspace.

Click OK to proceed.
Critical insight: This image originated from a digital camera configured for sRGB output—a common default for most consumer and many professional cameras. Failing to assign the correct profile before workspace conversion can introduce color shifts that compromise your entire editing process. This step establishes the foundation for accurate color interpretation.
Your image is now properly profiled and ready for professional editing. For this demonstration, close the file without making changes.
While this fast method excels in production environments where you're confident about source profiles, the preview method below offers crucial visual feedback for uncertain situations.
Quick Profile Assignment Process
Open File Dialog
Navigate to File > Open and select the image file without an embedded profile
Assign Profile
Select the appropriate profile (sRGB for most digital cameras) in the dialog
Convert to Working RGB
Check the convert document to working RGB option before clicking OK
Images shot on digital cameras typically use sRGB. Assigning the wrong profile before converting to workspace may result in incorrect starting colors for editing.
Technique #2: Previewing the Change
- Go to File > Open.
Open Smiling Baby-no profile (should be sRGB).tif from the Color Management Seminar Files folder.
Select Leave as is and click OK as demonstrated below.
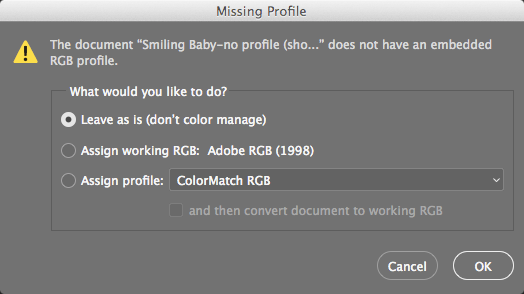
Technical explanation: By leaving the image unmanaged, no profile is assigned, forcing Photoshop to interpret the raw RGB values through your current workspace (Adobe RGB in our workflow). This creates a baseline for comparison when you assign the correct profile in the following steps.
Now you'll assign the proper profile while monitoring the precise color changes—an essential skill for handling images from unknown sources or legacy files.
Choosing 'Leave as is' means no profile is assigned, causing Photoshop to display the image using the current workspace settings rather than proper color management.
Assigning the Proper Profile so Photoshop Displays the Image Correctly
Deploy color samplers to monitor numerical color changes during profile assignment. Select the Color Sampler tool
 . If it's nested under the Eyedropper tool
  , cycle through with Shift–I until selected.
Click strategic points on the image to place color samplers—focus on skin tones, highlights, and shadow areas for comprehensive monitoring.
The Info panel opens automatically, displaying real-time values for your placed samplers. This becomes your color accuracy dashboard.
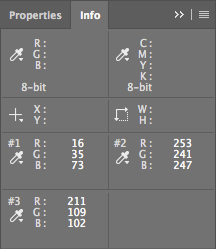
Place two or three additional samplers on distinctly different colors and record their baseline values in the Info panel. This establishes your reference points.
Navigate to Edit > Assign Profile.
Since this image originates from a digital camera using sRGB color space (standard for most digital cameras manufactured since 2000), select sRGB from the Profile menu. Hold off clicking OK—the preview functionality provides crucial visual feedback first.

Toggle the Preview checkbox repeatedly. The dramatic color shift demonstrates proper profile assignment in action—skin tones become more natural, reducing the excessive red cast that appeared when the image was misinterpreted through the Adobe RGB workspace. This visual transformation confirms that Photoshop now accurately represents how the camera's sensor captured the scene.
With Preview enabled, examine the Info panel closely.
Notice the dual number format (e.g., 63/63)—the first represents current values, the second shows post-assignment values. Crucially, these numbers remain identical because profile assignment never alters the actual image data. Instead, it provides Photoshop with the interpretive context needed for accurate monitor display. This non-destructive approach preserves original capture data while ensuring proper color interpretation.
Experiment with different profile assignments to observe how dramatically color interpretation varies. This exercise illustrates the fundamental challenge of color management: identical RGB numbers can represent vastly different colors depending on the assigned color space. Understanding this concept is essential for professional color work.
Return to the correct sRGB profile and click OK to finalize the assignment.
With proper profile assignment complete, the next phase involves converting your image into an optimal workspace for professional editing—a step that unlocks the full potential of your editing tools.
Profile Assignment with Preview
Place Color Samplers
Use the Color Sampler tool to place markers on different colored areas of the image
Access Assign Profile
Go to Edit > Assign Profile and select the appropriate profile for your image source
Preview Changes
Toggle the Preview checkbox to see color adjustments without changing actual pixel values
Assign Profile vs Convert to Profile
| Feature | Assign Profile | Convert to Profile |
|---|---|---|
| Pixel Values | No change to numbers | Changes color values permanently |
| Purpose | Tells Photoshop how to display | Transforms image to new colorspace |
| Info Panel | Same values (63/63) | Different values (63/58) |
Assigning a profile only tells Photoshop how to interpret and display existing color numbers. The actual pixel values remain unchanged, which is why Info panel shows identical before/after numbers.
Converting into a Device-Independent Workspace for Image Editing
Navigate to Edit > Convert to Profile.
Before proceeding, experiment with different destination profiles while monitoring both visual changes and the Info panel values. Toggle Preview on and off to observe how profile conversion permanently alters your image data—unlike assignment, conversion actually transforms the numerical values to match the new color space. This permanent change requires careful consideration.
For this camera-originated sRGB image, convert to a more robust editing space. While sRGB serves web design perfectly, its limited gamut restricts print production capabilities. Configure the conversion as follows:
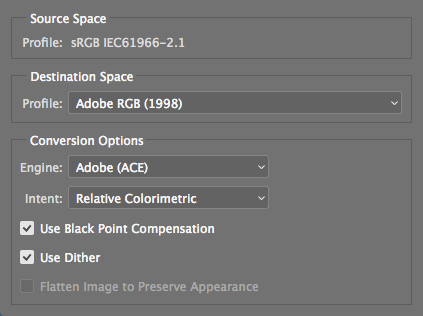
Strategic note: While Adobe RGB provides an excellent general-purpose workspace with broader gamut than sRGB, optimal workspace selection depends on your specific output requirements. Print professionals might prefer ProPhoto RGB for maximum flexibility, while web-focused workflows might retain sRGB. In 2026, many professionals adopt P3 color spaces for modern display compatibility.
Click OK to execute the conversion.
Your image now resides in a device-independent workspace, liberated from the original capture device's limitations. This expanded color gamut provides the foundation for professional-grade color adjustments, corrections, and creative enhancements.
Save your work using File > Save to preserve both the converted image data and embedded profile, then close the file to complete this workflow demonstration.
sRGB vs Adobe RGB for Editing
Converting to a profile permanently changes the color values in your image. Monitor the Info panel values during preview to understand the extent of changes before committing.
Color Management Workflow Checklist
Ensures accurate color interpretation from original capture device
Establishes proper color display without altering pixel values
Provides optimal colorspace for intended output (print vs web)
Allows precise tracking of color transformations during conversion