Topics Covered in This Photoshop Tutorial:
Opening & Editing RAW Files
Exercise Preview
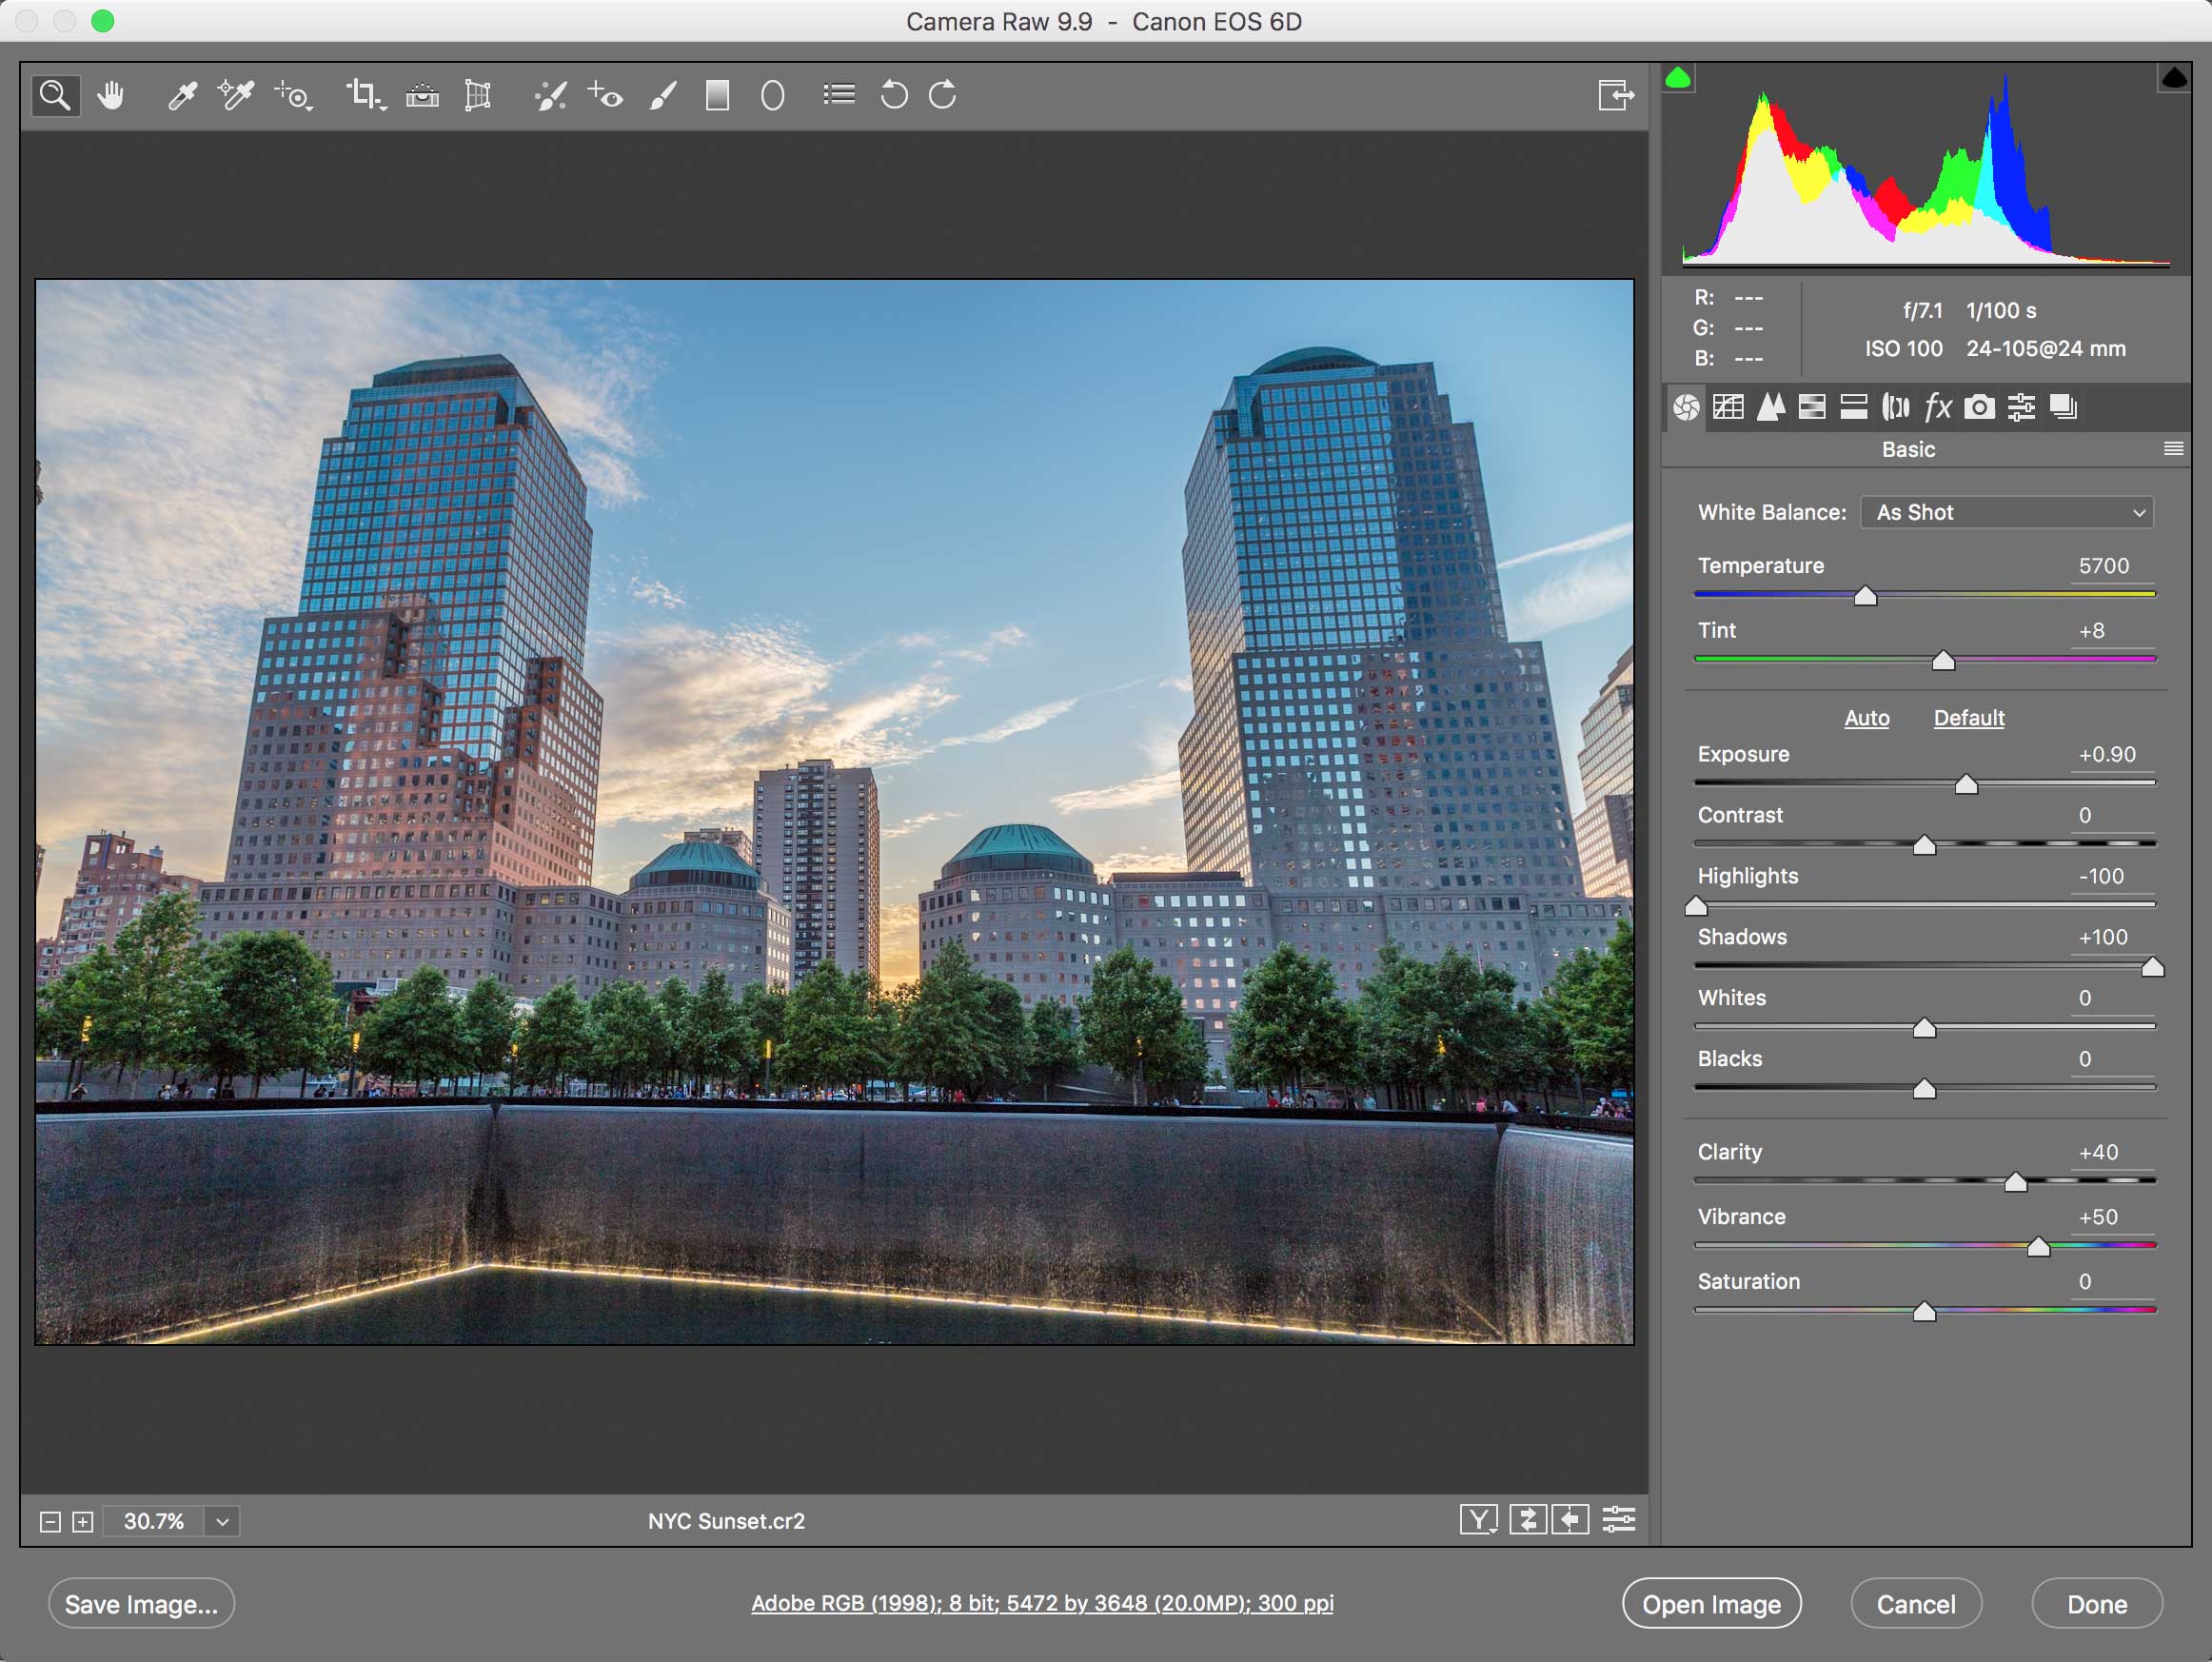
Photo Copyright © Dan Rodney, danrodney.com
Exercise Overview
Professional digital cameras offer the choice between JPEG and RAW file formats, but for serious image work, RAW is the clear winner. RAW files preserve the unprocessed sensor data exactly as captured, maintaining every bit of tonal and color information your camera recorded. JPEG files, by contrast, apply in-camera processing that permanently discards image data through compression—information you can never recover.
Think of RAW files as digital negatives: they contain pure sensor data that requires processing to become viewable images. Photoshop's Adobe Camera Raw serves as your digital darkroom, offering unprecedented control over exposure, color, and detail recovery. This workflow approach, now standard in professional photography, gives you the flexibility to correct exposure issues and artistic vision changes long after the shutter click.
RAW vs JPEG File Format Comparison
| Feature | RAW Files | JPEG Files |
|---|---|---|
| Data Retention | Contains raw sensor data | Compressed with information loss |
| Image Quality | Higher quality potential | Limited by compression |
| Processing Required | Needs Camera Raw processing | Ready to use immediately |
| File Size | Larger file sizes | Smaller, compressed files |
Opening a RAW File
Let's dive into the Camera Raw interface and see how this powerful processor transforms raw sensor data into polished images.
In Photoshop, navigate to File > Open.
Double–click NYC Sunset.cr2 to open it.
Photoshop automatically launches the Adobe Camera Raw dialog when it detects a RAW file. This initial processing stage is where you'll achieve the best results—you're working directly with the original imaging data before any destructive edits occur. Modern Camera Raw versions utilize advanced AI-powered auto-adjustments, but manual control remains essential for professional results.
NOTE: Camera manufacturers use proprietary RAW formats: .cr2/.cr3 for Canon, .nef for Nikon, .arw for Sony, and .raf for Fujifilm. Camera Raw supports virtually all current camera models, with Adobe regularly updating compatibility for new releases.
Opening RAW Files in Photoshop
Navigate to File Menu
Go to File > Open in Photoshop to access the file browser dialog
Select RAW File
Double-click your RAW file (extensions vary by manufacturer: .cr2 for Canon, .nef for Nikon)
Camera Raw Opens Automatically
Photoshop automatically launches Adobe Camera Raw dialog for processing the raw sensor data
Different camera manufacturers use unique file extensions for RAW files. Canon uses .cr2, Nikon uses .nef, and other brands have their own formats. Camera Raw supports most major formats.
Editing a RAW File
The real power of RAW processing becomes evident when working with challenging exposures. This sunset image demonstrates a fundamental principle of digital exposure: always protect your highlights during capture.
This image appears severely underexposed at first glance, but that's intentional technique. Digital sensors capture significantly more shadow detail than highlight detail—a characteristic opposite to film. Professional photographers deliberately underexpose to preserve highlight information, knowing they can recover shadows in post-processing without quality loss.
Begin your adjustment by dragging the Shadows slider to the right. Watch as hidden detail emerges from the dark areas without affecting the sky's delicate tones. Set Shadows to 100 for maximum shadow recovery.
The overall exposure still needs brightening. The Exposure slider acts as your digital aperture control, affecting the entire tonal range uniformly. Increase Exposure to 0.90 to achieve proper midtone brightness while maintaining the sunset's dramatic character.
Now address the sky's bright areas, which may appear blown out after the exposure increase. The Highlights slider specifically targets the brightest tones, allowing you to recover detail that would be impossible to restore in JPEG files.
Drag Highlights to –100, watching as cloud detail and color gradations reappear in the sky. This aggressive highlight recovery demonstrates RAW's extended dynamic range—often 2-3 stops beyond what JPEGs can capture.
NOTE: Sunset photography requires balancing drama with realism. The goal isn't maximum brightness but rather faithful representation of the scene's natural contrast.
Color saturation often appears muted in RAW files due to their unprocessed nature. Boost color intensity by setting Vibrance to 50.
NOTE: Vibrance versus Saturation represents a crucial distinction in professional color grading. Vibrance applies intelligent saturation that protects skin tones and prevents color clipping, making it ideal for general use. Saturation boosts all colors uniformly, which can create unnatural results with portraits or already-saturated subjects. In commercial work, Vibrance typically produces more believable results, while Saturation serves specific creative purposes.
The Clarity adjustment represents one of Camera Raw's most distinctive tools—a sophisticated contrast enhancement that targets midtone detail without affecting shadows and highlights. Unlike simple contrast adjustments, Clarity uses advanced algorithms to enhance local contrast around edges and textures.
Gradually increase the Clarity slider while observing the image. Notice how architectural details and cloud textures gain definition without creating harsh contrast. A setting around 40 provides excellent enhancement for this urban landscape without over-processing artifacts.
Evaluate your comprehensive adjustments with Camera Raw's preview toggle:
Press P to view the original, unprocessed RAW data.
Press P again to see your enhanced version. The transformation should be dramatic yet natural—this is the power of working with RAW's extended tonal range.
Essential RAW Editing Workflow
Adjust Shadows First
Drag Shadows slider to 100 to recover detail from dark areas, as digital cameras retain more shadow information
Set Overall Exposure
Adjust Exposure to 0.90 for overall brightness correction without losing highlight detail
Control Highlights
Set Highlights to -100 to darken overexposed areas and recover sky detail
Enhance Color Vibrancy
Increase Vibrance to 50 for natural color enhancement without oversaturation
Add Local Contrast
Apply Clarity around 40 to add punch and definition to image details
Vibrance vs Saturation
| Feature | Vibrance | Saturation |
|---|---|---|
| Color Enhancement | More subtle and natural | Can oversaturate unrealistically |
| Best Use Case | General color improvement | Specific dramatic effects |
| Skin Tone Protection | Protects skin tones better | Affects all colors equally |
Camera & Lens Specific Corrections
Modern Camera Raw includes extensive lens correction databases that automatically compensate for known optical issues. These corrections, based on precise measurements of popular camera-lens combinations, can dramatically improve image quality with minimal effort.
- Wide-angle lenses like the 24mm focal length used here commonly exhibit barrel distortion—straight lines appear curved, particularly near frame edges. Camera Raw's lens correction database contains precise correction profiles for thousands of camera-lens combinations. Click the Lens Corrections tab
 to access these automatic corrections.
 - Ensure you're working in the Profile tab for automatic corrections.
- Enable Profile Corrections and observe the subtle but important straightening of architectural lines. Camera Raw reads EXIF metadata embedded in your RAW file—including camera model, lens type, focal length, and aperture—then applies mathematically precise corrections based on Adobe's extensive lens testing. This database, continuously updated since 2005, now covers virtually every professional camera-lens combination available through 2026.
- Examine the correction's effectiveness by focusing on the building detail. Select the Zoom tool
 from the toolbar if not already active.
 - Click multiple times on the partially visible building on the right side to achieve approximately 300% magnification (visible in the bottom-left corner). This magnification level reveals optical imperfections invisible at normal viewing sizes.
- At this magnification, chromatic aberration becomes apparent—colored fringing (typically green and magenta) along high-contrast edges. This optical phenomenon occurs because lenses focus different wavelengths of light at slightly different points, creating color separation visible as edge fringing. Wide-angle lenses and older lens designs are particularly susceptible to this issue.
- Activate Remove Chromatic Aberration and watch the color fringing disappear. Camera Raw analyzes edge contrast and automatically removes color shifts using sophisticated algorithms that preserve edge detail while eliminating unwanted color artifacts.
Applying Lens Corrections
Access Lens Corrections Tab
Click the Lens Corrections tab above the adjustment settings panel
Enable Profile Corrections
Check 'Enable Profile Corrections' to automatically correct lens distortion using Camera Raw's lens database
Zoom to Check Details
Use Zoom tool to examine image at 300% magnification for chromatic aberrations on edges
Remove Chromatic Aberration
Check 'Remove Chromatic Aberration' to eliminate green and magenta color fringing
Camera Raw automatically reads camera and lens information from RAW file metadata and applies the correct distortion profile from its extensive database of popular cameras and lenses.
Camera Raw Workflow Options
Before completing your RAW processing, establish proper workflow settings that match your intended output. These technical specifications ensure optimal quality for your final deliverable.
Camera Raw's workflow options control how your processed image data transfers to Photoshop or exports as a final file. Click the workflow options link at the bottom of the window—typically displaying something like Adobe RGB (1998); 8-bit; 5472 × 3648 (20MP); 300ppi.
Configure these settings based on your project's final destination:
- Print Production:
Color Space: Adobe RGB (wider gamut captures more printable colors)
Resolution: 300 pixels/inch (industry standard for quality reproduction) - Digital/Web Distribution:
Color Space: sRGB (universal web standard, consistent display across devices)
Resolution: 72 pixels/inch (sufficient for screen display, smaller file sizes)
Professional tip: When uncertain about final usage, choose Adobe RGB and 300 PPI—you can always downsample later, but upsampling reduces quality.
- Print Production:
Click OK to confirm your workflow settings.
Complete your Camera Raw session with the appropriate action:
Click Open Image to transfer your processed file into Photoshop's main workspace for additional retouching, compositing, or advanced adjustments.
Click Done to save your Camera Raw adjustments without opening in Photoshop—ideal when processing multiple images or when your RAW adjustments achieve the desired result.
Regardless of your choice, Camera Raw saves all adjustments in a companion metadata file (yourfilename.xmp) alongside your original RAW file (yourfilename.cr2). This sidecar file preserves your complete adjustment history, allowing you to reopen and modify your processing decisions indefinitely. These .xmp files are essential—deleting them permanently loses all your Camera Raw work, forcing you to start from scratch.
Output Settings for Different Uses
| Feature | Print Output | Web Output |
|---|---|---|
| Color Space | Adobe RGB | sRGB |
| Resolution | 300 pixels/inch | 72 pixels/inch |
| Purpose | High quality printing | Screen display optimization |
Finishing Options
Open Image
Continue editing in Photoshop with full layer capabilities and additional tools for complex adjustments.
Done
Save Camera Raw edits to XMP metadata file without opening in Photoshop for basic processing workflow.
Camera Raw & Non-Destructive Changes
Camera Raw operates on a fundamentally non-destructive workflow principle—your original RAW file remains completely unchanged regardless of how extensively you process it. All adjustments exist as mathematical instructions stored in the companion .xmp metadata file, not as altered pixel data. This approach offers unlimited creative flexibility and technical advantages impossible with traditional pixel-based editing.
This non-destructive architecture means you can return to any RAW file months or years later, applying new techniques or correcting previous decisions without any quality degradation. Unlike repeated JPEG editing, which compounds quality loss with each save cycle, RAW processing maintains perfect image fidelity through unlimited revision cycles—essential for professional workflows where client requirements evolve or technical standards improve.
When you need to reset your adjustments completely, access the panel menu  in the Camera Raw interface and select Reset Camera Raw Defaults. This instantly returns the image to its original, unprocessed state while preserving the RAW file's integrity. This safety net encourages experimentation and creative risk-taking—hallmarks of professional image development.
Camera Raw saves all edits in separate .xmp files alongside your original RAW files. Never delete these files as they contain all your adjustment data and allow you to reopen images with previous edits intact.
Non-Destructive Editing Benefits
Non-Destructive Workflow Best Practices
These contain all your editing adjustments and must stay together
No risk of damaging original image data during adjustment process
Easily return to original state through panel menu options
Complete workflow preservation requires both file types