Blending modes in Photoshop represent one of the most powerful yet underutilized features in digital image editing. They control how pixels on one layer interact mathematically with the pixels on layers beneath, creating sophisticated visual effects that would be nearly impossible to achieve through traditional editing alone. The base layer serves as your foundation, while the blend layer — positioned above — determines the final composite result through complex algorithmic calculations.
What Are Blending Modes?
At their core, blending modes are mathematical formulas that determine how pixel values combine between layers. What makes them particularly valuable for professional workflows is their non-destructive nature — you can experiment freely, adjust intensity through opacity controls, or revert to Normal mode without permanently altering your original image data. This flexibility extends beyond simple layer interactions; adjustment layers, painting tools, and specialized filters all leverage blending mode technology, though layer-based blending remains the most commonly used application in professional retouching and compositing work.
Understanding blending modes transforms you from someone who randomly clicks through options to a deliberate artist who can predict and control outcomes. The mathematics behind each mode follows logical patterns, making them reliable tools for consistent results across projects.
Blending modes can always be adjusted or changed back to Normal mode at any time. The intensity of effects can be controlled by adjusting layer opacity.
How to Apply a Blending Mode in Photoshop
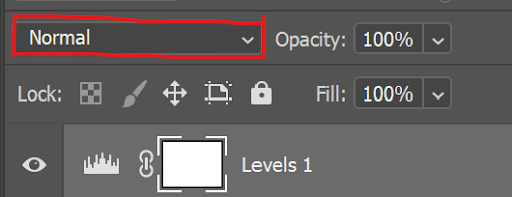
Accessing blending modes efficiently is crucial for maintaining creative momentum during intensive editing sessions. The blending mode dropdown appears at the top-left of the Layers panel, typically displaying "Normal" as the default state. However, the real power lies in keyboard navigation.
With any layer selected, use Shift + (plus) and Shift - (minus) to cycle through blending modes sequentially. This workflow allows you to preview effects in real-time without interrupting your creative process — a technique favored by professionals who need to evaluate multiple options quickly during client presentations or deadline-driven projects.
Pro tip: Many experienced retouchers create mental shortcuts by remembering that the most useful blending modes cluster in the first three categories, allowing them to focus their experimentation where results are most likely to be immediately usable.
Quick Blending Mode Application
Locate Layers Panel
Find the blending mode dropdown at the top left of the Layers panel, typically showing 'Normal'
Use Keyboard Shortcuts
With a layer selected, press Shift + or Shift - to quickly cycle through different blend modes
Understanding Blending Modes
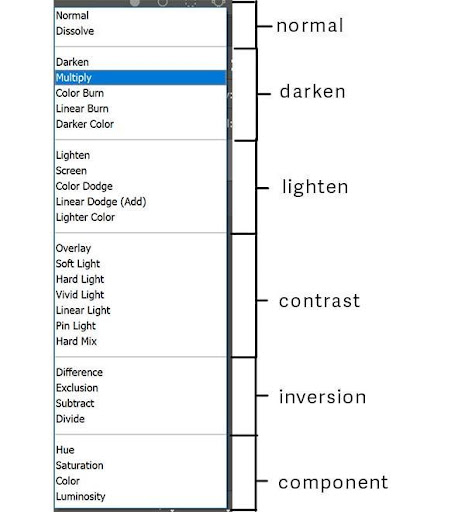
Rather than memorizing all 27+ blending modes available in modern Photoshop versions, successful professionals focus on understanding the six fundamental categories. These groups follow predictable behavioral patterns, making it easier to select the right starting point for any creative challenge.
Adobe organizes blending modes into six distinct sections, separated by subtle divider lines in the dropdown menu. Each category serves specific purposes: Normal, Darken, Lighten, Contrast, Inversion, and Component modes. Mastering one mode from each category provides you with a comprehensive toolkit for most professional scenarios.
Here's how each category functions in professional practice:
- Normal Blending Mode displays your layer at full opacity without mathematical interaction — your baseline for all comparisons.
- Darken Blending Modes emphasize darker pixels while rendering white completely transparent — ideal for adding shadows, vintage effects, or removing white backgrounds from scanned artwork.
- Lighten Blending Modes prioritize lighter pixels while making black transparent — perfect for adding light effects, lens flares, or integrating bright elements like stars or snow.
- Contrast Blending Modes treat 50% gray as neutral (transparent) while intensifying both highlights and shadows — essential for adding texture, enhancing details, or creating dramatic lighting effects.
- Inversion Blending Modes create complementary relationships between layer pixels — useful for color correction, special effects, or creating high-contrast artistic treatments.
- Component Blending Modes isolate specific color properties (hue, saturation, luminosity) — indispensable for precise color grading, selective color replacement, or maintaining luminance while adjusting chrominance.
To demonstrate these principles in action, let's examine four industry-standard blending modes that form the foundation of most professional workflows:
- Multiply: The go-to darken mode for natural shadow integration
- Screen: The primary lighten mode for seamless highlight addition
- Overlay: The most versatile contrast mode for texture and detail enhancement
- Color: The precision component mode for selective color replacement
Six Blending Mode Categories
Normal
Shows your layer as it currently is without any blending effect applied.
Darken
Darkens dark pixels and makes white pixels transparent for shadow effects.
Lighten
Lightens light pixels while making blacks transparent for highlight effects.
Advanced Blending Categories
Contrast
Makes 50% grey transparent while enhancing lighter and darker pixels for dramatic effects.
Inversion
Makes pixels in blend and base layers become opposite of each other.
Component
Uses hue, saturation, and luminosity to create sophisticated color blending effects.
The Multiply Blend Mode
Multiply remains the most frequently used blending mode in professional retouching because it mimics how light naturally behaves in the physical world. When light passes through multiple filters, it becomes progressively darker — exactly what Multiply achieves mathematically. This mode multiplies the color values of your blend layer with the base layer, always producing results darker than either original layer.

In this example, the compass overlay was applied using Multiply mode, instantly removing its white background while preserving all detail and natural shadow integration. This technique proves invaluable for incorporating scanned artwork, logos with white backgrounds, or any element where you need to eliminate bright areas while maintaining darker details. The resulting composite maintains photographic realism because Multiply respects the underlying image's luminosity structure.
Professional applications include adding realistic shadows, integrating vintage textures, or combining multiple exposures for HDR-style effects without the computational overhead of true HDR processing.
Multiply uses dark pixels to darken the underlying layer while making white backgrounds completely transparent, perfect for adding elements with white backgrounds.
When to Use Multiply
White becomes transparent automatically
Darkens existing tones naturally
Adds depth without losing detail
The Screen Blend Mode
Screen functions as Multiply's mathematical inverse, making it essential for adding light-based effects that integrate naturally with existing imagery. Screen mode inverts both layers, multiplies them together, then inverts the result — effectively lightening the composite while making black pixels completely transparent.
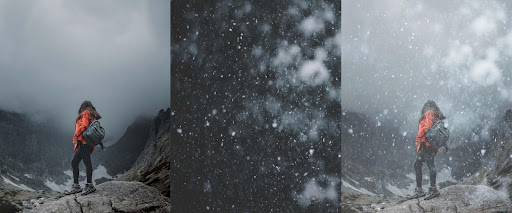
Here, Screen mode transforms a simple snow texture into convincing atmospheric precipitation by eliminating the dark background while preserving the bright snow particles. The resulting integration appears natural because Screen respects the existing lighting conditions in the base image, brightening areas where snow would logically catch and reflect light.
When Screen effects appear too intense — a common occurrence with high-contrast source materials — reducing the blend layer's opacity provides precise control over the effect's intensity. This approach maintains the natural interaction while scaling back the visual impact to suit your creative vision.
Screen is the opposite of Multiply, using light pixels to lighten the underlying layer while making black pixels transparent.
Screen Mode Applications
Dark backgrounds disappear naturally
Brightens existing light areas
Maintains luminosity while adding detail
The Overlay Blend Mode
Overlay represents a sophisticated hybrid approach that combines Screen and Multiply behaviors based on the underlying image's luminosity values. This intelligent switching creates natural-looking contrast enhancement that amplifies existing image characteristics rather than overwhelming them. Overlay brightens pixels lighter than 50% gray while darkening those below this threshold, with 50% gray itself becoming completely transparent.

This texture overlay demonstrates Overlay's ability to add surface complexity without destroying underlying image detail. Set to 70% opacity, the texture integrates selectively — enhancing the image's existing contrast structure while adding tactile quality. The water's reflective surfaces become more pronounced, while shadow areas gain depth and character.
Overlay excels in scenarios requiring subtle enhancement: adding film grain for cinematic quality, integrating paper textures for vintage aesthetics, or enhancing architectural details without creating obvious compositing artifacts. Its mathematical approach ensures that enhancements feel organic rather than applied.
Overlay is a combination of both the Screen and Multiply blending modesOverlay Mode Process
Add Texture Layer
Place your texture or overlay image above the base photograph
Apply Overlay Mode
Change blending mode to Overlay to combine light and dark elements
Adjust Opacity
Reduce to 70% or lower for more subtle, professional effects
The Color Blend Mode
Color mode provides surgical precision for color replacement workflows by affecting only the hue and saturation components while preserving the base layer's luminosity information. This separation of color and brightness data makes Color mode indispensable for product photography, automotive retouching, and any scenario requiring accurate color matching while maintaining photographic realism.

The automotive color change shown here illustrates Color mode's professional capabilities. By preserving the original photograph's lighting information — including reflections, shadows, and surface modeling — the yellow replacement appears completely natural. The paint's metallic properties, environmental reflections, and three-dimensional form all remain intact because Color mode only affects chromatic information.
This technique scales from simple product variants for e-commerce catalogs to complex automotive advertising where multiple color options must be generated from a single hero shoot. The key lies in proper selection techniques and understanding how different surface materials respond to color replacement — knowledge that separates amateur attempts from professional-grade results.
Color blending mode affects only the color of a layer while preserving the luminosity and saturation of the base layer, maintaining realistic lighting.
Color Mode vs Other Methods
| Feature | Color Blend Mode | Direct Color Fill |
|---|---|---|
| Preserves Shadows | Yes | No |
| Maintains Highlights | Yes | No |
| Realistic Results | High | Low |
| Ease of Use | Simple | Complex |