Topics Covered in This Lightroom Tutorial:
Importing Photos, Adding Metadata, Renaming Photos
Exercise Preview
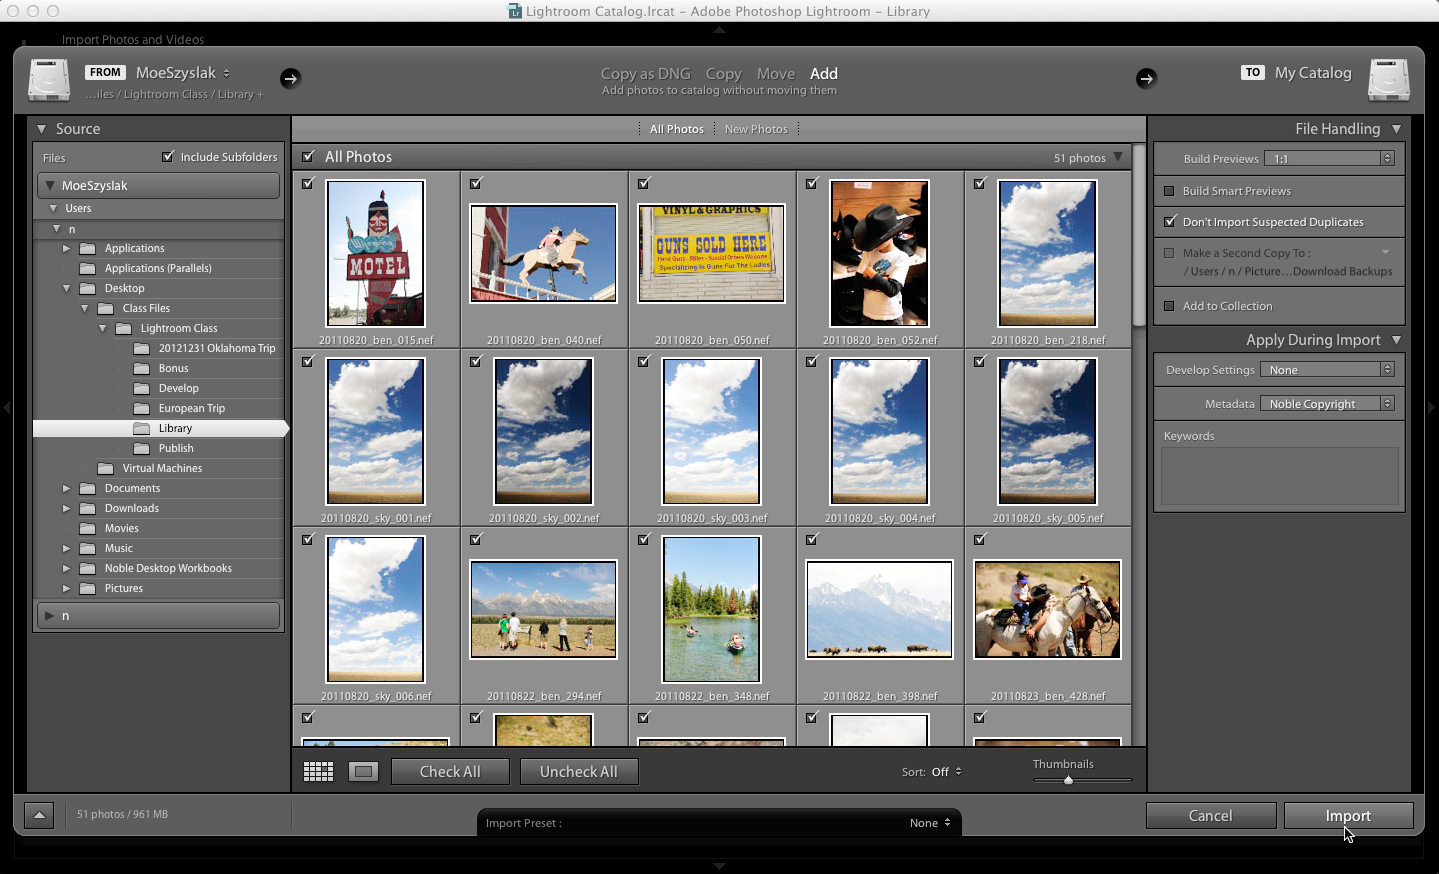
Exercise Overview
In this comprehensive exercise, you'll master the foundational skills of Lightroom's Library module—the command center for your entire photography workflow. You'll learn to efficiently import photos while simultaneously embedding essential metadata such as copyright information, establishing professional practices that protect your intellectual property from day one. These skills form the bedrock of any serious photographer's digital asset management strategy.
The Library module is your central hub for photo management in Lightroom. It's where you'll organize, view, and manage your entire catalog of images before moving to development.
Importing Photos
We've prepared a curated folder of sample images that mirror real-world shooting scenarios. This hands-on approach ensures you'll understand not just the mechanics, but the strategic thinking behind each import decision. Let's begin by bringing these images into your Lightroom catalog using industry best practices.
Launch Lightroom Classic. Note that this tutorial focuses on Lightroom Classic, the desktop application preferred by professional photographers for its comprehensive organizational and editing capabilities.
At the top right of the screen, if the Library tab isn't highlighted, click on it to switch to the Library module.
Think of this workspace as your digital darkroom's organizational hub—where you'll spend considerable time sorting, rating, and preparing images for editing. Mastering the Library module is crucial for maintaining an efficient workflow as your catalog grows to thousands of images.
At the bottom of the left panel, click Import. This launches Lightroom's import dialog, one of the most critical interfaces you'll use as a photographer.
At the top left of the window that opens, under Source, expand the folder with the same name as your computer, then navigate to Desktop > Class Files > Lightroom Class > Library.
- The import behavior options are located at the top middle of the screen. Understanding these four fundamental options is essential for maintaining organized file structures:
- Copy as DNG: Converts photos to Adobe's open-source DNG format while copying to a new location. This option future-proofs your files and can reduce file sizes, though it requires additional processing time.
- Copy: Creates duplicates in a new location while preserving original file formats. Ideal when consolidating files from multiple memory cards or external drives.
- Move: Relocates photos to a new destination. Use this when reorganizing existing archives or consolidating scattered files.
- Add: References photos in their current location without moving or copying. Perfect for files already organized in your preferred folder structure.
Select Add. This option adds photos to your catalog while maintaining your existing folder organization—a non-destructive approach that respects your current file management system.

On the right side of the window, locate the additional option panels. These settings significantly impact import speed and workflow efficiency. Click on File Handling and Apply During Import to reveal all available options.
- In the File Handling panel, configure these performance-critical settings:
- From the Build Previews menu, choose 1:1. This creates full-resolution previews during import, eliminating lag when zooming to 100% later—essential for critical focus checking.
- If Build Smart Previews is checked, uncheck it for now. Smart Previews enable editing when original files are offline, but they increase import time and storage requirements.
- Check Don't Import Suspected Duplicates. This intelligent feature prevents accidental duplicate imports, keeping your catalog clean and efficient.
Under Apply During Import, from the Develop Settings menu, choose None. Starting with neutral settings gives you complete creative control over each image's processing.
Now that we've configured the technical aspects of import, let's address the crucial business side of photography: metadata and copyright protection.
Import Options Comparison
| Feature | Method | File Location | Best For |
|---|---|---|---|
| Copy as DNG | Converts and moves files | New location | Long-term archival |
| Copy | Duplicates files | New location | Backup workflows |
| Move | Relocates files | New location | Storage reorganization |
| Add | References only | Current location | Quick catalog addition |
Import Configuration Steps
Navigate to Source Folder
Locate Desktop > Class Files > Lightroom Class > Library to access the prepared image folder.
Select Add Method
Choose Add to reference files in their current location without moving or copying them.
Configure Preview Settings
Set Build Previews to 1:1 and uncheck Build Smart Previews for this exercise.
Enable Duplicate Protection
Check Don't Import Suspected Duplicates to avoid importing the same image multiple times.
Adding Metadata
Metadata is your first line of defense against image theft and unauthorized usage. By embedding copyright information during import, you're establishing legal protection and professional credibility. This practice has become increasingly important in our digital-first world where images can be shared globally within seconds.
Under Apply During Import, from the Metadata menu, choose New.
The New Metadata Preset window opens, revealing fields that transform your images from simple files into protected intellectual property. This metadata travels with your images across platforms and can be read by stock agencies, clients, and legal professionals.
- Configure your professional metadata template with these essential fields:
- Preset Name: YourName Copyright
- Under IPTC Copyright, next to Copyright type Opt–G (Mac) or hold down the ALT key and on the numeric keypad type 0169 (Windows) to insert a copyright symbol ( © ), followed by YourName and 2026.
- From the Copyright Status menu, choose Copyrighted. This explicit declaration strengthens your legal position in infringement cases.
- Under Rights Usage Terms, type: No use without photographer's written permission. This clear statement prevents unauthorized usage and establishes licensing requirements.
- Under IPTC Creator, next to Creator type YourName.
- Complete your professional contact information under Creator City, Creator Country, Creator Phone, Creator E-Mail, and Creator Website. This enables potential clients to reach you directly when they discover your work.
Click Create to save this valuable template. You'll use this preset for all future imports, ensuring consistent copyright protection across your entire portfolio.
In the Metadata menu, verify that YourName Copyright is selected. This confirms your copyright information will be embedded in every imported image.
Click the Import button on the lower right to begin the import process. Lightroom will now process each image, building previews and embedding your metadata—establishing your professional workflow foundation.
With your images safely imported and protected, let's implement a systematic naming convention that supports long-term organization and professional presentation.
Metadata Preset Configuration
Use Opt-G on Mac or Alt-0169 on Windows numeric keypad
Legally protects your images and establishes ownership
Include 'No use without photographer's written permission'
Fill in city, country, phone, email, and website fields
Name it clearly for easy identification in future sessions
Adding metadata during import saves time and ensures consistent copyright protection across all your images. This information becomes embedded in the file and travels with your photos.
Renaming Photos
Professional file naming isn't just about organization—it's about creating a sustainable system that scales with your business growth. A well-designed naming convention enables quick file location, prevents confusion during client delivery, and projects professionalism in every interaction.
Expand the Catalog panel on the left if it's not already visible. This panel provides access to your entire image collection, regardless of folder structure.
Click on All Photographs to display your complete catalog. This view ensures you're working with all imported images simultaneously.
Go to Edit > Select All or press Cmd–A (Mac) or Ctrl–A (Windows) to select all photos. Batch renaming saves considerable time compared to individual file handling.
Navigate to Library > Rename Photos to access Lightroom's powerful batch renaming tools.
From the File Naming menu, choose Edit to open the Filename Template Editor—your gateway to creating sophisticated naming conventions.
From the Preset menu, choose Custom Name—Sequence to see how templates combine multiple elements.
This preset demonstrates the power of systematic naming: Custom Text followed by a dash (–) and a Sequence Number. You can adapt this concept or create entirely custom templates that match your specific workflow needs.
In the text box, select and delete all existing text. We'll build a more comprehensive template from scratch.
- In the Sequence and Date section, add the shoot date:
- If the Date menu (second dropdown) shows Date (YYYYMMDD), click Insert to add this field to your template.
- If not, select Date (YYYYMMDD) from the menu. This format ensures chronological file sorting across all operating systems.
In the text box, type an underscore (_) after the date field. Underscores create clean, professional separations without the spacing issues that plague other characters.
In the Custom section at the bottom, click Insert next to Custom Text. This field enables project-specific identification or client names.
Add another underscore (_) after the custom text field to maintain consistent formatting throughout your filename structure.
- Complete your template with sequence numbering:
- If the Sequence menu displays Sequence # (001), click Insert to add this field.
- Otherwise, select Sequence # (001) from the menu. Three-digit numbering accommodates shoots with hundreds of images while maintaining alphabetical order.
From the Preset menu at the top, choose Save Current Settings as New Preset to preserve your custom template for future projects.
Name your preset YourName Template—creating a reusable tool that ensures consistency across all your photography work.
Click Create to save this valuable workflow asset.
Click Done to return to the rename dialog with your custom template active.
In the Rename Photos window, specify the variable elements of your naming convention:
Custom Text: YourName Start Number: 1 Click OK to execute the batch rename operation. Lightroom will systematically rename all selected photos according to your professional template.
Click on any photo to see the transformation in action.
In the toolbar at the bottom of the screen, observe your newly renamed file following the format you specified. This consistent, professional naming convention will serve you throughout your photography career, making file management effortless and client deliveries polished.
Custom Filename Template Creation
Select All Photos
Use Cmd-A (Mac) or Ctrl-A (Windows) to select all imported photos in the All Photographs view.
Access Rename Function
Navigate to Library > Rename Photos to open the renaming interface.
Build Custom Template
Create a template using Date (YYYYMMDD), Custom Text, and Sequence # with underscores as separators.
Save Template Preset
Save your custom template for future use with a descriptive name for easy identification.
The Date_CustomText_Sequence format ensures chronological sorting, easy identification, and prevents filename conflicts when organizing large photo collections.