Topics Covered in This Lightroom Tutorial:
Mapping Photos with Embedded GPS, Mapping Photos Without Embedded GPS, Creating & Saving Locations
Exercise Preview
Exercise Overview
In this exercise, you'll master one of Lightroom's most powerful organizational features: the Map Module. This tool transforms scattered photos into a comprehensive visual journey, allowing you to organize your work geographically and tell compelling location-based stories. Whether you're managing travel photography, documenting real estate properties, or organizing event photography across multiple venues, the Map Module provides professional-grade location management that can dramatically improve your workflow efficiency.
This exercise requires completion of previous exercises 1A through 1E. Ensure you have the Library folder properly configured and access to internet connectivity for map functionality.
Mapping Photos with Embedded GPS
Modern smartphones and many cameras automatically embed GPS coordinates into image metadata, creating an invisible foundation for location-based organization. Let's leverage this data to create your first mapped photo collection.
If you have not completed the previous exercises (1A–1E), do them before proceeding with this exercise.
In the Folders panel on the left, select the Library folder.
Photos captured with smartphones, including iPhones, and most modern cameras automatically record GPS coordinates during capture. This metadata becomes invaluable for professional organization and client delivery. The GPS icon
 appears in the bottom right corner of thumbnails containing GPS coordinates, serving as your visual indicator for location-tagged images.
Scroll to the bottom of the Library to locate photos containing GPS coordinates. These images will display the distinctive GPS icon
in the bottom right corner of each thumbnail.Select the totem pole photo (20121227_YourName_050).
Navigate to the Metadata panel in the right sidebar (you may need to scroll down to locate it). Expand the Metadata panel if it's currently collapsed to access the complete range of embedded information.
Scroll to the bottom of the Metadata panel and locate the GPS section. Here you'll find the precise coordinates recorded by the camera or device at the moment of capture—valuable data for professional documentation and asset management.
Click the arrow
 adjacent to the GPS coordinates to instantly switch to the Map module and visualize the exact capture location. Note: This feature requires an active internet connection for map rendering. Windows users may occasionally encounter display issues; if the map fails to load despite internet connectivity, restart Lightroom and repeat the process.
The yellow pin marks the precise capture location—in this example, Oklahoma. Hover over the pin to preview associated photographs, then use the left/right navigation arrows to browse through all images captured at this location. This feature proves invaluable for client presentations and location scouting documentation.
Below the map interface, you'll find a zoom slider flanked by minus and plus buttons for manual zoom control. However, there's a more efficient method for precision navigation.
Hold Option (Mac) or Alt (Windows) and drag to create a selection box around the yellow pin. This gesture-based zoom provides faster, more intuitive navigation than traditional controls—particularly useful during client reviews or detailed location analysis.
From the Map Style menu located left of the zoom slider, select Satellite to switch to high-resolution aerial imagery. Experiment with different map styles to find the most appropriate view for your specific workflow needs—road maps for navigation context, satellite imagery for terrain analysis, or hybrid views for comprehensive location understanding.
Locating GPS-Enabled Photos
Identify GPS Photos
Look for the GPS icon in the bottom right corner of photos. iPhone and most mobile device photos automatically include GPS coordinates when location services are enabled.
Access Metadata Panel
Select a GPS-enabled photo and locate the Metadata panel in the right side panels. Expand if necessary to view the GPS coordinates box.
Navigate to Map Module
Click the arrow next to GPS coordinates to automatically switch to Map module and display the location on Google Maps.
The map feature can be buggy on Windows systems. If the map doesn't load despite internet connectivity, close and restart Lightroom before repeating the process.
Mapping Photos Without Embedded GPS
Not all valuable images contain GPS metadata—particularly those from older cameras, studio work, or situations where location services were disabled. Lightroom's manual mapping capabilities allow you to retroactively organize these images geographically, maintaining comprehensive location-based workflows regardless of original metadata limitations.
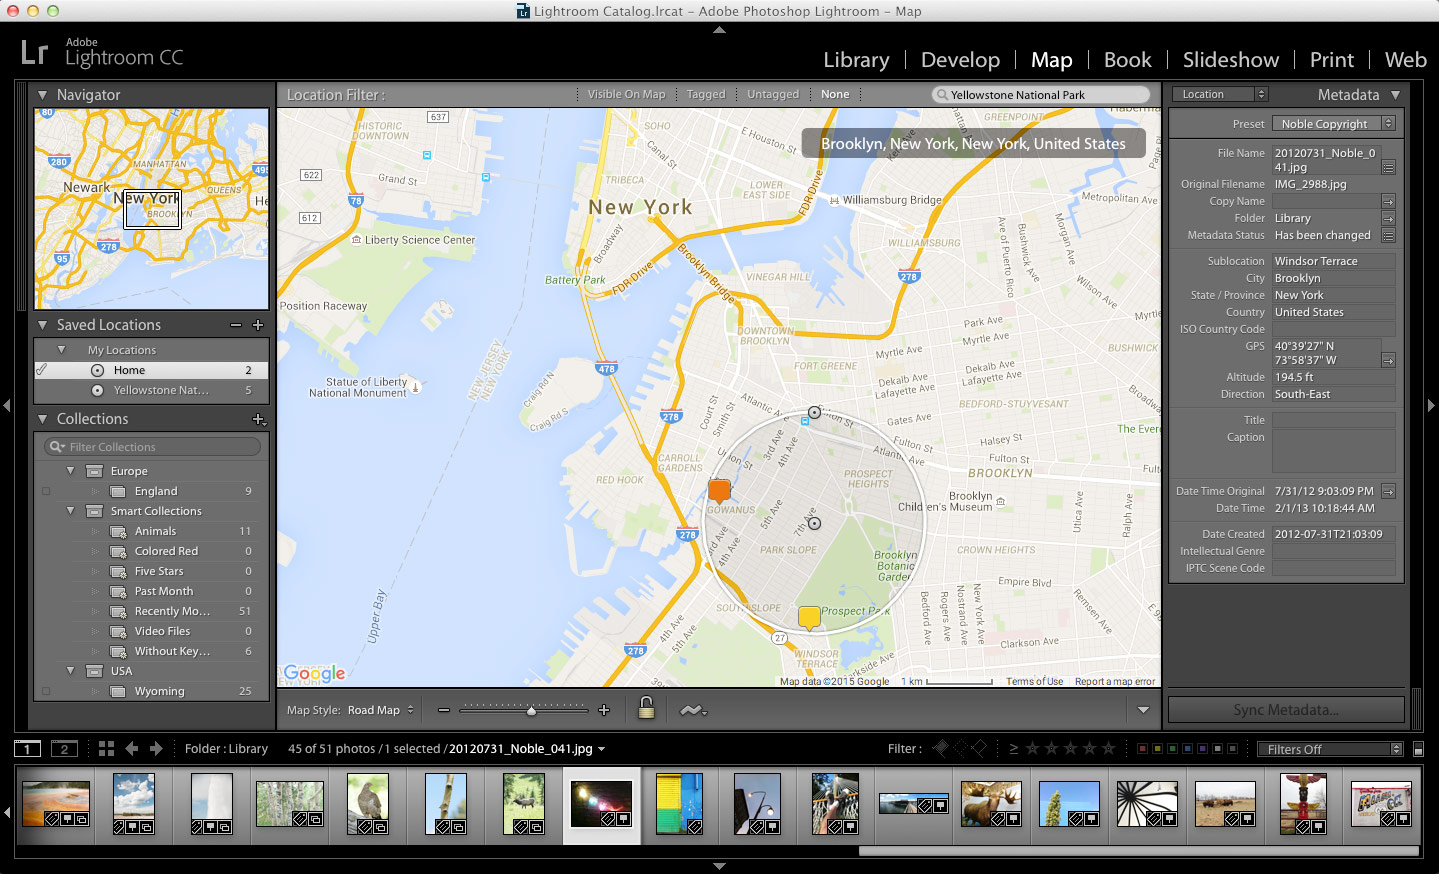
In the search bar at the top right of the map interface, type Yellowstone National Park.
Press Return (Mac) or Enter (Windows) to execute the search query.
Lightroom automatically places a yellow location pin at Yellowstone National Park's general coordinates, providing your target destination for manual photo assignment.
Access the Filmstrip panel at the bottom of your screen to select photos for location assignment. If the Filmstrip isn't visible, navigate to Window > Panels > Show Filmstrip to enable this essential navigation tool.
Hover your cursor over thumbnails in the Filmstrip to display image names at the top of the panel—crucial for identifying specific images in large collections.
Locate and click the first Yellowstone photo (20110827_YourName_032, positioned after the moose image) to select it.
To select the complete Yellowstone series, Shift-click on the final image showing Old Faithful's eruption (20110827_YourName_036). This action selects all five consecutive Yellowstone photographs.
Verify that exactly five images are selected before proceeding to the next step.
Drag the selected photos from the Filmstrip directly onto the yellow pin on the map. Ensure you begin dragging from an actual thumbnail, not the surrounding gray space, to properly execute the assignment.
If prompted to Enable address lookup, click Enable. This feature enhances location data with readable addresses, improving searchability and client presentation quality.
A new pin appears displaying the number "5," indicating five photographs are now associated with this location. Hover over the pin to preview assigned images—this visual confirmation system ensures accurate location assignments in complex projects.
In the Search Bar, enter Alfriston, UK to establish another location marker.
Press Return (Mac) or Enter (Windows) to initiate the search.
In the Filmstrip, locate and select the first church photograph (20090503_YourName_006).
Hold Command (Mac) or Ctrl (Windows) and click the remaining church images (20090503_YourName_007 and 20090503_YourName_008) to create a non-consecutive selection of related photographs.
Drag the selected church photographs onto the Alfriston pin, maintaining the same careful dragging technique from image thumbnails rather than empty space.
Zoom out to display a world map view showcasing all location pins where your photographs have been assigned. This global perspective provides immediate visual confirmation of your collection's geographic scope.
Click and hover over each pin to review assigned photographs and verify accurate location assignments. This organizational system transforms scattered images into a coherent geographic narrative—invaluable for travel documentation, client presentations, and portfolio organization.
Manual GPS Assignment Workflow
Search Location
Use the search bar at top right of map to enter location names like 'Yellowstone National Park' and press Enter to drop a yellow pin.
Select Multiple Photos
In the Filmstrip panel, click first photo then Shift-click last photo to select a range, or Cmd/Ctrl-click for individual selections.
Drag to Map Pin
Drag selected photos from the Filmstrip onto the yellow pin location. The pin will display the number of attached photos.
Photos Mapped by Location
Creating & Saving Locations
Custom location presets streamline repetitive mapping tasks and ensure consistency across projects. This professional feature proves essential for photographers who frequently work in specific locations or need to maintain standardized geographic references for client work.
Enter New York, NY in the search bar at the top right of the map interface.
Press Return (Mac) or Enter (Windows) to navigate to the location.
Select Road Map from the Map Style menu in the bottom left to optimize street-level navigation and location precision.
Zoom in until street names become clearly visible, providing the detail necessary for precise location definition.
Pan the map to position Manhattan on the far left side of your view, creating optimal framing for location preset creation.
In the Saved Locations panel, click the Create New Preset icon
 to begin defining a custom location.
- Configure the New Location parameters:
- Enter Home for the Location Name.
- Select My Locations from the Folder dropdown for organized preset management.
- Set the Radius to 1.0 using either the slider or direct text input for precise geographic boundaries.
- Click Create to finalize the location preset.
A semi-transparent circle now overlays the map, featuring two control points: a center dot for position adjustment and an edge dot for radius modification. This visual system provides intuitive location boundary management.
Drag the center dot to position the location circle over your actual home address (or select an aspirational NYC neighborhood if you're not a local resident).
Adjust the location boundaries by dragging the edge dot to expand or contract the coverage area based on your specific geographic requirements.
Return to Yellowstone National Park using the search bar functionality.
Press Return (Mac) or Enter (Windows) to navigate to Yellowstone.
Click the Create New Preset icon
in the Saved Locations panel to create another location preset.- Define the Yellowstone location parameters:
- Enter Yellowstone National Park as the Location Name.
- Choose My Locations from the Folder menu for consistent organization.
- Set the Radius to 33.0 to encompass the park's expansive boundaries.
- Click Create to save the location preset.
The Saved Locations panel now displays both custom locations within the My Locations folder, creating a reusable library of important geographic references for future projects.
Test the navigation functionality by hovering over the Home location and clicking the arrow
 to instantly jump to that saved location on the map.
Press G to return to the Library module and explore the filtering capabilities enabled by your location work.
Click Metadata in the Library Filter bar at the top of the Library interface to access advanced filtering options.
Hover over the first column header to reveal the dropdown menu, as illustrated below:
Select Map Location from the dropdown to enable location-based photo filtering—a powerful tool for quickly isolating images from specific geographic areas.
Click Yellowstone National Park to instantly display all photographs associated with that location, demonstrating the efficiency of your geographic organization system.
Click the GPS icon
on any filtered photograph to instantly navigate to its location on the Map module. This seamless integration between Library and Map modules creates a fluid, professional workflow that enhances both organization efficiency and client presentation capabilities.
Custom Location Creation Process
Search and Position
Search for your desired location using the search bar, then navigate and zoom to the specific area you want to save.
Create New Preset
Click the Create New Preset icon in Saved Locations panel. Name your location and assign it to the My Locations folder.
Adjust Radius
Set the radius size - use 1.0 for precise locations like homes, or 33.0 for large areas like national parks.
Fine-tune Boundaries
Drag the center dot to reposition and the edge dot to resize the transparent circle representing your location boundary.
Radius Settings for Different Location Types
| Feature | Small Radius (1.0) | Large Radius (33.0) |
|---|---|---|
| Best Use Case | Specific addresses, homes | Large parks, cities |
| Coverage Area | Precise location targeting | Broad geographic regions |
| Example Locations | Home, workplace, restaurant | National parks, metropolitan areas |
Use the arrow button next to saved location names to instantly jump to that location on the map. Press G to quickly return to the Library module from any map view.