Topics Covered in This Lightroom Tutorial:
The Slideshow Module, Creating Intro & Ending Screens, Exporting a Slideshow
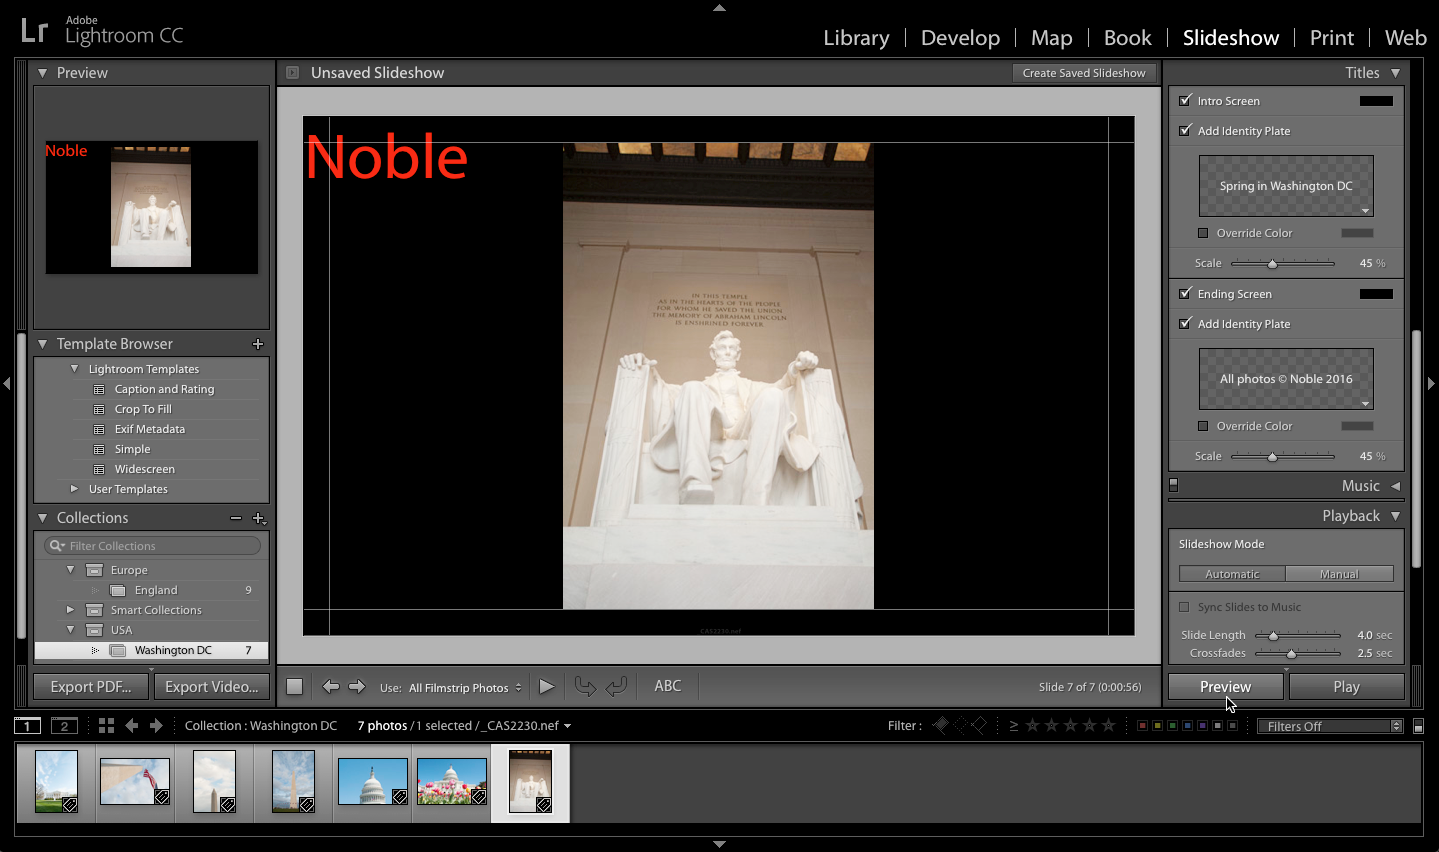
Exercise Preview
Exercise Overview
In this comprehensive exercise, you'll master the art of creating professional slideshow presentations from your photo collections. This skill is invaluable for client presentations, portfolio reviews, and marketing materials. You'll learn to craft compelling intro and ending screens while maintaining consistent branding throughout your presentation.
This tutorial assumes you have completed Exercise 4G: Creating a Basic Web Gallery to import photos and create the Washington DC collection. Ensure you have the necessary image collection before proceeding.
Creating a Slideshow
Before diving into slideshow creation, ensure your photos are properly organized in collections. This workflow approach will serve you well in professional environments where efficiency and organization are paramount.
Make sure you're in the Library module.
On the left, expand the Collections panel if it's not already expanded.
Click on Washington DC. (If you don't see this collection, complete the first part of Exercise 4G: Creating a Basic Web Gallery to import the photos and create the collection.)
At the top right, click on Slideshow to switch to the Slideshow module.
On the left, in the Template Browser panel, expand Lightroom Templates.
Click on Simple to select it. This template provides a clean, professional foundation that works well for most presentation contexts.
On the right, expand the Overlays panel if it's not already expanded.
At the bottom right of the Identity Plate (the box with a gray checkerboard background), click the arrow
 and from the menu, select Edit.
In the Identity Plate Editor dialog that appears, delete the current text and replace it with YourName.
Select the YourName text.
Change the Font Size to 36.
Click the color box to the right of the font size.
Choose a red color. Consider your brand colors when making this choice—consistency across all your marketing materials reinforces professional credibility.
Click OK to set the color (or dismiss the dialog if there's no OK button).
Click OK to finish editing the Identity Plate.
The Identity Plate has been added to the top-left corner of the slideshow. Right now, it's very small. Let's scale it up for better visibility and impact.
In the Overlays panel, under Identity Plate, set Scale to 20%.
Initial Setup Process
Access Collection
Navigate to Library module, expand Collections panel, and select Washington DC collection containing your imported photographs
Switch to Slideshow Module
Click Slideshow at top right to access slideshow creation tools and template options
Select Template
Expand Lightroom Templates in Template Browser panel and choose Simple template for clean, professional layout
Configure Identity Plate
Edit default identity plate by replacing text with your name, setting font size to 36, choosing red color, and scaling to 20%
The Introductory Slide
A compelling intro slide sets the tone for your entire presentation. Think of it as your first impression—it should immediately communicate the theme and quality of work that follows.
On the right, expand the Titles panel if it's not already expanded.
Check Intro Screen to add a slide before all of the photos, which will each be on their own slide.
Below Intro Screen, make sure Add Identity Plate is checked. This adds text to the first slide.
At the bottom right of the Intro Screen's Identity Plate, click the arrow
and from the menu select Edit.In the Identity Plate Editor dialog that appears, delete the current text and replace it with Spring in Washington DC.
NOTE: You may have to resize the Identity Plate Editor dialog window to see all the text you typed in.
Click OK.
In the Titles panel, underneath the Identity Plate, set Scale to 45%. This larger scale ensures your title commands attention and establishes the slideshow's subject matter clearly.
For intro screens, use larger scale percentages like 45% to ensure text is prominently displayed and readable. The intro screen sets the tone for your entire presentation.
Intro Screen Configuration
Creates dedicated first slide before photo content begins
Ensures your custom text appears on the introductory slide
Replace default text with descriptive title like 'Spring in Washington DC'
Use 45% scaling for prominent, readable title presentation
Adding an Ending Screen Identity Plate
The ending screen is your opportunity to reinforce your brand and protect your intellectual property. This final impression should leave viewers with your contact information and copyright notice firmly in mind.
In the Titles panel on the right, make sure Ending Screen and Add Identity Plate are both checked.
At the bottom-right corner of the Ending Screen's Identity Plate, click the arrow
and from the menu select Edit.In the Identity Plate Editor dialog that appears, delete the current text and replace it with All photos © YourName Year.
NOTE: To type the copyright © symbol, use Opt−G (Mac) or ALT−0169 (Windows)
Click OK.
In the Titles panel, underneath the Ending Screen's Identity Plate, set Scale to 45%.
Copyright and Attribution Best Practices
Copyright Symbol Usage
Use proper copyright symbol (©) by typing Opt-G on Mac or ALT-0169 on Windows. This provides legal protection notice for your photographic work.
Professional Attribution
Include photographer name and year in format 'All photos © YourName Year'. This establishes clear ownership and adds professional credibility.
Previewing a Slideshow
Always preview your slideshow before exporting. This quality control step ensures timing, transitions, and visual elements work harmoniously together—critical for maintaining professional standards.
On the right, make sure the Playback panel is expanded.
In the Playback panel, make sure Repeat Slideshow is NOT checked, so that the slideshow only plays once. For client presentations, a single play-through maintains focus and allows for natural discussion points.
At the bottom of the right side panel, click the Preview button to preview the slideshow.
Looks great! At the top-right corner of the slideshow window, click Create Saved Slideshow.
In the dialog that appears, set the Name to Spring in Washington DC.
We don't want to put the slideshow inside any existing collection, so uncheck Inside if it isn't already.
We're all set! Click Create.
At the bottom of the left side panel, click the Export Video button. This creates a standalone video file that can be shared across platforms without requiring Lightroom.
With the save options expanded, navigate to Desktop > Class Files > Lightroom Class.
Name the file yourname-slideshow. Use descriptive filenames that include your name and project details—this practice becomes essential when managing multiple client projects.
From the Video Preset menu, choose 480 X 270 (16:9). In 2026, this smaller preset remains ideal for email delivery and quick client reviews, while larger presets serve better for presentation displays and social media.
Notice there is a description below the Video Preset menu that tells you what the different presets are good for. These guidelines help you choose the optimal format for your intended distribution method.
Click Export (Mac) or Save (Windows). The video will start exporting. You can see the progress at the top left next to the Lightroom logo. Export times vary based on slideshow length and chosen video quality—plan accordingly when working under client deadlines.
Preview and Export Workflow
Configure Playback Settings
Ensure Repeat Slideshow is unchecked in Playback panel so presentation plays once through completely
Preview Before Saving
Click Preview button to review slideshow flow, timing, and visual elements before finalizing
Save Slideshow Project
Use Create Saved Slideshow, name it descriptively, and uncheck Inside to avoid placing in existing collections
Export Video File
Click Export Video, choose appropriate preset like 480 X 270 (16:9), and save to designated class files location
Lightroom provides preset descriptions below the Video Preset menu explaining optimal use cases for each resolution and format option. Choose based on your intended distribution method.