Topics Covered in This iOS Development Tutorial:
Preparing Professional Assets, Mastering the Assets Catalog, Implementing & Testing Launch Images, Configuring iTunes Artwork Files
Exercise Preview
![]()
Exercise Completion Requirements
Various resolutions needed for different devices and display contexts
Enables automatic file handling and proper integration
Ensures smooth startup experience on all target devices
Test actual appearance and timing of assets
Exercise Overview
Your app's functionality is complete, but the user experience isn't finished until you've implemented the visual elements that users encounter first: launch screens and app icons. These aren't just decorative touches—they're critical components that affect user perception, App Store approval, and overall app quality. Professional app icons and launch screens signal to users that your app is polished and trustworthy, while poorly executed assets can undermine even the most sophisticated functionality.
Getting Started
If you completed the previous exercise you can skip the following sidebar. We strongly recommend completing the previous exercises (B1–B4) before starting this one, as they build essential foundational skills.
If you completed the previous exercise, Jive Factory.xcworkspace should already be open in Xcode. If you closed it, navigate to yourname-iOS Dev Level 2 Class > Jive Factory and reopen the workspace file.
If You Did Not Complete the Previous Exercises (B1–B4)
- Close any open files and return to your Desktop workspace.
- Navigate to Class Files > yourname-iOS Dev Level 2 Class.
- Duplicate the Jive Factory Ready for Launch Images folder.
- Rename the duplicated folder to Jive Factory.
- Open Jive Factory > Jive Factory.xcworkspace to begin.
Project Setup for New Users
Navigate to Class Files
Close any open files and switch to Desktop, then locate the Class Files directory
Duplicate Ready Project
Copy the 'Jive Factory Ready for Launch Images' folder and rename to 'Jive Factory'
Open Workspace
Launch Jive Factory.xcworkspace to begin the exercise
Preparing the Assets
Professional app icon creation requires attention to Apple's exacting standards and multiple device requirements. If you're working with Photoshop, applypixels.com offers an excellent template system that streamlines the entire process—simply add your icon artwork and the template automatically generates all required sizes while providing realistic previews of how your icon will appear in the App Store and on device home screens. The template even includes batch actions for exporting all variants with proper naming conventions, eliminating manual resizing errors that can cause App Store rejection.
Apple's ecosystem demands numerous icon variations across different device types, screen densities, and use cases—from tiny notification icons to large App Store displays. The requirements evolve with each iOS release, so always consult Apple's current iOS Developer Library documentation for the most up-to-date specifications. What worked for iOS 15 may be insufficient for iOS 17 and beyond.
Launch images serve a specific psychological purpose beyond mere decoration. Apple's Human Interface Guidelines emphasize that launch images should enhance perceived app performance rather than create branding opportunities. The ideal launch image resembles your app's initial state, creating seamless continuity as the interface loads. Apple explicitly discourages splash screens, about windows, or prominent branding elements unless they're permanent fixtures of your app's first screen.
For our Jive Factory app, we created launch images by capturing screenshots directly from the iOS Simulator—press Cmd–S to save screenshots to your Desktop. We then used Photoshop to remove dynamic UI elements that might change between app launches, ensuring the launch image remains consistent with the actual interface users will see.
Use applypixels.com Photoshop template for efficient icon generation. It automatically resizes artwork to all required sizes and provides App Store preview functionality.
The launch image is not meant to provide an opportunity for artistic expression; it is solely intended to enhance the user's perception of your app as quick to launch and immediately ready for use.Using the Assets Catalog for App Icons
The Assets Catalog represents Apple's modern approach to asset management, replacing the fragmented file-based system with a centralized, organized workflow that scales across all Apple platforms.
- In the Project navigator, locate and click on the Assets.xcassets folder to access your project's asset catalog.
- In the Editor area, you'll see an AppIcon catalog at the top of the left column—this is where all app icon variants are managed.
Click the AppIcon catalog to reveal the icon configuration interface.
The catalog displays a grid of placeholder areas for different icon requirements, as shown below:
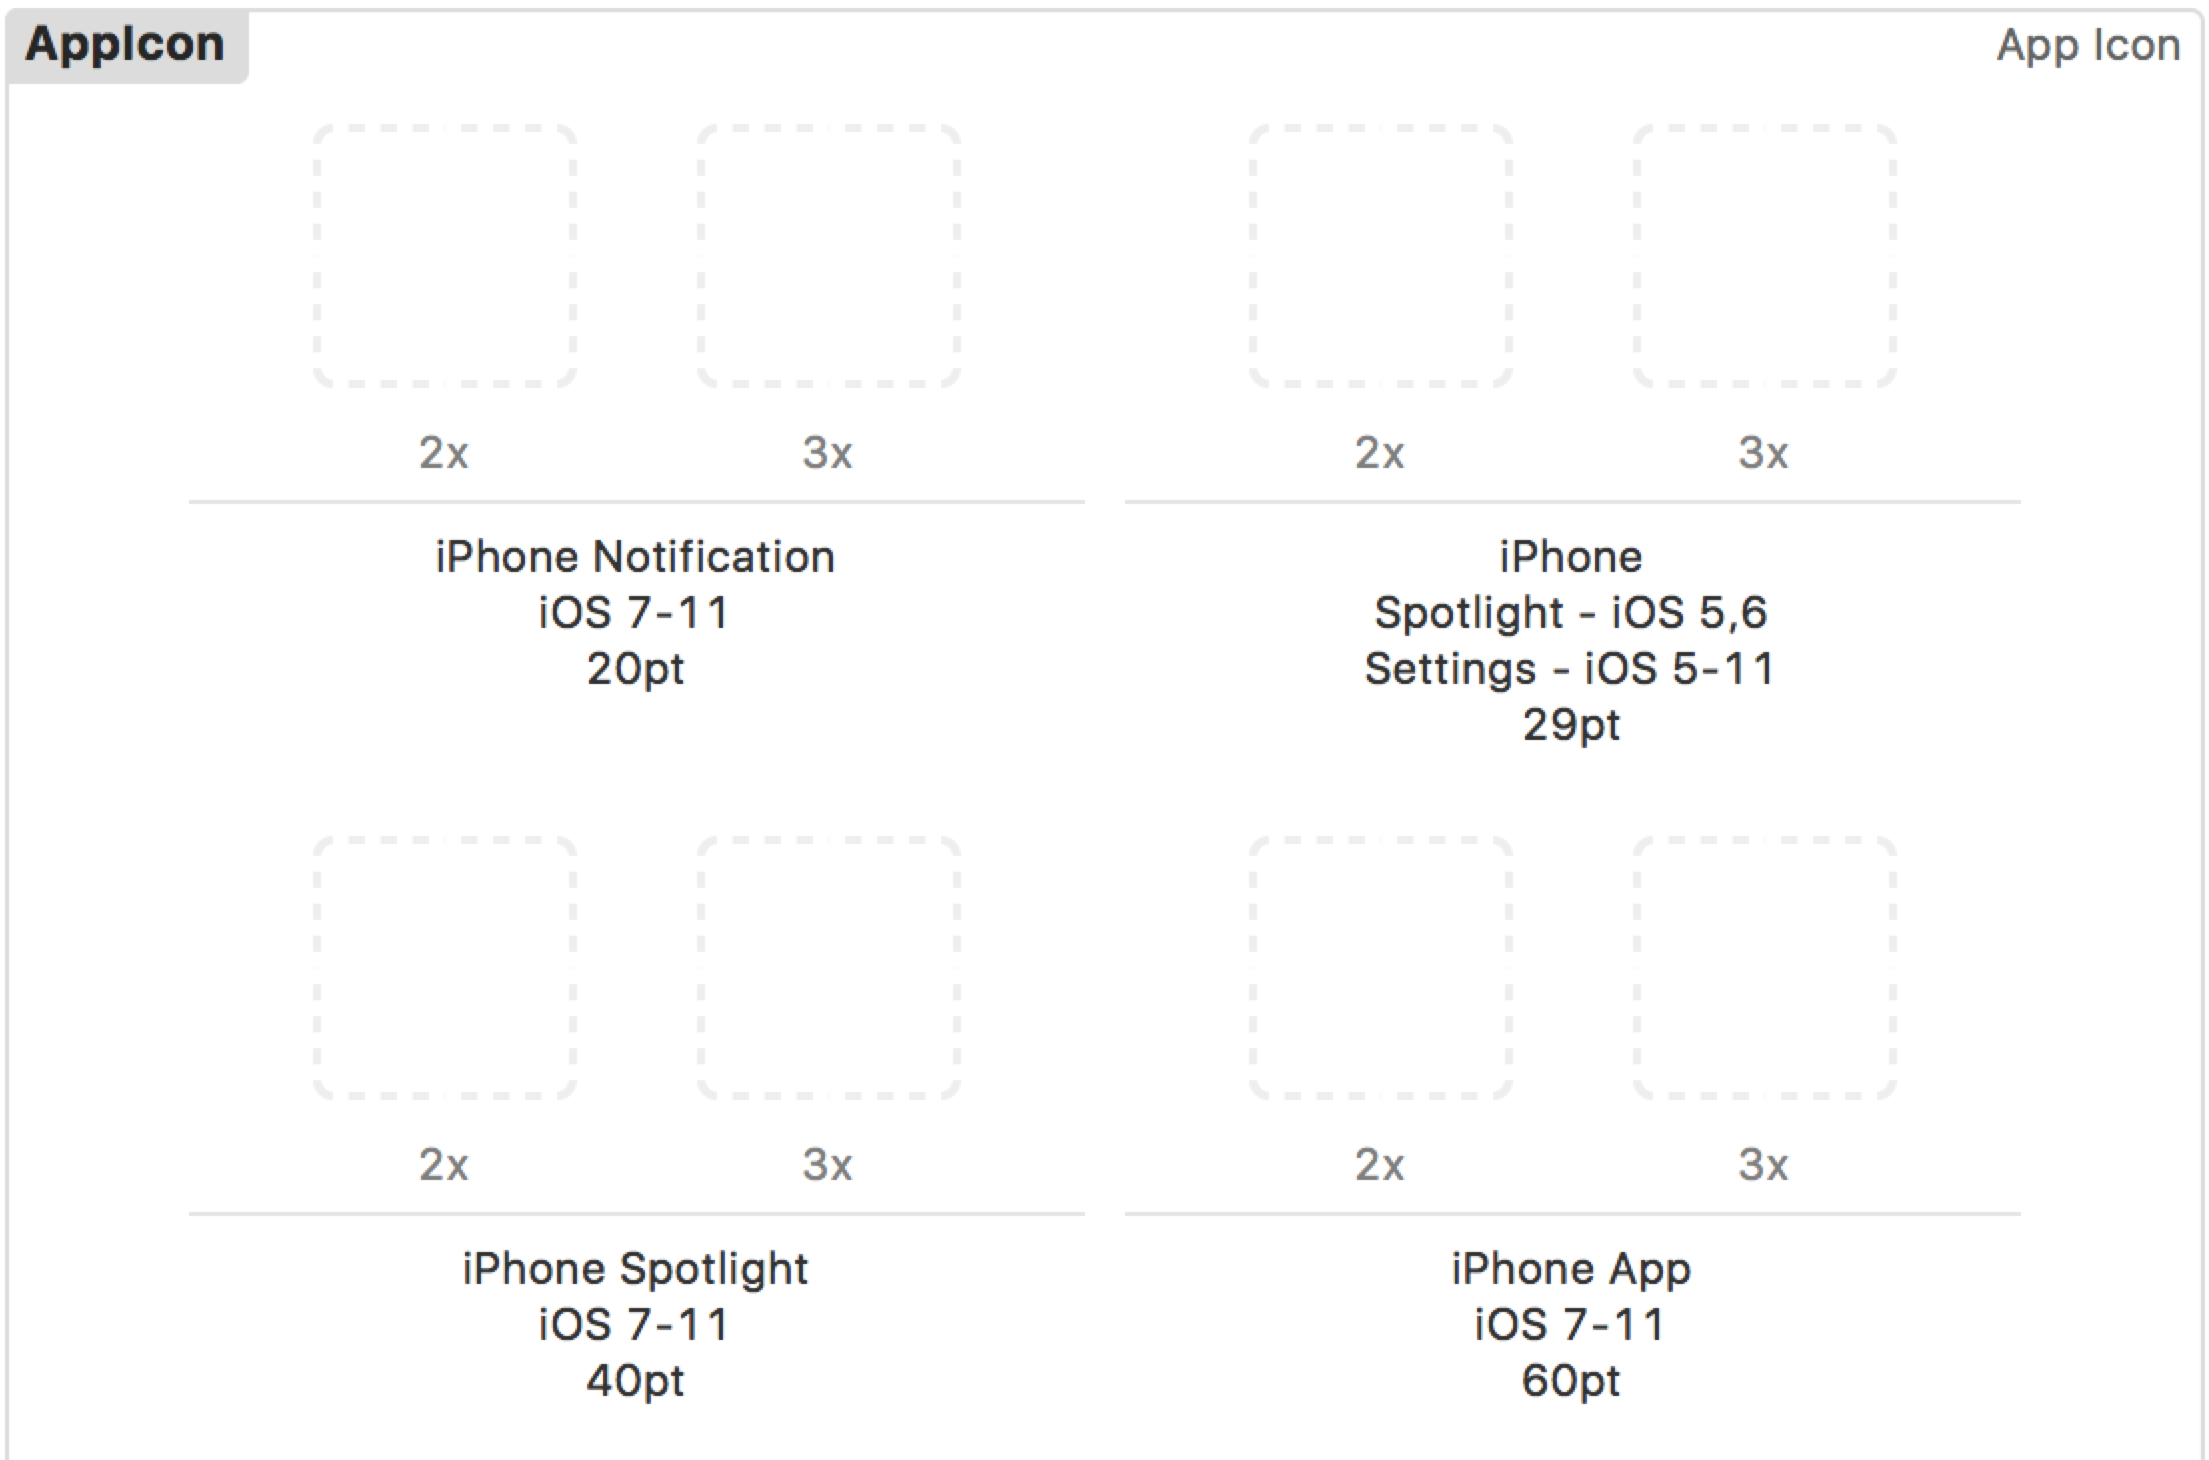
Each placeholder includes detailed specifications: the target use case, supported iOS versions, resolution multiplier (1x, 2x, 3x), and dimensions in points. Understanding these specifications is crucial for delivering pixel-perfect icons across all devices.
- In the Utilities panel, select the Attributes inspector tab
 to configure platform targets.
 - Ensure both iPhone and iPad platforms are selected—this exposes all necessary icon slots for universal app distribution.
- Open a new Finder window to access your prepared icon assets.
- Navigate to Desktop > Class Files > yourname-iOS Dev Level 2 Class > App Icons folder.
- Position the Finder window alongside Xcode so both the asset files and empty icon slots are visible simultaneously.
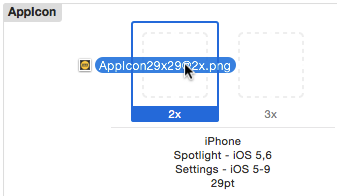
From the Finder window, drag appicon29x29@2x.png to the first iPhone icon area (Settings, not Notification) as demonstrated below:
Continue systematically adding the remaining icons by dragging the corresponding files to their designated slots:
3x iPhone Spotlight iOS 5,6 29pt: appicon29x29@3x.png 2x iPhone Spotlight iOS 7–10 40pt: appicon40x40@2x.png 3x iPhone Spotlight iOS 7–10 40pt: appicon40x40@3x.png 2x iPhone App iOS 7–10 60pt: appicon60x60@2x.png 3x iPhone App iOS 7–10 60pt: appicon60x60@3x.png 1x iPad Settings iOS 5–10 29pt: AppIcon29x29.png 2x iPad Settings iOS 5–10 29pt: appicon29x29@2x.png 1x iPad Spotlight iOS 7–10 40pt: AppIcon40x40.png 2x iPad Spotlight iOS 7–10 40pt: appicon40x40@2x.png 1x iPad App iOS 7–10 76pt: AppIcon76x76.png 2x iPad App iOS 7–10 76pt: appicon76x76@2x.png 2x iPad Pro iOS 9–10 83.5pt: appicon83.5x83.5@2x.png 1x App Store iOS 1024pt: AppIcon1024x1024.png NOTE: The Assets Catalog automatically copies imported files into the project bundle within a dedicated AppIcon.appiconset folder, maintaining organization and preventing accidental file moves that could break your app build.
- Now let's verify the icons display correctly in the iOS Simulator. Set the active scheme to iPhone 8 or your preferred device target.
- Click the Run button to build and launch your app.
- In the Simulator, navigate to Hardware > Home (or press Shift+Cmd+H) to view the home screen with your custom app icon.
Return to Xcode to continue with launch image configuration.
Icon Resolution Requirements
Assets Catalog Configuration
Access Assets Catalog
Navigate to Assets.xcassets in Project navigator and select AppIcon catalog
Configure Target Devices
Ensure both iPhone and iPad are selected in Attributes inspector
Drag and Drop Icons
Position Finder window alongside Xcode and drag corresponding icon files to empty areas
Adding the Launch Images
With your app icons successfully configured, it's time to implement launch images using the same systematic approach. Launch images require their own dedicated catalog within the Assets system.
- Ensure Assets.xcassets remains selected in the Project navigator.
- Navigate to: Editor > Add Assets > App Icons & Launch Images > New iOS Launch Image to create a launch image catalog.
- In the Editor, select the newly created LaunchImage catalog from the left column.
- In the Attributes inspector tab , locate the iOS 7.0 and Later section and verify that iPhone Portrait is checked.
- For iPad support, check Landscape orientation and uncheck Portrait if it's currently selected.
- In the iOS 8.0 and Later section, uncheck iPhone Landscape to focus on the most commonly used orientations.
In the iOS 6.0 and Prior section, uncheck all options to streamline your asset requirements.
NOTE: While this tutorial doesn't target iOS 6.0 and earlier versions, production apps may need backward compatibility depending on your user base analytics and business requirements.- Open a new Finder window for asset access.
- Navigate to Desktop > Class Files > yourname-iOS Dev Level 2 Class > App Launch Images folder.
- Arrange the Finder window so both the launch image files and Xcode's empty launch image slots are simultaneously visible.
- From the Finder window, drag default@3x-iphonex.png to the iPhone X Portrait iOS 11+ launch image slot in Xcode.
Complete the launch image configuration by adding the remaining files to their corresponding slots:
Retina HD 5.5 iPhone Portrait iOS 8,9: default@3x-iphone-rhd55.png Retina HD 4.7 iPhone Portrait iOS 8,9: default@2x-iphone-rhd47.png 2x iPhone Portrait iOS 7–9: default@2x-iphone.png Retina 4 iPhone Portrait iOS 7–9: default@2x-iphone-r4.png 1x iPad Landscape iOS 7–9: Default-Landscape-ipad.png 2x iPad Landscape iOS 7–9: default-landscape@2x-ipad.png
Launch Image Setup Process
Create Launch Image Catalog
Add new iOS Launch Image through Editor menu in Assets.xcassets
Configure Device Orientations
Set iPhone Portrait and iPad Landscape options, disable unsupported orientations
Import Launch Images
Drag corresponding files from App Launch Images folder to appropriate catalog areas
This tutorial focuses on iOS 7.0 and later. For broader compatibility, consider enabling iOS 6.0 and prior options in the launch image configuration.
Testing the Launch Images
Launch images appear for mere milliseconds on modern devices, but this brief moment significantly impacts user perception of app performance and quality. Let's verify your implementation works correctly across different scenarios.
- Return to Xcode and click the Run button to build and launch your updated app.
Watch closely for the launch image—it displays as a subtle white background that should seamlessly transition into your app's interface. If the transition happened too quickly to observe, run the app again from Xcode.
NOTE: Launch images only appear during cold app launches, not when resuming from background states. iOS preserves app states in memory, so returning to a backgrounded app typically bypasses the launch sequence entirely. To consistently see launch images during testing, always initiate fresh launches from Xcode rather than switching between backgrounded apps.
Congratulations! Your app now includes professional-grade visual assets that meet App Store requirements and enhance user experience from the first interaction.
Launch images only appear when apps start from a fresh state, not when resuming from saved state. Run the app multiple times to ensure proper testing.
Testing Considerations
Quick Display
Launch images appear briefly during app startup. Watch carefully to verify proper loading and appearance.
Fresh State Required
Images only show when launching fresh, not when returning from background. Test by running app again.
Changing the Name of the App
App naming decisions often evolve during development—what seemed perfect in planning might prove too lengthy when displayed on actual device home screens. iOS truncates long app names with ellipses, potentially obscuring your brand identity.
- In the Project navigator, single-click on your project name to select it.
- Click the selected project name again and pause briefly until it becomes editable, then type your new name and press Return.
- When Xcode prompts about renaming project content items, click Rename to update all internal references automatically.
- Click OK when the renaming process completes to confirm the changes.
Project Renaming Process
Select Project Name
Click on project name in Project navigator to select it
Enter Edit Mode
Click again and pause until name becomes editable
Complete Rename
Enter new name, press Return, and choose Rename when prompted about project content items
Monitor how your app name appears on the Home Screen. Long names get truncated with ellipses, potentially affecting user recognition and professional appearance.