Topics Covered in This InDesign Tutorial:
The Layers Panel, Showing & Hiding Layers, Locking Layers
Exercise Preview
Exercise Overview
While layers aren't mandatory for every InDesign project, they're a professional's secret weapon for maintaining clean, organized files and accelerating design iterations. Think of layers as transparent sheets stacked on top of each other—each containing specific design elements that can be independently controlled. Their locking and visibility features become invaluable during client revisions, preventing accidental edits while allowing rapid design variations. Master this fundamental workflow, and you'll save hours on complex projects.
Open Layers.indd and update links if needed.
We've prepared all the text and artwork for this layout exercise. If the pasteboard elements are visible and distracting, navigate to the bottom of the Tools panel and select Preview
 . This essential view mode hides all non-printing elements, giving you a clean preview of your final output—much better for design decision-making.
Currently, all elements exist on a single layer—a common starting point that quickly becomes problematic in complex layouts. Let's examine the current structure by opening the Layers panel (Window > Layers).
You'll see InDesign's default layer named Layer 1, which contains everything in your document.
While layers aren't mandatory in InDesign, they significantly improve file organization, speed up design experimentation, and prevent accidental modifications through their locking capabilities.
Getting Started with Your Exercise File
Open the Exercise File
Launch Layers.indd and update any missing links to ensure all elements display properly
Switch to Preview Mode
Select Preview from the bottom of the Tools panel to hide non-printing elements and see your clean layout
Access the Layers Panel
Navigate to Window > Layers to open the panel where you'll see the default Layer 1 containing all elements
Creating Layers & Moving Objects onto Them
Now we'll implement a professional layer strategy by distributing objects across purpose-specific layers. This organizational approach enables precise control over design elements and streamlines your revision process.
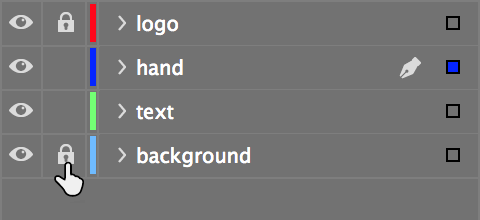
In the Layers panel, double–click Layer 1 to access its properties.
Rename it background and click OK. Descriptive layer names are crucial for team collaboration and future file maintenance.
Create a dedicated layer for branding elements. In the Layers panel, click the New layer button
 .
.Double–click the new layer and name it logo. Isolating logos on separate layers is standard practice for brand consistency and client approval workflows.
Select the Interview logo located at the bottom left of the page.
In the Layers panel, locate the blue square on the right side of the background layer—this indicator shows which layer contains your selected object. Drag this blue square to the logo layer to reassign the object, as demonstrated below.

Test your layer control by toggling visibility of the logo and background layers. Click the eye icon
 to hide/show elements and evaluate different design combinations. This technique is invaluable during client presentations when exploring layout alternatives.
Restore visibility to both layers before proceeding.
Create another layer and name it text. Separating typography allows for independent text formatting and positioning adjustments.
Position the text layer strategically by dragging it between the logo and background layers if it's not already there. Layer stacking order directly affects visual hierarchy in your design.
- Locate the single text frame on the page and move it to the text layer:
- Select the text frame.
- Drag the blue indicator square from the Layers panel to the text layer.
Create another layer named hand for the photographic element.
Position it between the text layer and the background layer to establish proper visual layering.
Select the circular image frame containing the hand photograph (positioned near the Welcome to Interview Magazine heading).
Transfer this object to the hand layer by dragging its blue indicator square in the Layers panel.
Setting Up Your Layer Structure
Rename Default Layer
Double-click Layer 1 in the Layers panel, rename it to 'background' and click OK to establish your base layer
Create Logo Layer
Click the New layer button, double-click the new layer, and name it 'logo' for better organization
Move Objects to Layers
Select objects and drag the blue square indicator from the current layer to the target layer in the Layers panel
Create Additional Layers
Add 'text' and 'hand' layers, positioning them strategically between existing layers for proper stacking order
The blue square on the right side of each layer shows which layer contains your currently selected object. Drag this indicator to move objects between layers quickly.
Playing with Layer Variations
With your layer architecture in place, you can now experiment with design variations efficiently—a crucial skill for client work and creative exploration. This non-destructive workflow lets you test ideas without compromising your original layout.
Before experimenting, protect critical elements from accidental modification. Lock layers by clicking the empty box between the layer name and the eye icon
—this produces a lock icon indicating the layer is protected.Lock both the logo and background layers to prevent unintended changes during your design exploration.
Experiment with visual hierarchy by dragging the hand layer above the text layer. This simple change dramatically alters the design's focal point.
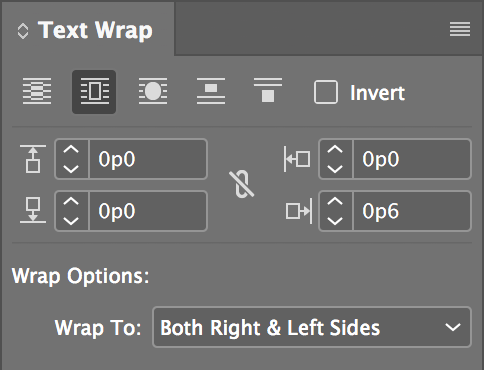
The repositioned hand image now overlaps the text—a common challenge when adjusting layer order. Resolve this by applying text wrap to the hand image. Ensure the hand picture is selected, then open the Text Wrap panel (Window > Text Wrap) and apply these professional settings:
The text wrap pushes the welcome text aside, creating a more dynamic layout. To compare this variation with your original design, drag the hand layer below the text layer again. You'll notice the text doesn't immediately reflow—this occurs because InDesign's default text wrap behavior affects objects regardless of layer position. To change this behavior, access InDesign menu (Mac) or Edit menu (Windows) and choose Preferences > Composition.
Enable Text Wrap Only Affects Text Beneath and click OK. This setting provides more predictable text wrap behavior based on actual layer stacking order.
Now test both arrangements: drag the hand layer above the text layer for the wrapped text effect, then below it for the original layout. Choose the version that best serves your design objectives.
Congratulations—you've mastered fundamental layer management techniques that form the backbone of professional InDesign workflows!
Remember this crucial workflow tip: always verify which layer is active before creating new objects. InDesign places new elements on the currently selected layer, and developing this awareness prevents organizational headaches in complex projects. Consider establishing layer naming conventions and organizational systems early in your career—these habits distinguish professional designers from casual users.
Layer Safety and Experimentation Workflow
Click the empty box between layer name and eye icon to prevent accidental changes to logo and background
Drag layers above and below each other to see how stacking order affects your design composition
Use Window > Text Wrap panel to control how images interact with surrounding text elements
Set 'Text Wrap Only Affects Text Beneath' in Preferences > Composition for better control
Always pay attention to which layer is selected when creating new objects. New elements will automatically be placed on the currently active layer.