Topics Covered in This Illustrator Tutorial:
The Type Tool, Clipping Masks (editable Type), Filling Text with a Photo, Placing Linked Images
This tutorial assumes basic familiarity with Adobe Illustrator's interface. You'll need the provided chile.psd file and Adobe Illustrator CC or later.
Exercise Preview

Exercise Overview
Text masking stands as one of the most powerful and versatile techniques in Illustrator, allowing designers to create compelling visual narratives where imagery becomes the very substance of typography. This fundamental skill bridges the gap between text and image, enabling you to craft designs that communicate on both literal and visual levels. Whether you're creating poster designs, social media graphics, or brand identity elements, mastering text masks will elevate your design capabilities and open new creative possibilities.
Tutorial Workflow Overview
Document Setup
Create a new print document using the Letter preset for proper dimensions and resolution.
Typography Creation
Use the Type tool to create and style text with Impact font at 160pt size and 180% vertical scale.
Image Integration
Place the chile.psd file as a linked image and arrange it behind the text for proper layering.
Mask Application
Create the clipping mask by selecting both objects and applying the mask effect for the final result.
Setting the Type
We'll begin by establishing our typographic foundation with bold, impactful lettering designed to showcase the masking effect effectively.
Go to File > New to create a new document.
At the top of the dialog that opens, click on the Print tab.
Double–click the Letter preset to establish our workspace dimensions.
Select the Type tool
 from the toolbar.
Click once in the center of your artboard and type the word CHILE in all caps, replacing any placeholder Lorem ipsum text that may appear.
To center-align the text for optimal visual balance, click the Align Center button
 (located in either the Control panel at the top of the screen or the Properties panel's Paragraph section near the bottom).
TIP: For faster workflow, use the keyboard shortcut Cmd–Shift–C (Mac) or Ctrl–Shift–C (Windows) to center your text instantly.
Double–click the word CHILE to select all the text for styling adjustments.
In the Properties panel's Character section, click the More Options button
 at the bottom right to reveal all available typography controls.
Configure the following type specifications to create bold, mask-ready lettering:
Font: Impact Size  :
:160 pt Vertical Scale  :
:180% These settings create substantial letterforms with strong vertical presence—essential characteristics for effective text masking that ensures your imagery will be clearly visible through the type.
Text Formatting Specifications
Use Cmd-Shift-C (Mac) or Ctrl-Shift-C (Windows) to quickly center-align your text without searching for toolbar buttons.
Importing the Picture & Making the Mask
Now we'll bring in our photographic element and execute the masking technique that transforms static typography into a window for visual storytelling.
Navigate to File > Place to import your image asset.
Select the chile.psd file, ensuring the Link option at the bottom of the dialog window remains checked before clicking Place. Mac users may need to click the Options button to access this setting. Linking preserves file size and maintains connection to the original asset for future updates.
Click once in the center of the artboard to place the image at its native resolution. Avoid clicking and dragging, which will resize the image and potentially compromise its quality.
The imported Chilean mountain landscape will appear prominently on your artboard. To reveal your underlying typography, send the image to the back layer using Object > Arrange > Send to Back.
Using the Selection tool
 , select your CHILE text and position it centrally over the most visually compelling area of the photograph—this strategic placement will determine which portion of the image shows through your final mask.
Select both the photograph and the text elements simultaneously. This dual selection is crucial for the masking process to function correctly.
Execute the mask by navigating to Object > Clipping Mask > Make. This command transforms your text into a viewing window for the underlying image.
Click elsewhere on the artboard to deselect all objects. Your text now reveals the Chilean landscape imagery through its letterforms, creating a sophisticated integration of type and photography.
To reposition just the text element within the mask, use the Group Selection tool
 . If this tool isn't visible in your toolbar, click and hold on the Direct Selection tool
  to access it.
Fine-tune the positioning by dragging the text or using arrow keys for precise nudging until you achieve optimal visual composition within the mask.
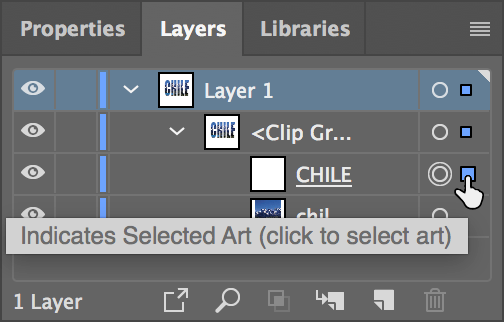
NOTE: The Layers panel offers an alternative method for selecting specific elements within your clipping mask:
- Expand Layer 1 by clicking the triangle disclosure arrow to its left.
- Similarly expand the
<Clip Group>to reveal its contents. - You'll now see both the CHILE text object and chile image listed separately. Click in the selection area to the right of the target circle to isolate either element for individual editing.
The beauty of this technique lies in its editability. To modify your text content or adjust styling attributes, simply select the Type tool
and edit as you would any standard text object. The mask relationship remains intact while allowing complete typographic flexibility.Save your completed project as yourname-Mask With Type.ai to preserve all vector information and maintain future editability.
In the save dialog that appears, accept the default Adobe Illustrator options and click OK to finalize your file.
Always ensure the Link option is checked when placing images. This maintains file connections and keeps your document size manageable for professional workflows.
Clipping Mask Creation Checklist
Maintains file connection and reduces document size
Ensures proper layering order for mask creation
Positions text for optimal visual impact
Required for the clipping mask command to work
Allows independent movement of masked elements
Clipping Mask Advantages & Considerations