Topics Covered in This Illustrator Tutorial:
Master the fundamentals of vector illustration by drawing precise corners and smooth curves with the Pen Tool, while learning professional techniques for adjusting anchor points to create flawless artwork.
This tutorial assumes you have Adobe Illustrator installed and access to the Illustrator Class folder with the required template files.
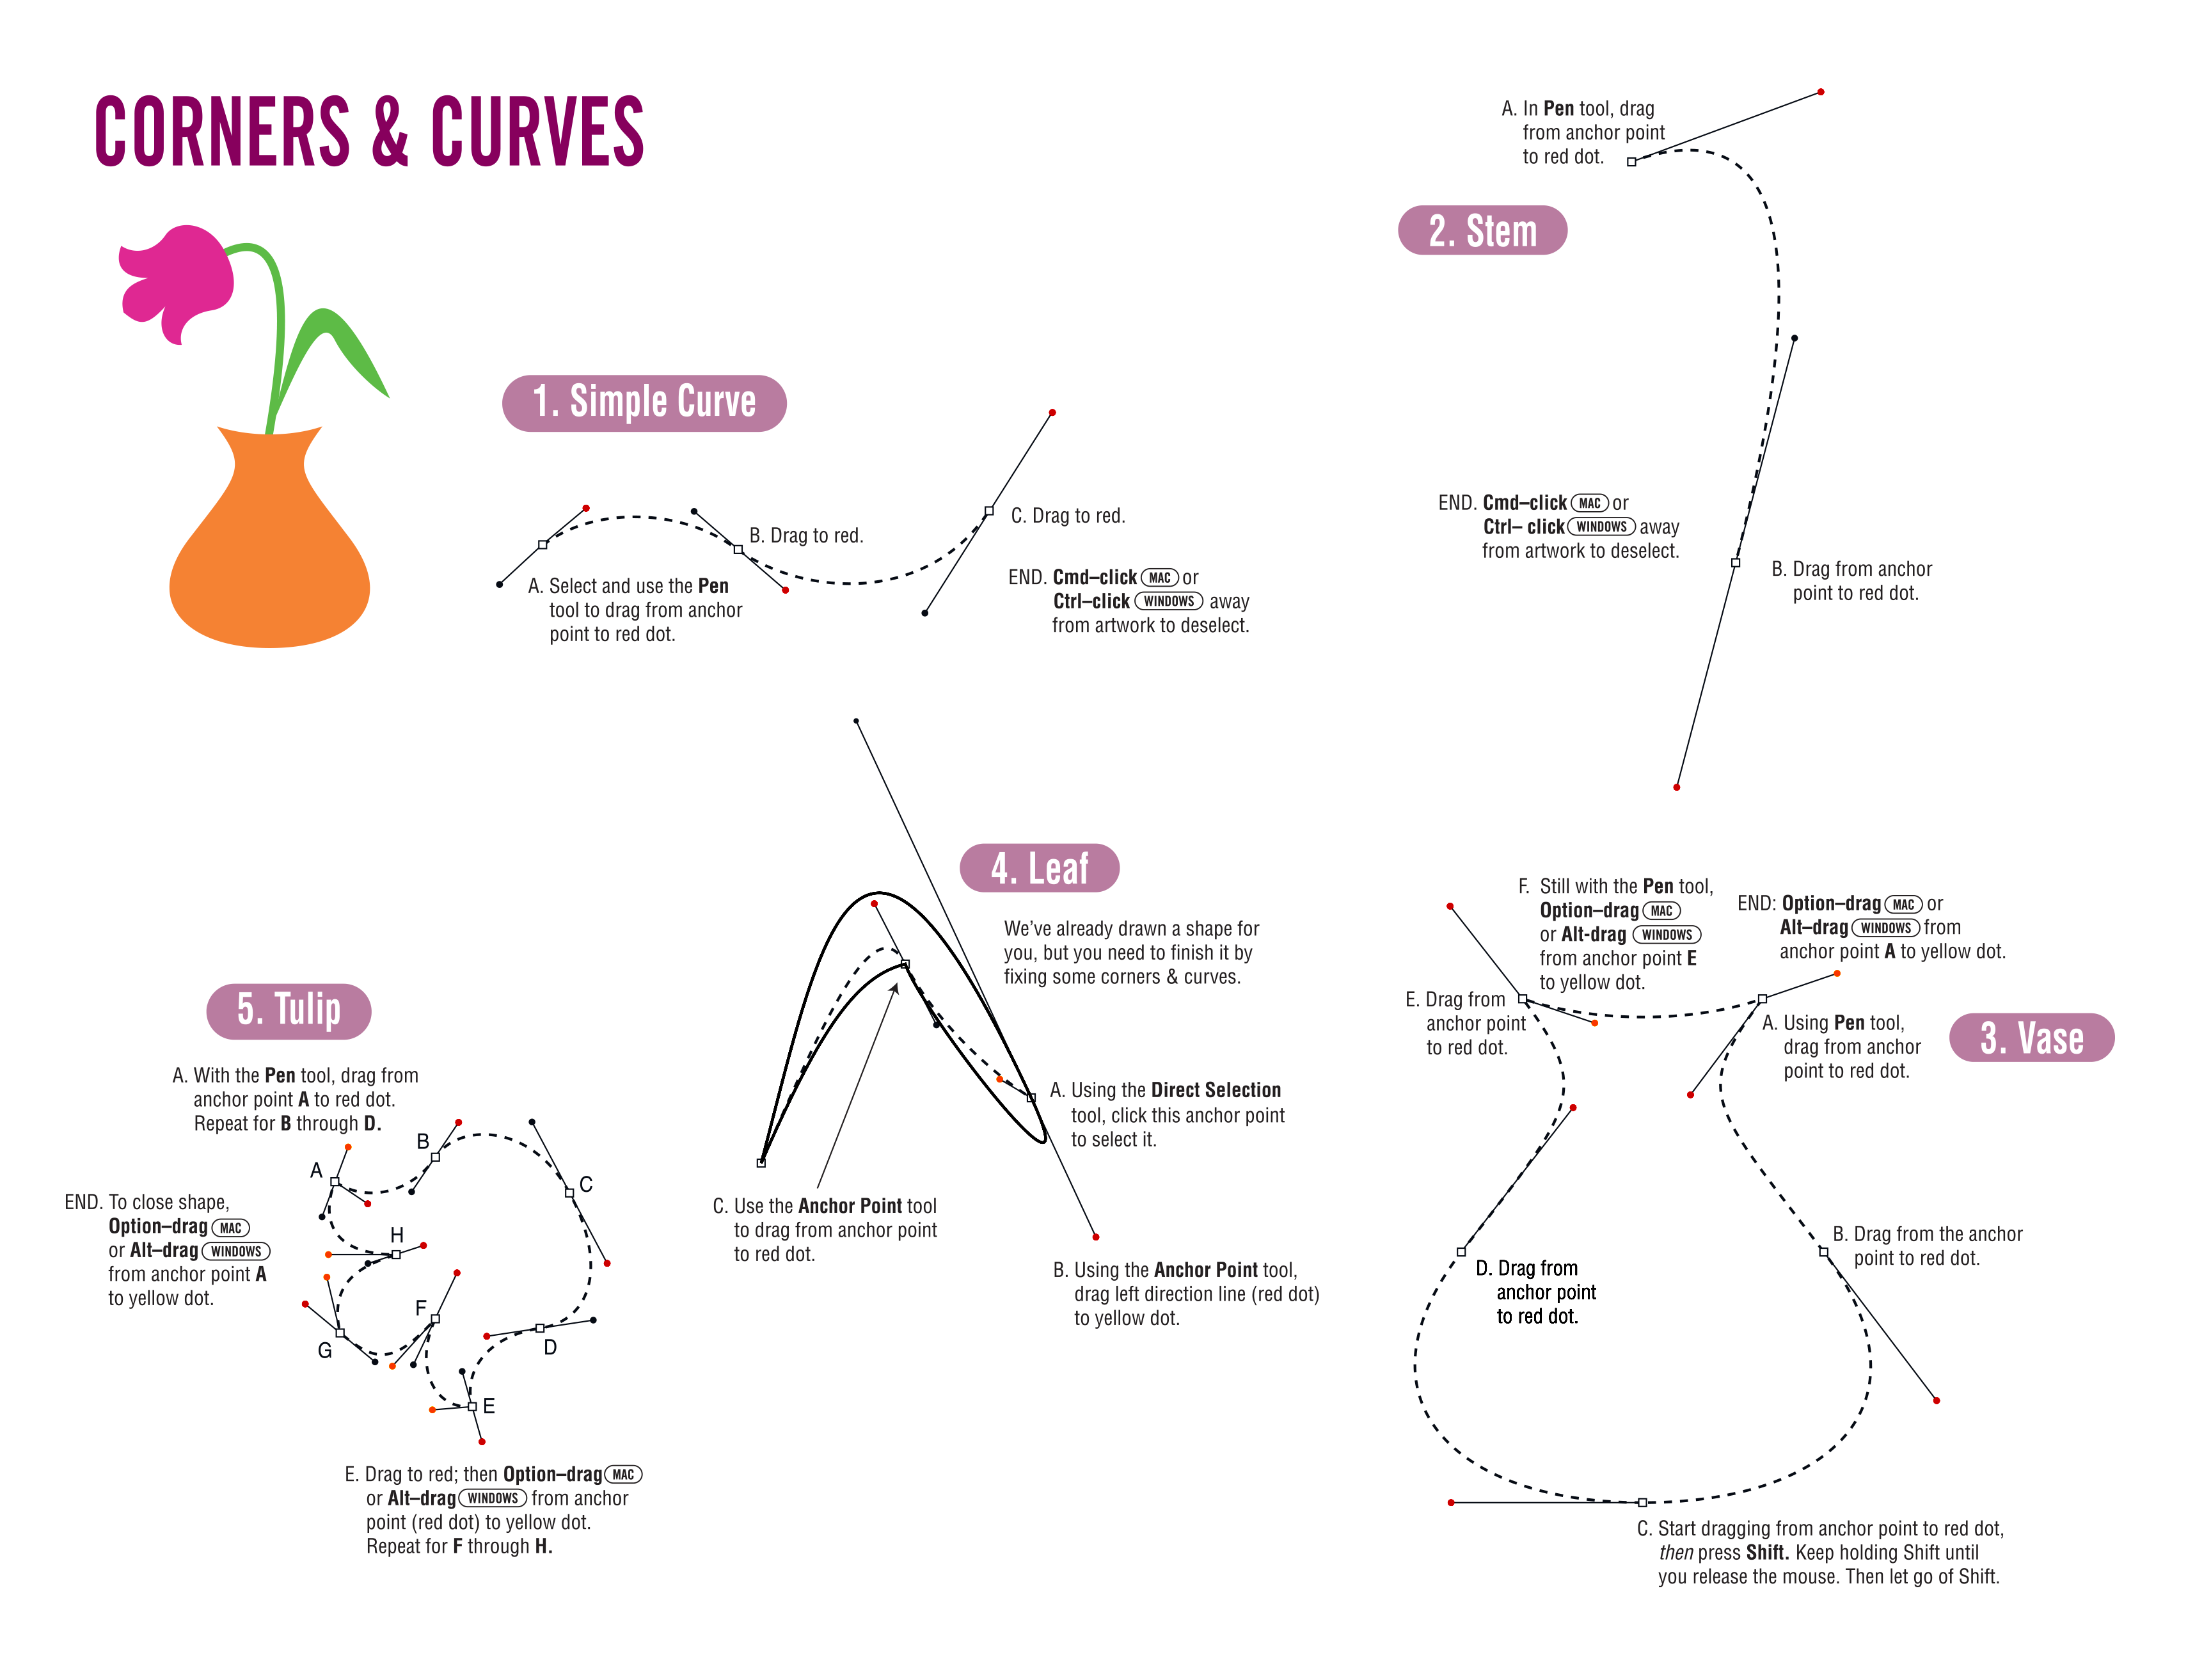
Exercise Preview
Exercise Overview
Drawing precise corners and smooth curves is a fundamental skill that separates amateur vector work from professional-quality illustrations. This carefully designed template eliminates guesswork and provides a structured approach to mastering these essential techniques. By the end of this exercise, you'll have the confidence to tackle complex shapes in any professional project.
From the Illustrator Class folder, open the file Corners & Curves Template.ai.
Select File > Save As, naming the file yourname-Corners & Curves.ai.
Click Save.
In the dialog that appears, leave the default options checked and click OK.
Setting Up Your Workspace
Open the Template
Navigate to the Illustrator Class folder and open 'Corners & Curves Template.ai' to begin the exercise.
Save Your Work
Use File > Save As to create 'yourname-Corners & Curves.ai' with default options to preserve your progress.
Prepare Tools
Set default fill and stroke settings, then configure the fill to 'None' to prepare for pen tool exercises.
Selecting Colors & Using the Template
Before diving into the pen tool work, we'll establish the proper color settings to ensure clean, visible paths as you draw.
In the Tools panel, click the Default Fill and Stroke button
 .
.In the Tools panel, click the Fill icon and then click the None button
 .
.Follow the on-screen directions in the file methodically. Take your time with each shape—precision here builds the foundation for all your future vector work. When you have completed all the template directions, save your changes and move on to the next section in this exercise.
Always reset to default fill and stroke settings before starting a new drawing exercise. This prevents confusion and ensures consistent results.
Template Preparation Checklist
Resets all color settings to black stroke, white fill
Prevents unwanted fills when drawing with pen tool
Template provides step-by-step guidance for each shape
Preserve your progress throughout the exercise
Finishing up Once You're Done with the Template
Now comes the rewarding part: transforming your individual practice shapes into a cohesive, professional illustration. You've drawn the individual components that make up a complete vase and flower composition, so let's combine them into a polished final piece.
- If you closed the yourname-Corners & Curves.ai file, please open it again.
- Using the Selection tool
 , click on the Stem you drew.
 - Shift–click the Vase, Leaf, and Tulip so they are also selected.
- Now that all four shapes are selected, copy them (Edit > Copy).
- Go to File > New to create a new document.
- At the top of the dialog that opens, click on the Print tab.
- Double–click the Letter preset to open the new file.
- Select File > Save, naming the file yourname-flowers.ai.
- Click Save, and in the dialog that appears, click OK.
- Now paste your objects (Edit > Paste).
- Click away from the artwork to deselect the shapes.
- The shapes need thoughtful arrangement to create visual harmony. Let's start with the Vase as our foundation element. Using the Selection tool , drag it by one of its lines to the center of the page.
- Drag the Stem into place above the Vase, ensuring it appears to emerge naturally from the vase opening.
- Position the Tulip at the end of the Stem, creating a believable botanical relationship.
- Drag the Leaf into place above the Vase and to the right of the Stem, adding visual interest and balance to the composition.
- Click away from the artwork to deselect the shapes. The composition structure is now complete, but strategic color application will transform this into a professional illustration.
- Click on the Vase to select it.
- Click on the Fill icon (in the Tools panel).
- In the Properties panel under Appearance, click on the swatch next to Fill.
In the Color Mixer panel, enter 60 next to M (M agenta) and 90 next to Y (Y ellow). C yan and blacK should remain at 0.
For efficiency throughout the rest of this workbook, when we ask you to enter CMYK values, we will use a professional shorthand notation. The above values would be written as 60m and 90y. This streamlined approach mirrors industry-standard color specifications you'll encounter in professional workflows.
To close the Color Mixer panel, press Return (Mac) or Enter (Windows).
Click on the Tulip to select it.
In the Properties panel, click on the Fill icon. Then in the Color Mixer panel, enter 7c and 94m.
NOTE: When you type in color values, Illustrator will sometimes automatically populate the remaining fields with values from your previously specified color. For any color values you are not specifying, always verify they are set to 0 if Illustrator didn't clear them automatically—this prevents unwanted color contamination.
To close the Color Mixer panel, press Return (Mac) or Enter (Windows).
Click on the Leaf to select it.
In the Properties panel, click on the Fill icon. Then in the Color Mixer panel, enter 66c and 100y.
PRO TIP: Once you click in a number field in the Color Mixer panel, simply press Tab to jump to the field below. This keyboard shortcut dramatically speeds up color entry in professional workflows—a small efficiency that adds up over hundreds of color adjustments in complex projects.
To close the Color Mixer panel, press Return (Mac) or Enter (Windows).
Click on the Stem to select it.
The Stem and Leaf should share the same natural green color for botanical accuracy. Since the Stem is drawn as a path rather than a filled shape, it requires a stroke color rather than a fill color to be visible.
In the Properties panel under Appearance, click on the swatch next to Stroke. (It should display as a black outline.)
At the top middle of the panel that appears, click the Color Mixer button
 if it isn't already selected.
In the Color Mixer panel, enter 66c and 100y.
To close the Color Mixer panel, press Return (Mac) or Enter (Windows).
With the Stem still selected, return to the Properties panel and in the weight field to the right of the Stroke swatch, change the weight from 1 pt to 5 pt.
TIP: You can also access stroke weight controls in the Control panel at the top of the screen—use whichever location feels more intuitive to your workflow.
Now let's clean up the visual presentation by removing the distracting black strokes from the filled shapes.
With the Selection tool
, starting outside the shapes, click and drag a selection marquee over all elements. When you release, they will all be selected.Shift–click the Stem to deselect it specifically. (This is crucial because the stem exists only as a stroked path—removing its stroke would make it completely invisible.)
In the Tools panel, ensure that the Stroke icon is active and displays black. If it shows question marks instead, the stem is likely still selected.
Assembling Your Illustration
1Select All Components
Use Selection tool to click Stem, then Shift-click Vase, Leaf, and Tulip to select all four drawn shapes.
2Copy and Create New Document
Copy selected shapes, create new Letter-sized print document named 'yourname-flowers.ai', then paste components.
3Arrange Elements
Position Vase at center, Stem above Vase, Tulip at Stem end, and Leaf above Vase to the right of Stem.
Color Application Process
Vase Coloring
Apply warm terracotta color using 60m and 90y values in CMYK color mixer for a natural pottery appearance.
Tulip Coloring
Create vibrant pink flower using 7c and 94m values, ensuring other color values remain at zero for pure color.
Foliage Coloring
Apply natural green to both Leaf fill and Stem stroke using 66c and 100y, adjusting stroke weight to 5pt for visibility.
CMYK Color Entry ShortcutUse Tab to jump between color value fields in the Color Mixer panel for faster color entry. Always verify unused fields are set to 0.
Understanding Question Marks in the Interface
When multiple objects with different properties are selected, the Stroke and Fill icons display question marks instead of solid colors.

This indicates mixed properties across your selection—Illustrator cannot display a single color because multiple different colors are present. When all selected objects share the same color properties, Illustrator will display that unified color instead. This visual feedback helps you understand your selection and make informed adjustments.
Click the None button to remove the strokes from the selected filled objects.
Click away from the artwork to deselect everything and admire your work.
Select File > Save and close the file.
Congratulations! You've successfully created a professional vector illustration using fundamental pen tool techniques. Spring has sprung, and more importantly, so have your vector drawing skills!
Question marks in Fill and Stroke icons indicate multiple selected objects have different color values. Illustrator shows the actual color only when all selected objects share the same color.
Removing Unwanted Strokes
Select All Elements
Drag selection marquee over all artwork to select everything at once.
Deselect Stem
Shift-click the Stem to remove it from selection since it needs to keep its stroke to remain visible.
Remove Strokes
With Stroke icon active showing black color, click None button to remove strokes from filled shapes.