Topics Covered in This HTML Email Tutorial:
Working with Tables, Centering the Email, Text Styling with Inline CSS, Adding a Border, Closing the Gap Below Images
Core HTML Email Concepts
Table-Based Layouts
Learn why tables are essential for HTML email layout consistency across different email clients with limited CSS support.
Inline CSS Styling
Master inline CSS techniques required for Gmail and other clients that don't support external stylesheets or embedded styles.
Cross-Client Compatibility
Understand email client quirks and implement solutions for consistent rendering across different platforms.
Exercise Preview
Exercise Overview
Even in 2026, many popular HTML email clients still lack comprehensive CSS layout support, making table-based layouts essential for consistent email rendering across all platforms. While modern web development has moved beyond table layouts, email development remains an exception due to the fragmented nature of email client rendering engines. In this exercise, we'll construct a professional email template using a single table structure, optimized images, semantic text, and strategically applied inline CSS to ensure maximum compatibility across email clients.
Single Image vs HTML Email Approach
Getting Started
Before diving into the code, ensure you have a reliable code editor configured for HTML development. We'll be working with table-based markup that requires precision and attention to detail.
Launch your preferred code editor (we recommend Visual Studio Code for its excellent HTML support, though Sublime Text or any professional editor works well).
In your code editor, press Cmd–O (Mac) or CTRL–O (Windows) to open a file.
Navigate to the Desktop and locate the Class Files folder, then yourname-HTML Email Class folder, followed by Omniburger.
Double–click on birthday.html to open it in your editor.
Set the document title by editing the HTML structure as follows:
<!DOCTYPE html>
<html lang="en">
<head>
   <meta charset="UTF-8">
   <title>Happy Birthday from Omniburger!</title>
</head>
<body>

</body>
</html>
Save the file using Cmd–S (Mac) or CTRL–S (Windows).
NOTE: While most email clients strip or ignore the title tag, some clients do display it, and having a descriptive title improves accessibility and SEO if the email is viewed as a web page. It's a professional best practice that takes seconds to implement.
Project Setup Process
Launch Code Editor
Open Visual Studio Code, Sublime Text, or your preferred editor for HTML development
Open Project Files
Navigate to Desktop > Class Files > yourname-HTML Email Class > Omniburger folder
Edit Document Title
Add meaningful title for email client compatibility and web preview
Coding the Table Structure
Now we'll build the foundation of our email using HTML tables. This approach ensures consistent rendering across the diverse landscape of email clients, from modern Gmail interfaces to legacy corporate email systems.
To understand our target design, navigate to Desktop > Class Files > yourname-HTML Email Class > Reference Files.
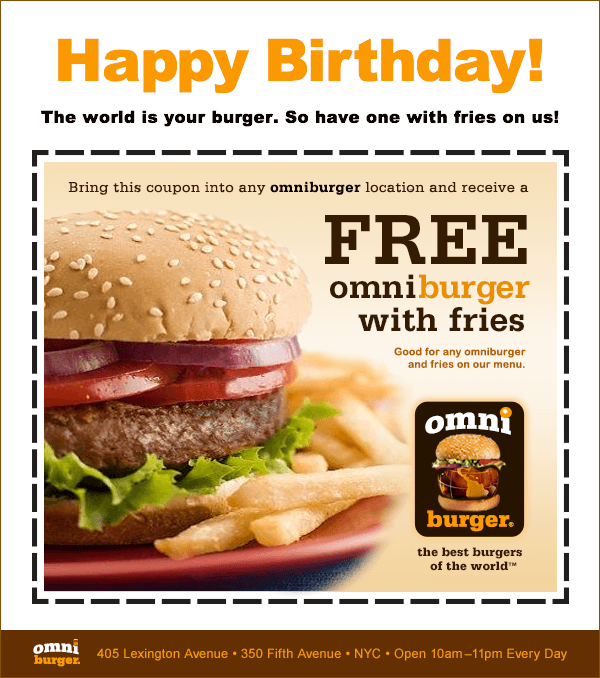
Double–click on birthday-coupon.pdf to view the complete design. Notice the hierarchical structure: a prominent heading, concise messaging, the featured coupon image, and a branded footer.
While sending a single image would be faster, this approach violates email marketing best practices for several critical reasons:
- Image blocking: A significant percentage of email recipients have images disabled by default. Single-image emails become completely invisible to these users, resulting in zero message delivery and potential brand damage.
- Spam filtering: Modern spam detection algorithms flag emails with high image-to-text ratios as potentially malicious. A balanced mix of HTML text and images significantly improves deliverability rates and sender reputation.
Following industry standards, we'll create a robust single-table layout that combines semantic HTML text with optimized images for maximum impact and deliverability.
Return to your code editor to begin building the table structure.
Create the foundational table by adding this code inside the
<body>tags:<body> <table> <tr> <td></td> </tr> </table> </body>This creates the essential table architecture: the
<table>element contains a single row (<tr>) with one data cell (<td>). All visible content will be placed within the<td>tags, while the<tr>tags provide structural organization.Email preview panes vary significantly in width across different clients and devices. Research shows that 600 pixels provides optimal compatibility across desktop clients, mobile devices, and preview panes without triggering horizontal scrolling. Add the width attribute to the
<table>tag:<table width="600"> <tr> <td></td> </tr> </table>Email clients apply inconsistent default spacing to table elements. To ensure pixel-perfect control over our layout, we'll reset all spacing and border values. Add these attributes to the
<table>tag:<table width="600" cellpadding="0" cellspacing="0" border="0">NOTE: Without explicit declaration, most email clients add 1 pixel of cellpadding and 2 pixels of cellspacing by default. The border="0" attribute eliminates reserved space for borders in certain clients, even when no visible border is intended.
Save your work before proceeding to content addition.
Rather than typing content manually, we'll use pre-written copy to focus on structure and styling. Navigate to Desktop > Class Files > yourname-HTML Email Class > Omniburger > snippets and open content-coupon.html in your code editor.
Select all content with Cmd–A (Mac) or CTRL–A (Windows).
Copy the content using Cmd–C (Mac) or CTRL–C (Windows).
Close the content file and return to birthday.html.
Paste the content (Cmd–V (Mac) or CTRL–V (Windows)) inside the
<td>tags:<table width="600" cellpadding="0" cellspacing="0" border="0"> <tr> <td> <h1>Happy Birthday!</h1> <p>The world is your burger. So have one with fries on us!</p> </td> </tr> </table>Now we'll add the coupon image, which serves as the email's primary call-to-action. Insert this code below the paragraph tag:
<td>
   <h1>Happy Birthday!</h1>
   <p>The world is your burger. So have one with fries on us!</p>
   <img src="img/free-burger.jpg" height="480" width="537" ALT="Free Burger Coupon">
</td>
Save the file to preserve your progress.
Complete the email structure by adding the footer image, which reinforces brand identity and provides essential business information. Add this code directly below the coupon image:
<img src="img/free-burger.jpg" height="480" width="537" ALT="Free Burger Coupon">
<img src="img/footer.png" height="47" width="598" ALT="Omniburger">
NOTE: The footer width of 598px accounts for the 1px borders we'll add later (598px + 1px left + 1px right = 600px total). This precise calculation ensures perfect alignment within our table structure.
Save your work before previewing the current state.
Navigate to Desktop > Class Files > yourname-HTML Email Class > Omniburger.
CTRL–click (Mac) or Right–click (Windows) on birthday.html, select Open with, and choose your preferred browser (Google Chrome recommended for its rendering accuracy).
Browser Preview Shortcuts
If you're using Visual Studio Code with the Live Preview or open in browser extension installed, press Option–B (Mac) or ALT–B (Windows) to instantly open your HTML document in the default browser. This streamlines the development workflow significantly.
The content displays properly, but professional email design requires centered alignment for optimal visual impact across all viewing environments.
TIP: Keep birthday.html open in your browser and use the refresh function to quickly preview changes as you code. This iterative approach speeds development and helps catch issues early.
Return to birthday.html in your code editor to implement centering.
Center the content within the table cell by adding the align attribute:
<td align="center">
   <h1>Happy Birthday!</h1>
   <p>The world is your burger. So have one with fries on us!</p>
   <img src="img/free-burger.jpg" height="480" width="537" ALT="Free Burger Coupon">
   <img src="img/footer.png" height="47" width="598" ALT="Omniburger">
</td>
NOTE: Always declare alignment attributes explicitly for table cells. While browsers default to left alignment, nested tables can cause inheritance issues where parent cell alignment overrides child elements. Explicit declaration prevents rendering inconsistencies across email clients.
Save and preview your changes. The content centers nicely within the cell, but we also need to center the entire email within the browser window and email preview pane. Return to your code editor.
Center the complete table structure by adding the align attribute to the <table> tag:
<table width="600" cellpadding="0" cellspacing="0" border="0" align="center">Save the file and refresh your browser preview. The email now displays with professional centering that will work consistently across email clients.
Development Workflow Tips
Live Preview Setup
Keep birthday.html open in browser for easy reloading. Use Chrome for most accurate rendering preview.
VS Code Integration
Install open in browser extension for quick preview with Option-B (Mac) or Alt-B (Windows) shortcuts.
Styling the Email
Email CSS presents unique challenges compared to web development. Gmail and other major clients strip external stylesheets and <head> styles, requiring all formatting to be applied inline. This approach, while verbose, ensures maximum compatibility across the email ecosystem.
Return to birthday.html in your code editor to begin styling the headline.
Add typography styling to the
<h1>tag using inline CSS:<h1 style="font-family:'Arial Black', sans-serif;">Happy Birthday!</h1>Save and preview the change in your browser. The font weight improvement is noticeable. Now we'll enhance the visual impact with size and color adjustments.
Expand the headline styling to match the design specifications:
<h1 style="font-family:'Arial Black', sans-serif; font-size:58px; color:#fb9a00;">Save and refresh your browser. The headline now commands proper attention. Let's style the supporting paragraph text.
Apply consistent typography to the paragraph element:
<p style="font-family:'Arial Black', sans-serif; font-size:17px;">Save and preview the results. The typography is cohesive, but default margin spacing creates excessive white space that dilutes the message impact.
Optimize the headline spacing by adding margin controls:
<h1 style="font-family:'Arial Black', sans-serif; font-size:58px; color:#fb9a00; margin-top:0; margin-bottom:5px;">Apply similar spacing optimization to the paragraph:
<p style="font-family:'Arial Black', sans-serif; font-size:17px; margin-top:0;">Save and refresh your browser to see the improved spacing. The text now has appropriate visual hierarchy without unnecessary gaps.
Gmail does not support external stylesheets or embedded styles in head/body. All styles must be inline, element by element, for reliable rendering.
Inline Styling Process
Add Font Family
Use web-safe fonts with fallbacks: 'Arial Black', sans-serif for consistent rendering
Set Font Size and Color
Apply specific pixel sizes and hex colors for precise control across email clients
Control Margins
Reset default margins and add specific spacing for professional appearance
Adding Professional Borders and Fixing Display Issues
Professional email design often requires borders for visual structure and brand consistency. We'll also address a common rendering issue that affects image display in email clients.
Add a border around the entire content area by styling the
<table>tag:<table width="600" cellpadding="0" cellspacing="0" border="0" align="center" style="border:1px solid #825102;">Save and preview the result. Notice the unwanted gap between the footer image and the bottom border—this is a common issue in email development.
Images display as inline elements by default, inheriting text baseline alignment properties. This creates space below images to accommodate text descenders (like the tails on letters 'j' and 'g'). While invisible for text, this baseline space appears as an unwanted gap below images, particularly noticeable against borders or background colors.
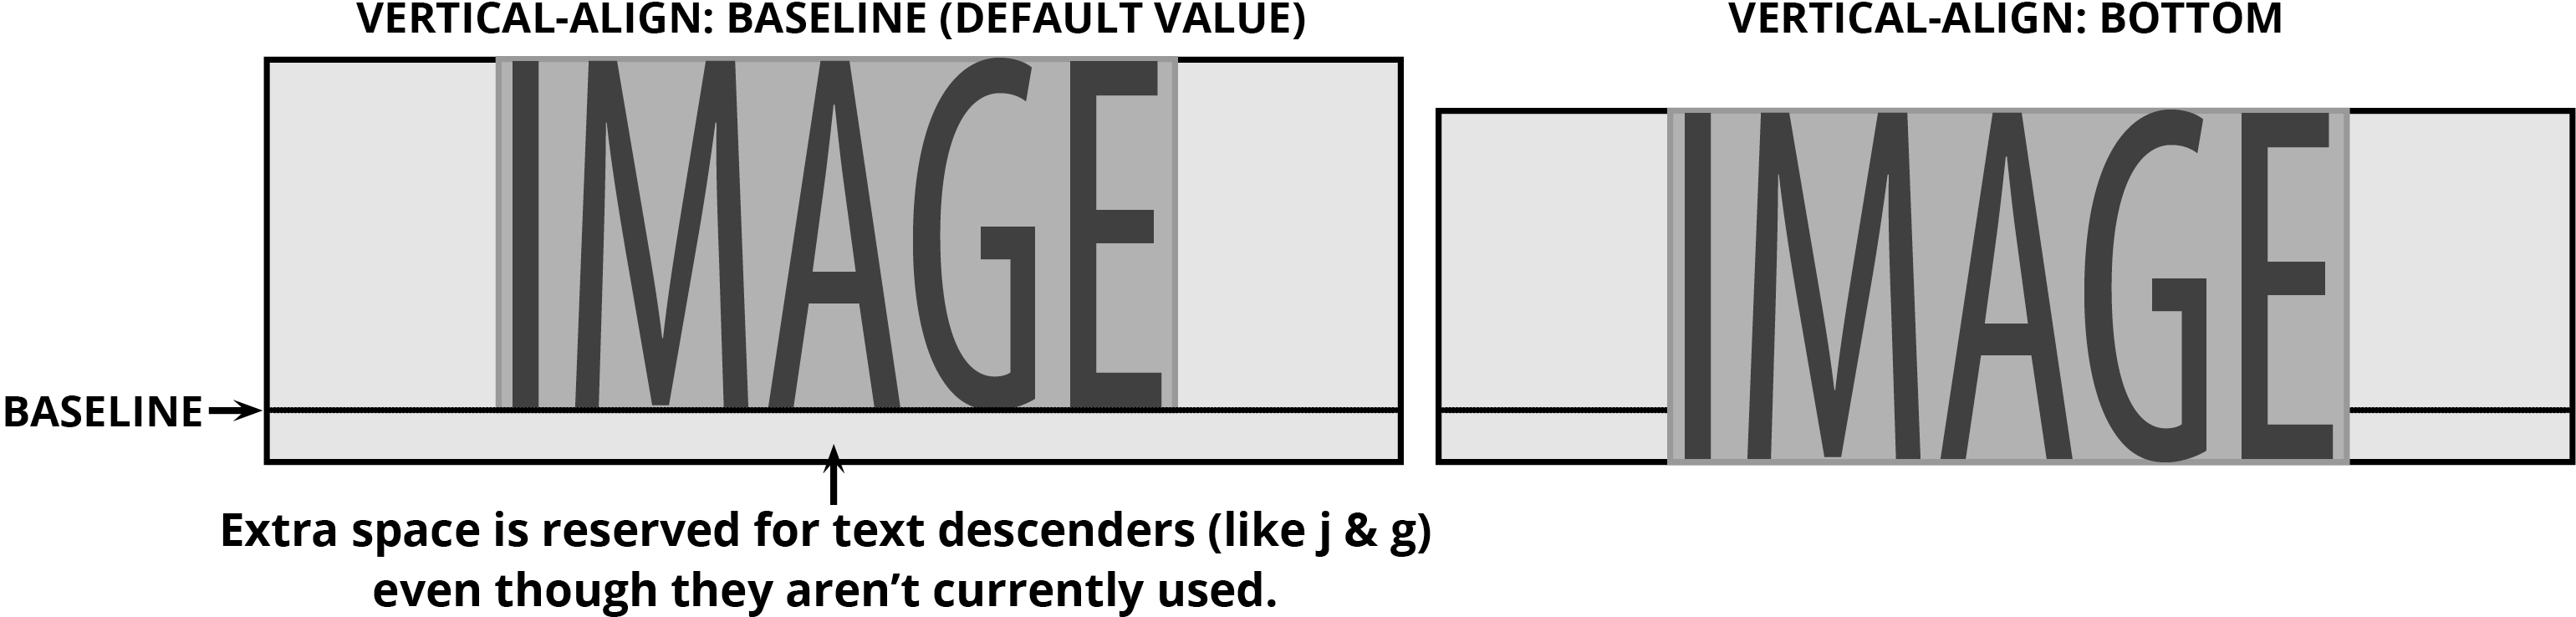
NOTE: This spacing issue appears in HTML5 and other strict DOCTYPEs but not in transitional DOCTYPEs. Since many email clients impose their own DOCTYPE—typically strict—we must account for this behavior in our code.
The solution involves changing the image display property from inline to block, eliminating the baseline alignment issue entirely.
Fix the footer image display by adding a style attribute:
<img src="img/footer.png" height="47" width="598" ALT="Omniburger" style="display:block;">Save and refresh your browser. The gap disappears, creating a clean, professional appearance.
NOTE: This completes the core email layout. Production emails require additional steps including testing across multiple email clients, spam filter optimization, and deployment through email service providers—topics covered in subsequent exercises.
Optional Enhancement: Adding Background Color
Advanced email design often incorporates background colors to create visual depth and improve brand recognition. Due to email client limitations, this requires a specific table-wrapping technique.
Return to birthday.html in your code editor.
While modern web design typically applies background colors to the
<body>element, many email clients either strip the body tag entirely or ignore CSS background properties. The reliable approach involves wrapping our content table within a full-width container table and applying the background color to the container's table cell.Wrap the existing table structure with a new container table:
<table cellpadding="0" cellspacing="0" border="0" width="100%">
   <tr>
      <td align="center" bgcolor="#ece2ce">
         <table width="600" cellpadding="0" cellspacing="0" border="0" align="center" style="border:1px solid #825102;">
Code Omitted To Save Space
</table>
      </td>
   </tr>
</table>
NOTE: The explicit alignment declaration in the wrapper cell prevents inheritance issues. Yahoo Mail and similar clients often ignore nested table alignment in favor of parent cell defaults, making explicit alignment essential for consistent rendering.
Save and preview the result. The background color creates depth, but the content needs a contrasting background for optimal readability.
Add a white background to the content area by locating the
<td>tag within the 600-pixel table (around line 13) and editing it:<td align="center" bgcolor="#ffffff">NOTE: Always use full six-character hex codes in email development rather than shorthand (#fff). Some email clients don't properly interpret three-character hex notation, potentially causing display issues.
Save and refresh your preview. The contrast improves significantly, but the content would benefit from padding around the edges.
While HTML cellpadding could achieve this spacing, certain email clients (particularly Outlook.com) ignore cellpadding attributes. CSS padding provides more reliable cross-client compatibility.
Add padding to the wrapper table cell:
<table cellpadding="0" cellspacing="0" border="0" width="100%">
   <tr>
      <td align="center" bgcolor="#ece2ce" style="padding:20px;">
Save and refresh to see the improved spacing.
For a polished preview experience, eliminate the default browser margins by styling the
<body>tag (around line 7):<body style="background-color:#ece2ce;">Save and take a final preview. The email now displays with professional polish suitable for client presentations.
Remember: Body tag styles are primarily for preview purposes since most email clients strip or ignore them. The wrapper table technique provides the actual background color functionality in live email environments.
Close birthday.html in both your browser and code editor. You've successfully created a professional HTML email template using industry best practices.
This exercise demonstrates the foundational techniques of email development. Production deployment requires additional considerations including multi-client testing, accessibility optimization, and integration with email service providers—advanced topics covered in subsequent exercises.