Topics Covered in This HTML Email Tutorial:
Slicing a Photoshop File, Naming Slices, Adding ALT Text, Adding Link URLs
This tutorial covers the complete workflow from Photoshop file preparation to HTML-ready email with proper slicing, naming, and link configuration.
Exercise Preview
Exercise Overview
While modern email development favors responsive HTML and CSS, there are still scenarios where image-heavy designs cannot be recreated with code alone—particularly for one-off campaigns with complex visual elements or tight deadlines. In these situations, creating an entire email with sliced images becomes a practical necessity, despite its inherent limitations.
This approach comes with significant trade-offs: larger file sizes, poor accessibility for users with images disabled, and reduced deliverability in spam-sensitive environments. However, Photoshop's slice-and-export functionality can handle most requirements for single-use campaigns and often proves faster than custom coding complex layouts from scratch. The key limitation is flexibility—Photoshop generates static, non-reusable code that's unsuitable for email templates or campaigns requiring multiple variations.
For this exercise, we'll walk through the complete process of slicing a restaurant email design, setting up proper naming conventions, and configuring accessibility and linking attributes that will translate into clean HTML output.
Image-Heavy Email Design Trade-offs
Photoshop does not produce flexible, reusable code. This approach is not recommended for emails that will be used more than once.
Slicing the File
We'll begin by setting up our workspace and creating strategic slices that correspond to distinct functional areas of the email design.
Launch Photoshop.
Go to File > Open, and navigate into the yourname-HTML Email Class folder. In the Lunch Menu folder, open Lunch Menu.psd.
If you encounter a warning about missing fonts, proceed through the dialog(s) and select Don't Resolve. Since we're slicing for image export rather than editing text elements, font resolution is unnecessary for this workflow.
Go to File > Save As and name the file yourname-Lunch Menu.psd to preserve the original.
If you receive a compatibility warning, click OK to maintain standard PSD format.
Now we'll create slices that correspond to distinct clickable areas and content sections. In the Tools panel, select the Slice tool
 . You may need to click and hold the Crop tool
  to access it from the tool group.
Create your first slice by dragging over the top wood area. Use the pink Smart Guides to ensure precise alignment with design elements.
To fine-tune slice boundaries, hover your cursor over any edge until you see the resize cursor, then drag to adjust positioning.
Create a second slice over the Lunch Specials bar, positioning it directly below your first slice with no gaps.
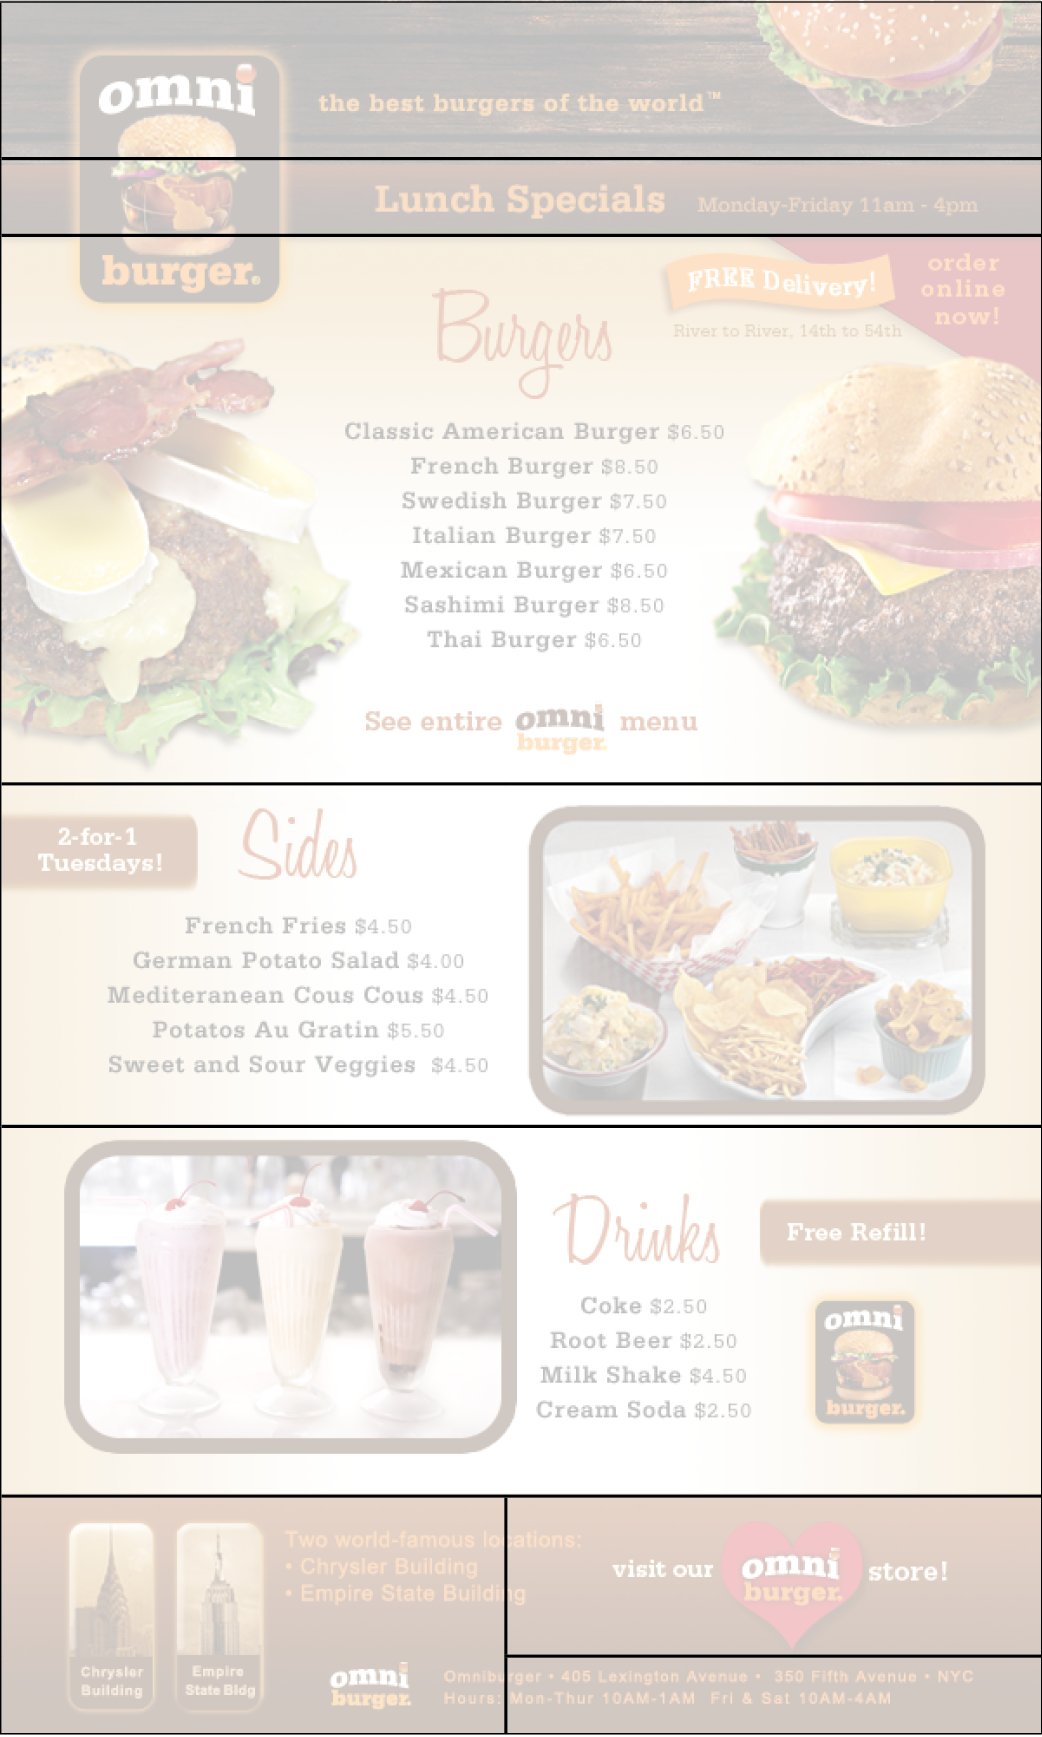
Continue creating slices for each distinct content area as demonstrated in the reference below. Each slice should represent either a unique link destination or a logical content grouping:
File Preparation Workflow
Open and Setup
Launch Photoshop, open the Lunch Menu.psd file from the designated folder, and proceed through any font warnings without resolving them.
Save Working Copy
Use File > Save As to create your personalized version named 'yourname-Lunch Menu.psd' and accept compatibility settings.
Begin Slicing
Select the Slice tool from the Tools panel and create slices over linkable areas using Smart Guides for precise positioning.
The Slice tool may be hidden under the Crop tool. Click and hold the Crop tool to access it from the dropdown menu.
Naming Slices
Strategic slice naming is crucial for maintaining organized assets and ensuring your exported HTML uses semantic filenames. Well-named slices also make future updates and collaboration significantly easier.
Switch to the Slice Select tool
 by clicking and holding the Slice tool to reveal the tool group.
Double-click the top slice to open its properties dialog.
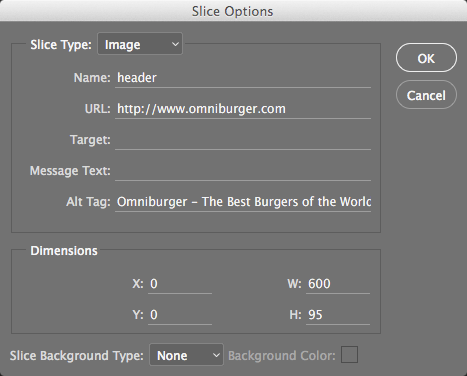
In the Name field, enter: header
Click OK to confirm.
Double-click the Lunch Specials slice to access its properties.
Enter lunch-specials in the Name field and click OK. Note the use of hyphens rather than spaces for web-safe filenames.
Apply descriptive names to all remaining slices following the naming convention shown below. Use lowercase letters and hyphens to ensure cross-platform compatibility:
Slice names become the actual filenames when you export, so descriptive naming is crucial for organized file management and web deployment.
Slice Naming Process
Switch Tools
Select the Slice Select tool by clicking and holding the Slice tool to access the dropdown menu options.
Access Properties
Double-click any slice to open its properties dialog where you can modify the name and other settings.
Apply Descriptive Names
Use clear, descriptive names like 'header' for the top section and 'lunch-specials' for menu areas to maintain organization.
Creating ALT Text & Links
Proper ALT text and link configuration at the slice level ensures your exported HTML meets accessibility standards and provides appropriate fallbacks for users with images disabled. This step is particularly important for email marketing compliance and deliverability.
Using the Slice Select tool
, double-click the top slice to open its properties panel.Configure the header slice with appropriate linking and accessibility attributes:
URL: http://www.omniburger.com ALT Tag: Omniburger—The Best Burgers of the World Click OK to save these settings.
Double-click the Lunch Specials slice to configure its properties.
Set the lunch specials linking and descriptive text:
URL: http://www.omniburger.com/lunch.html ALT Tag: Lunch Specials Mon-Fri, 11am-4pm Click OK to confirm.
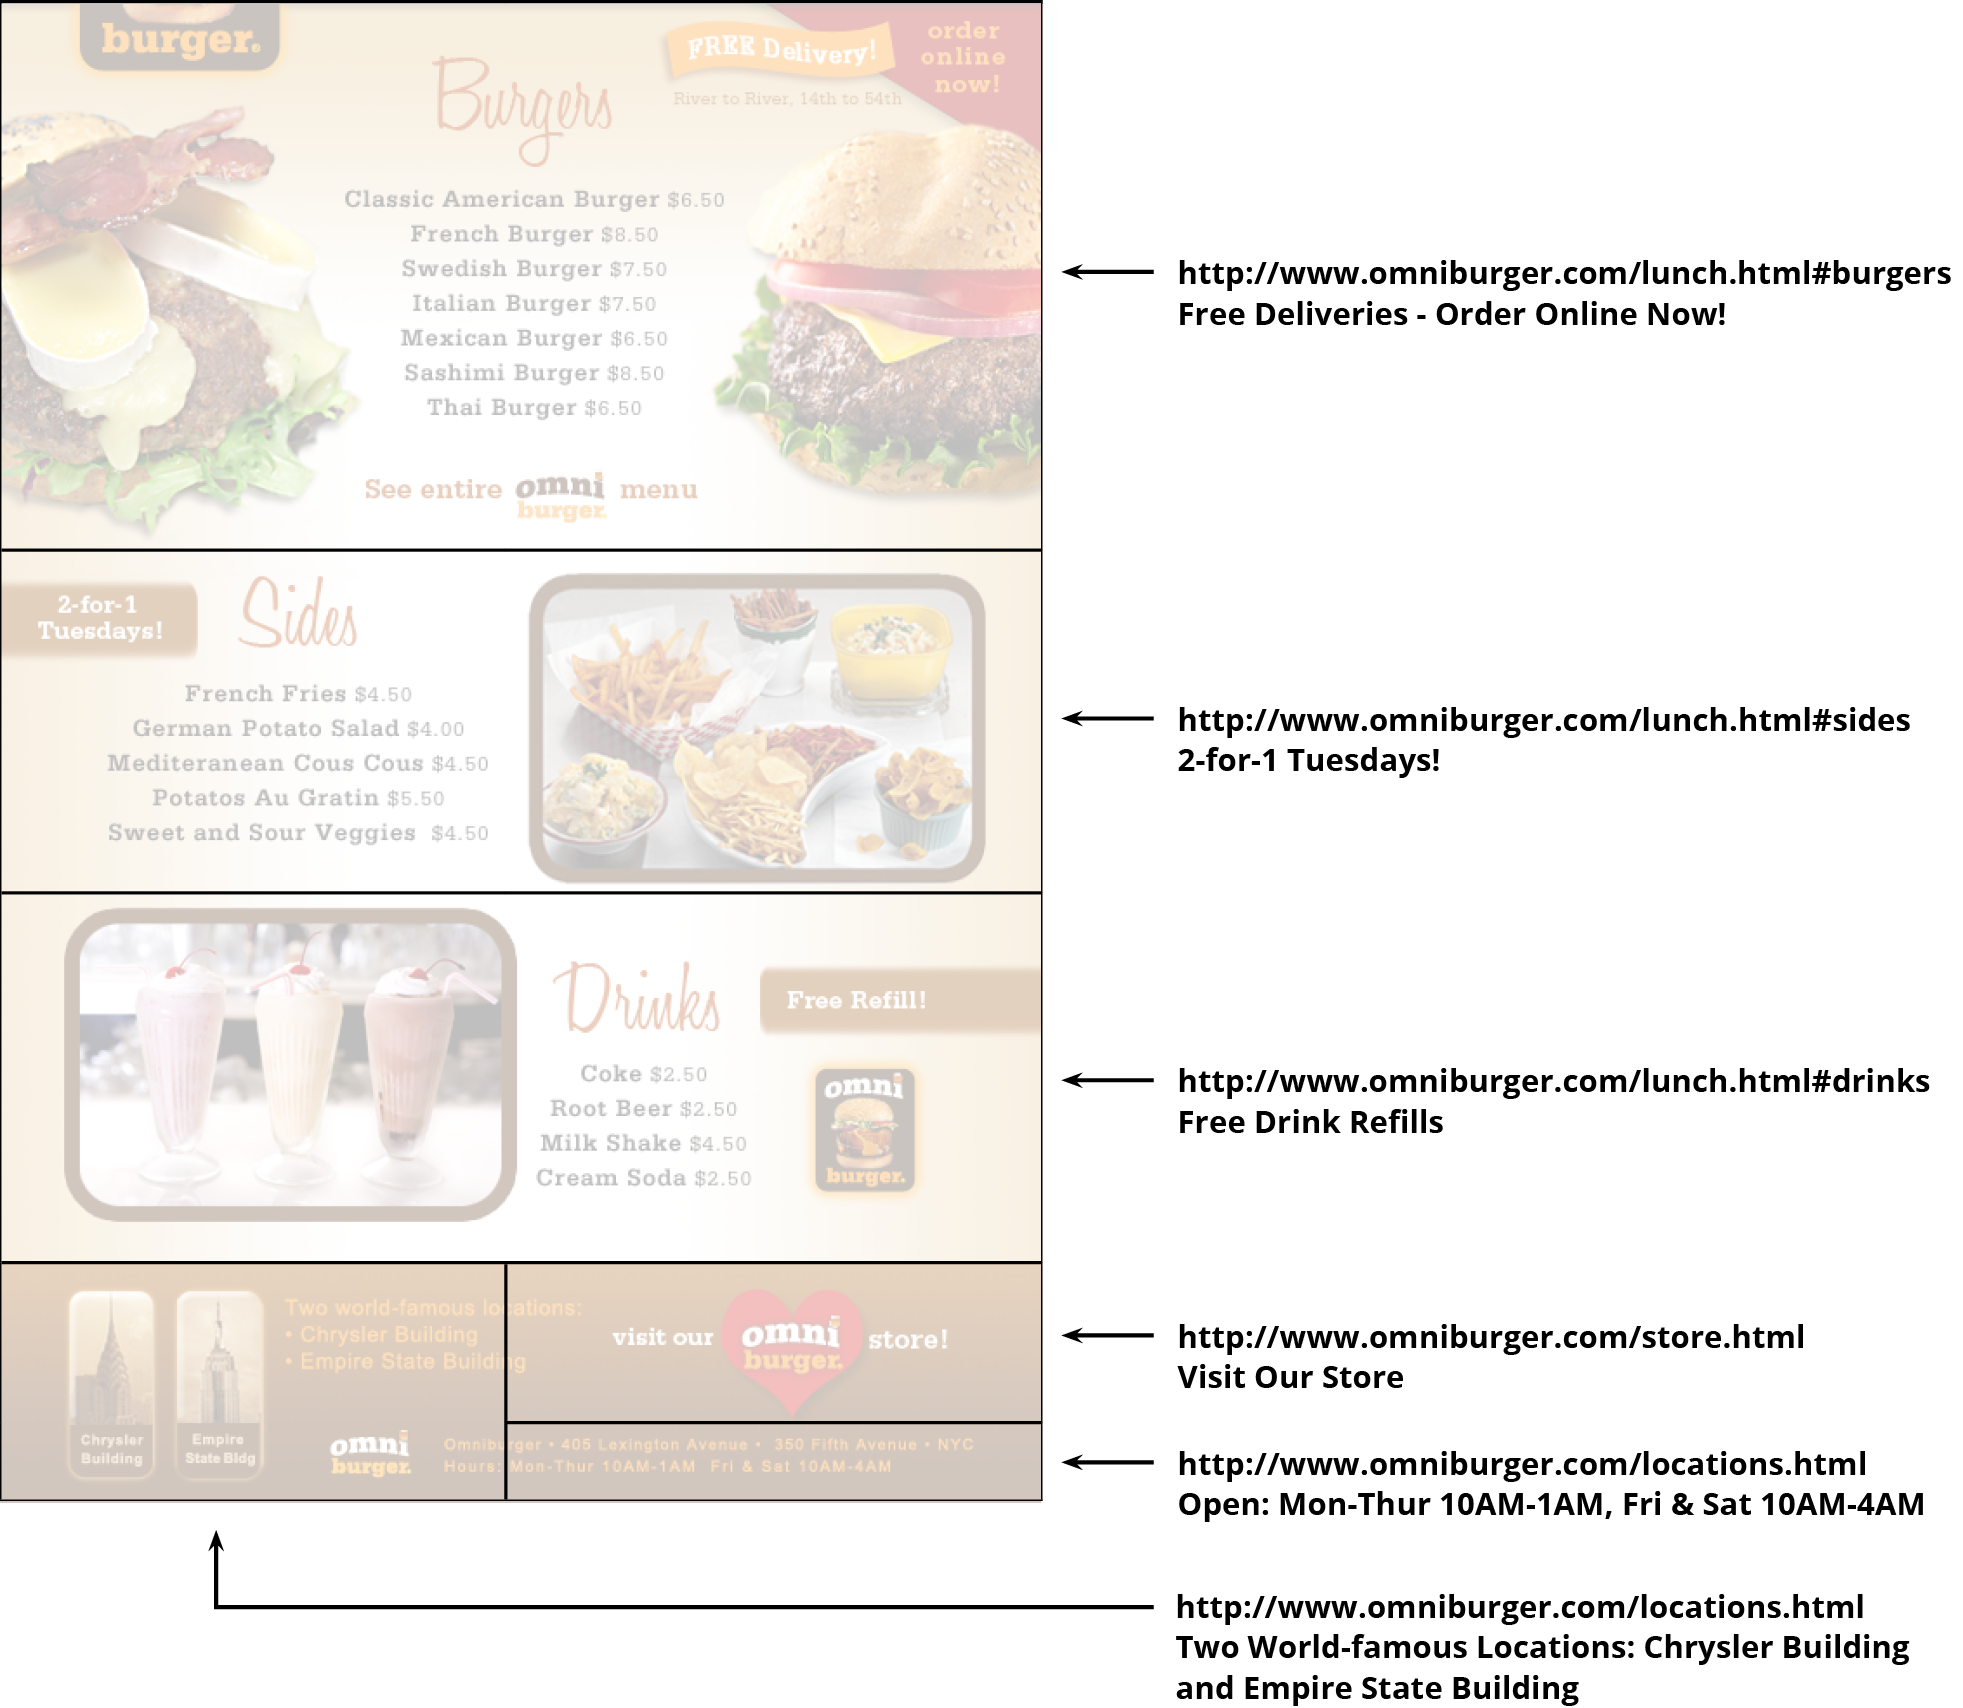
Complete the remaining slices by adding appropriate URLs and ALT text for each section. Remember that ALT text should be descriptive and actionable, telling users what they'll find if they click through:
Save the file to preserve all slice configurations and metadata.
Keep the file open—you'll need it for the HTML export process in the following exercise.
Essential Link Configuration
URL Integration
Add clickable links directly in Photoshop that will be automatically included in the exported HTML code for seamless functionality.
ALT Text Accessibility
Configure descriptive ALT text for each image slice to ensure accessibility compliance and better user experience when images are disabled.
Link Setup Checklist
Provides primary navigation back to homepage
Directs users to specific menu section for targeted conversion
Ensures accessibility and provides context when images don't load
Preserves all slice settings for the next export exercise