Create a New Repo on GitHub
GitHub remains the industry standard for hosting Git repositories, with over 100 million developers using the platform as of 2026. Setting up a new repository is straightforward, but the choices you make during creation can significantly impact your workflow and collaboration capabilities.
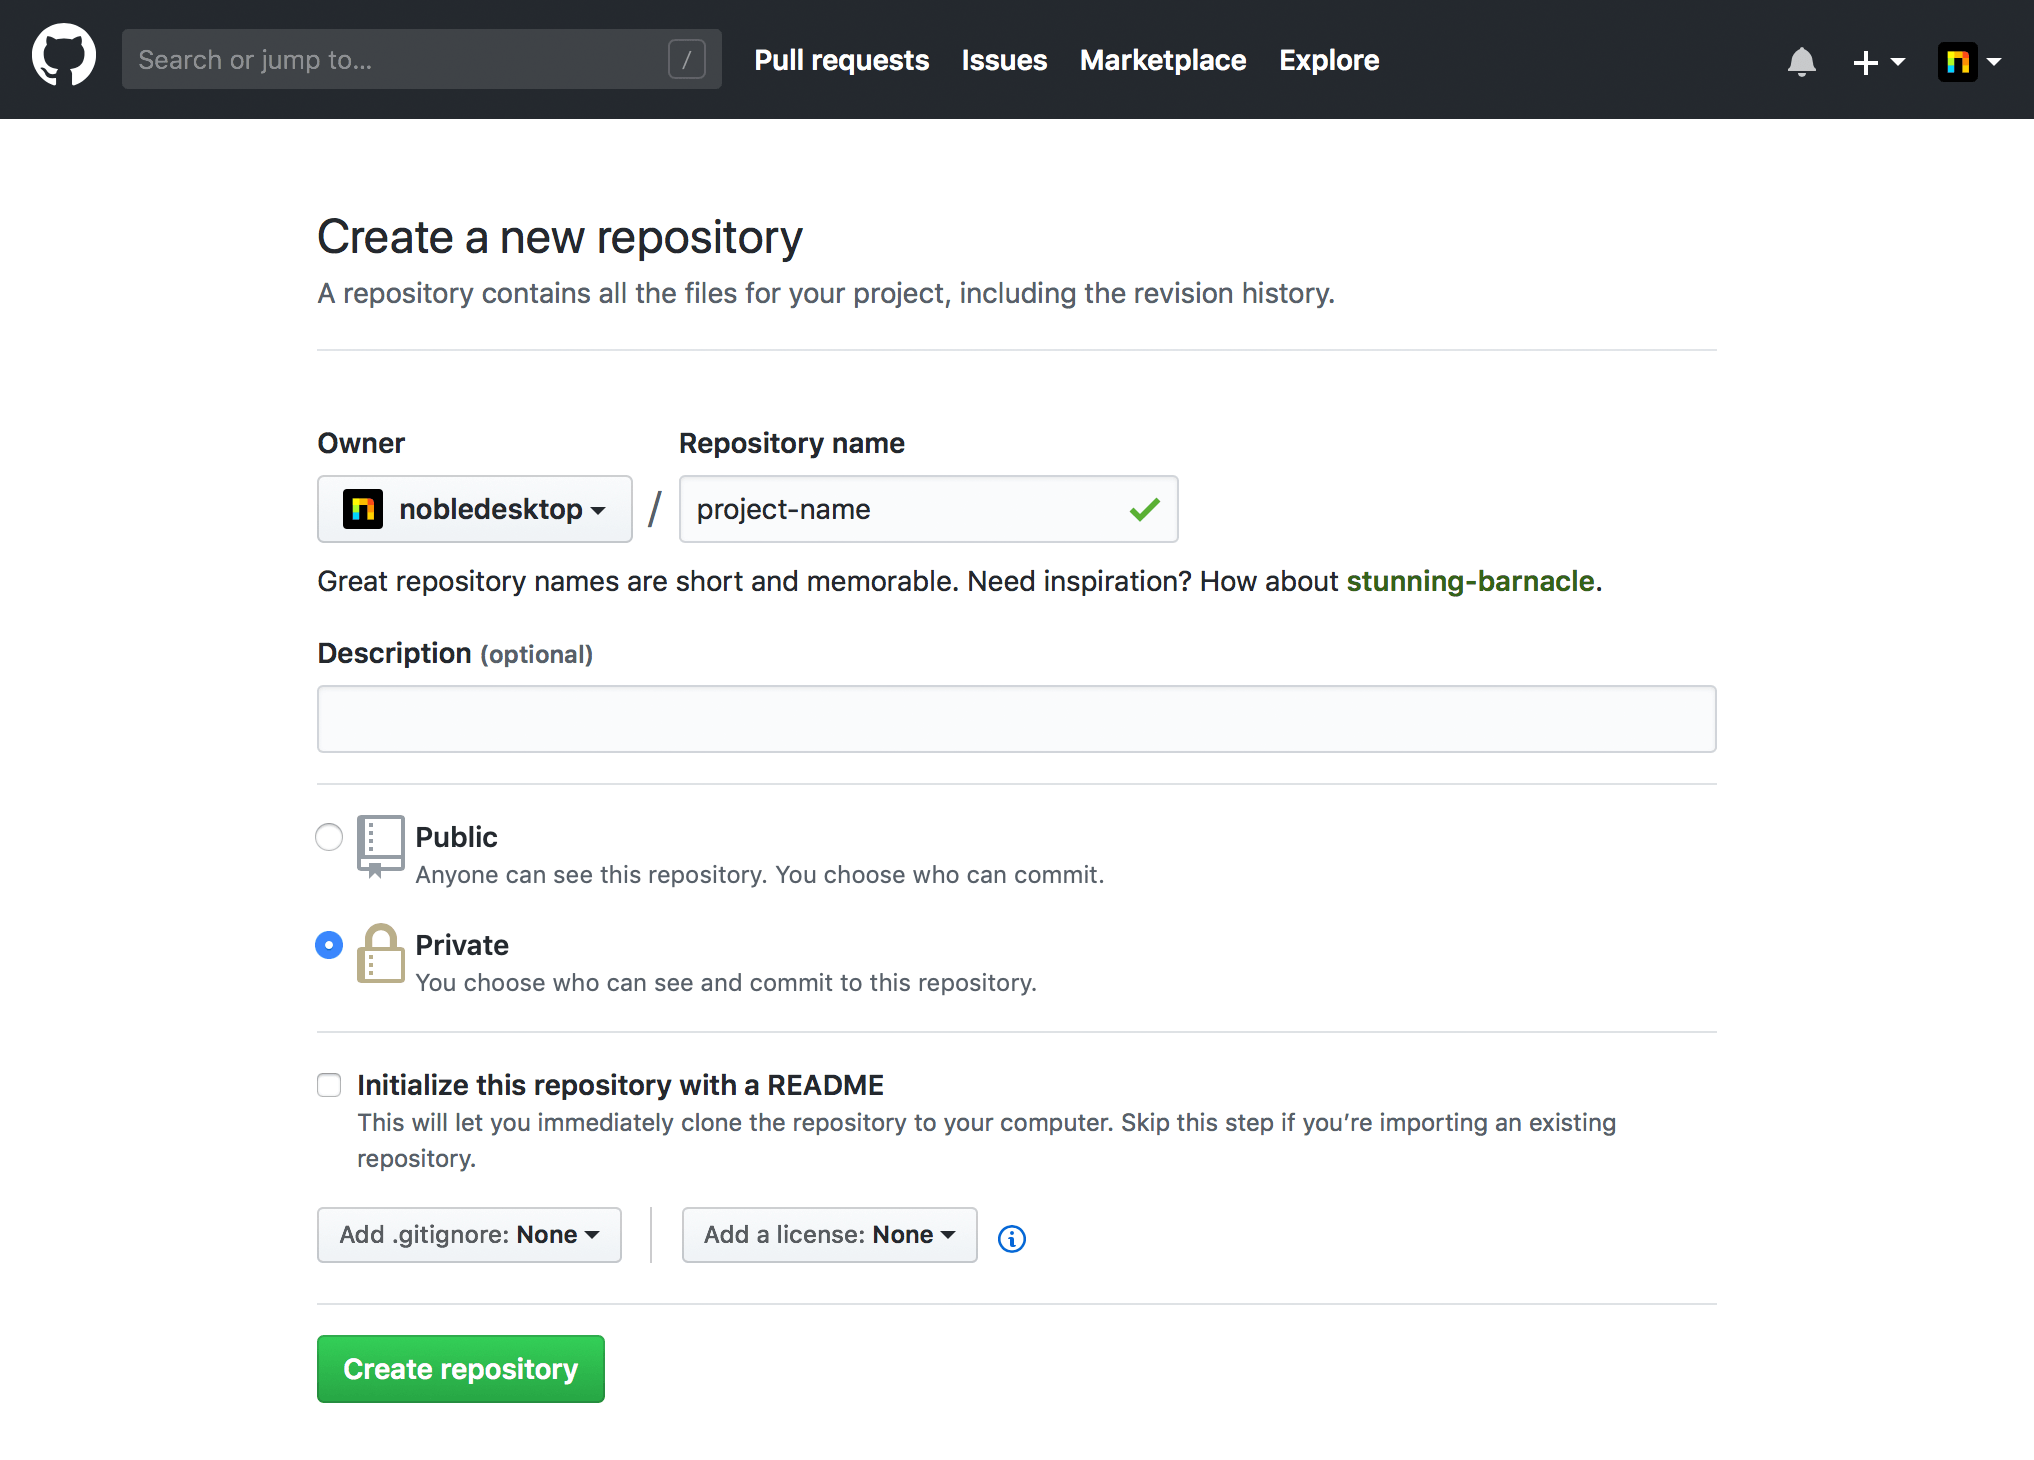
1. Navigate to GitHub.com and log in to your existing account or create a new one (GitHub offers robust free tiers for individual developers and small teams).
2. In the top navigation bar, click the + button and select New repository. This will direct you to GitHub.com/new, where you'll configure your repository settings.
3. Configure your repository with these essential settings:
- Enter a descriptive Repository name that clearly identifies your project's purpose.
- Consider visibility carefully: public repositories are visible to anyone and can enhance your professional profile, while Private repositories keep your code confidential until you're ready to share.
- If you're planning to connect an existing local repository to this remote, leave "Initialize this repository with a README" unchecked to avoid merge conflicts during your first push.
4. Click Create repository. The subsequent page will display Git commands for connecting your local repository to this remote—keep this page accessible as you'll need these commands for the next steps in your workflow.
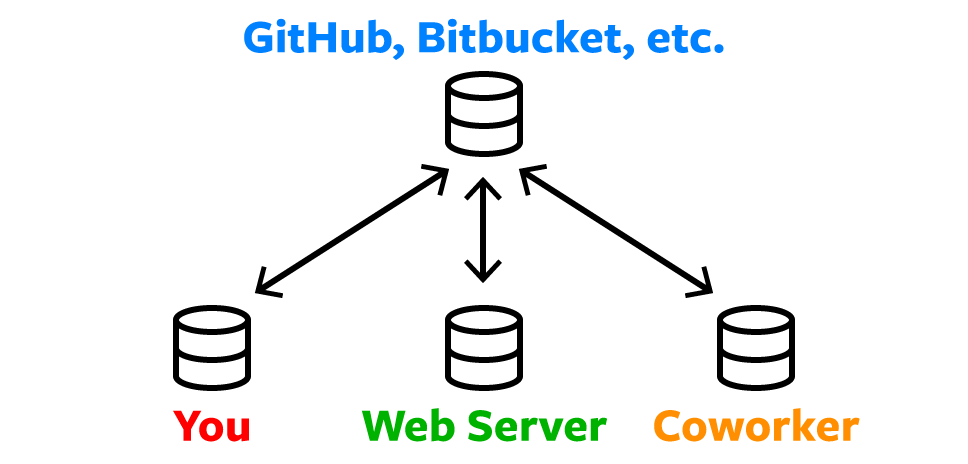
While GitHub dominates the market, many development teams also leverage Bitbucket for its tight integration with Atlassian's development ecosystem.
GitHub Repository Creation Process
Account Access
Navigate to GitHub.com and either log in to your existing account or create a new free account
Repository Initialization
Click the plus button in the top navigation bar and select New repository to access GitHub.com/new
Configuration Setup
Enter a repository name, set visibility to private if needed, and avoid README initialization if pushing existing local repository
Creation Completion
Click Create repository and keep the resulting page open for push commands in subsequent exercises
Do not initialize with README if you already have a local repository to push, as this can create merge conflicts during the initial push process.
Create a New Repo on Bitbucket
Bitbucket, owned by Atlassian, offers compelling advantages for teams already using Jira, Confluence, or other Atlassian tools. Its seamless integration with these platforms makes it particularly attractive for enterprise development workflows.
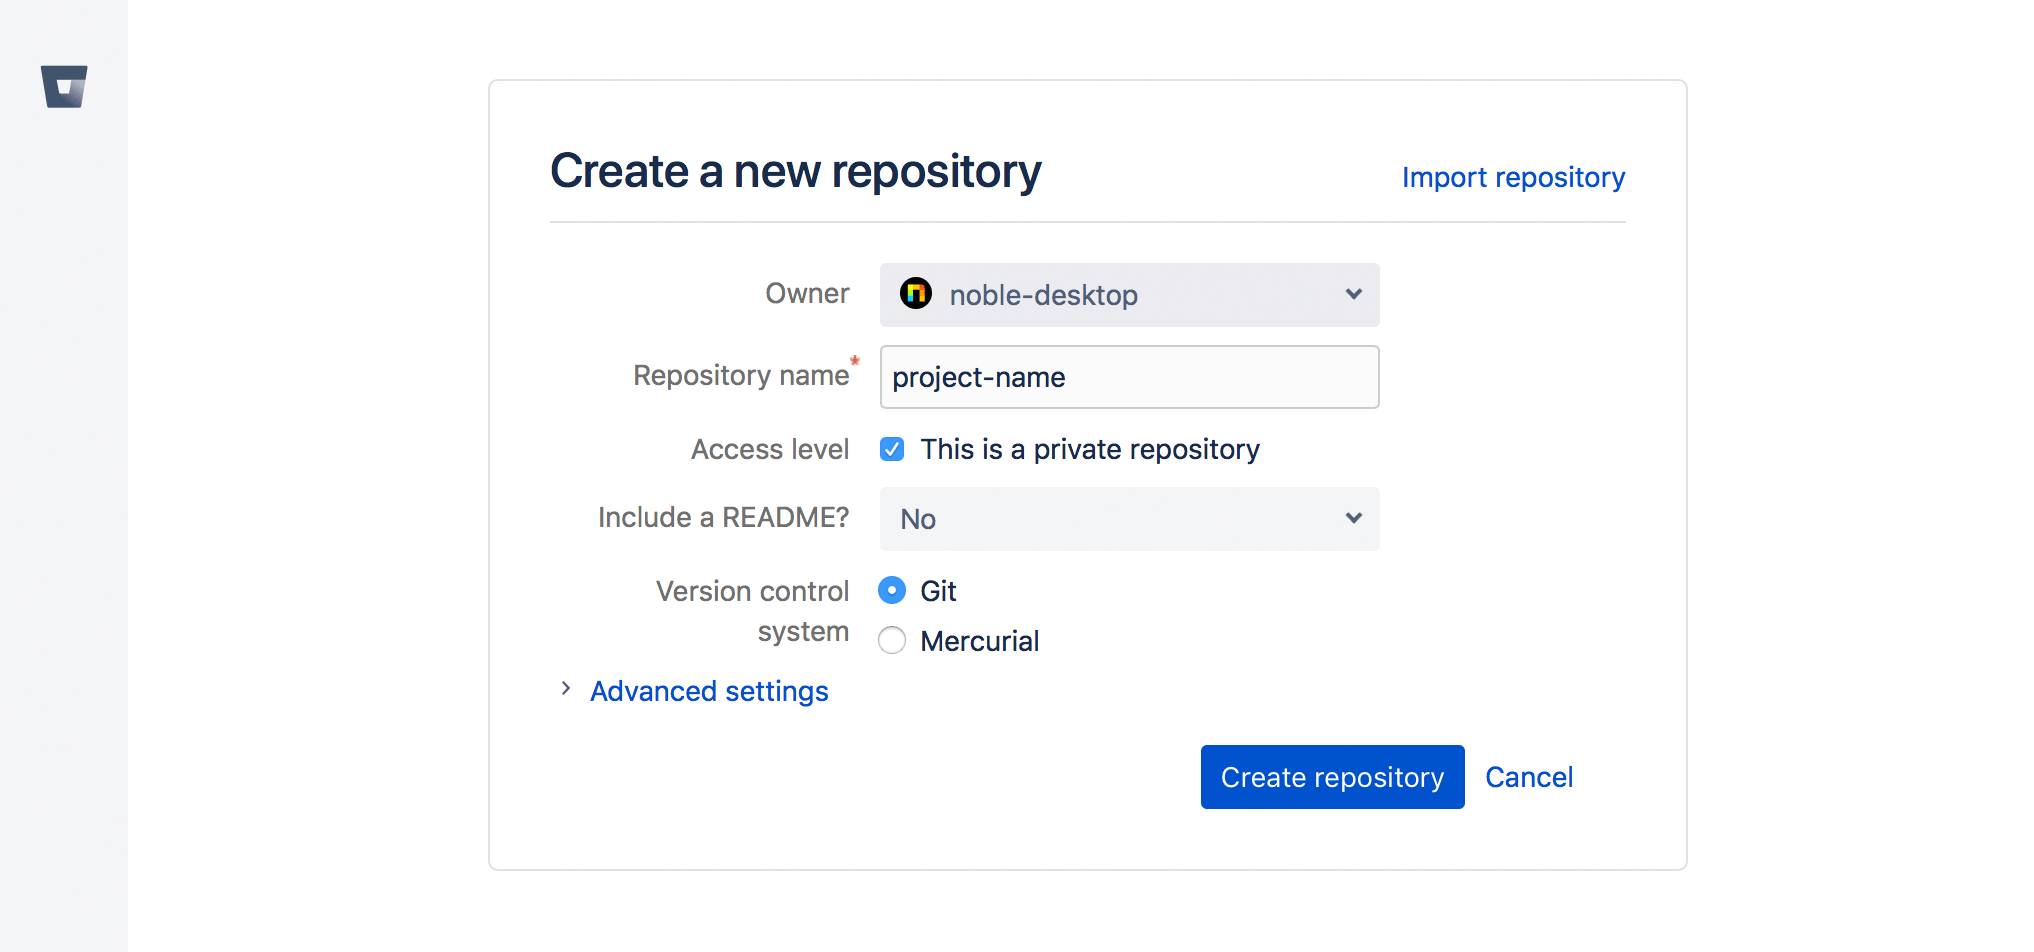
1. Visit bitbucket.org and authenticate with your account credentials or register for a new account (Bitbucket provides generous free tiers with unlimited private repositories for small teams).
2. In the left sidebar navigation, click the + button, then select Repository under the Create section. This will take you to bitbucket.org/repo/create.
3. Configure your repository parameters:
- Choose a meaningful Repository name that follows your team's naming conventions.
- Bitbucket defaults to private repositories—if you want public visibility for your project, uncheck This is a private repository.
- When connecting an existing local repository, set "Include a README" to No to prevent initial commit conflicts.
4. Click Create repository to finalize the setup. Like GitHub, Bitbucket will present you with connection commands on the following page—bookmark this page for easy reference during your repository setup process.
With your remote repository established, you're now ready to connect your local development environment and begin collaborating with your team.
Bitbucket Repository Creation Process
Account Access
Navigate to bitbucket.org and either log in to your existing account or create a new free account
Repository Initialization
Click the plus button in the left navigation bar and select Repository under Create to access bitbucket.org/repo/create
Configuration Setup
Enter a repository name, keep private repository setting checked if desired, and leave README inclusion set to No for existing local repositories
Creation Completion
Click Create repository and maintain the resulting page for push commands covered in following exercises
Repository Setup Checklist
Makes identification easier across multiple projects
Public repositories are visible to everyone, private ones are restricted
Skip if you have existing local repository to avoid conflicts
Contains essential push commands for next steps
Grow Your Skills
Mastering version control is just one component of modern software development. To advance your career and tackle increasingly complex projects, consider expanding your technical expertise through structured learning programs designed for working professionals.
We offer a comprehensive curriculum of coding courses tailored for students at every career stage. Our project-based approach, led by industry veterans, ensures you gain practical experience with the tools and methodologies used in today's development teams. Explore our current offerings:
Available Learning Tracks
Web Development Courses NYC
Comprehensive full-stack development training covering modern frameworks and technologies. Build real-world applications with expert guidance.
Python Bootcamp NYC
Intensive Python programming bootcamp focusing on practical applications and industry best practices. Learn through hands-on projects.
Data Science Courses NYC
Advanced data science curriculum covering analytics, machine learning, and statistical modeling with real-world datasets.
Web Design Courses NYC
Professional web design training emphasizing user experience, visual design principles, and modern design tools.
All courses feature real-world projects guided by experienced industry professionals, ensuring practical skills that translate directly to professional environments.