Topics Covered in This AutoCAD Tutorial:
Hatch Flooring
This exercise specifically targets architectural flooring applications using AutoCAD's Hatch command with practical room-based scenarios.
Exercise Preview
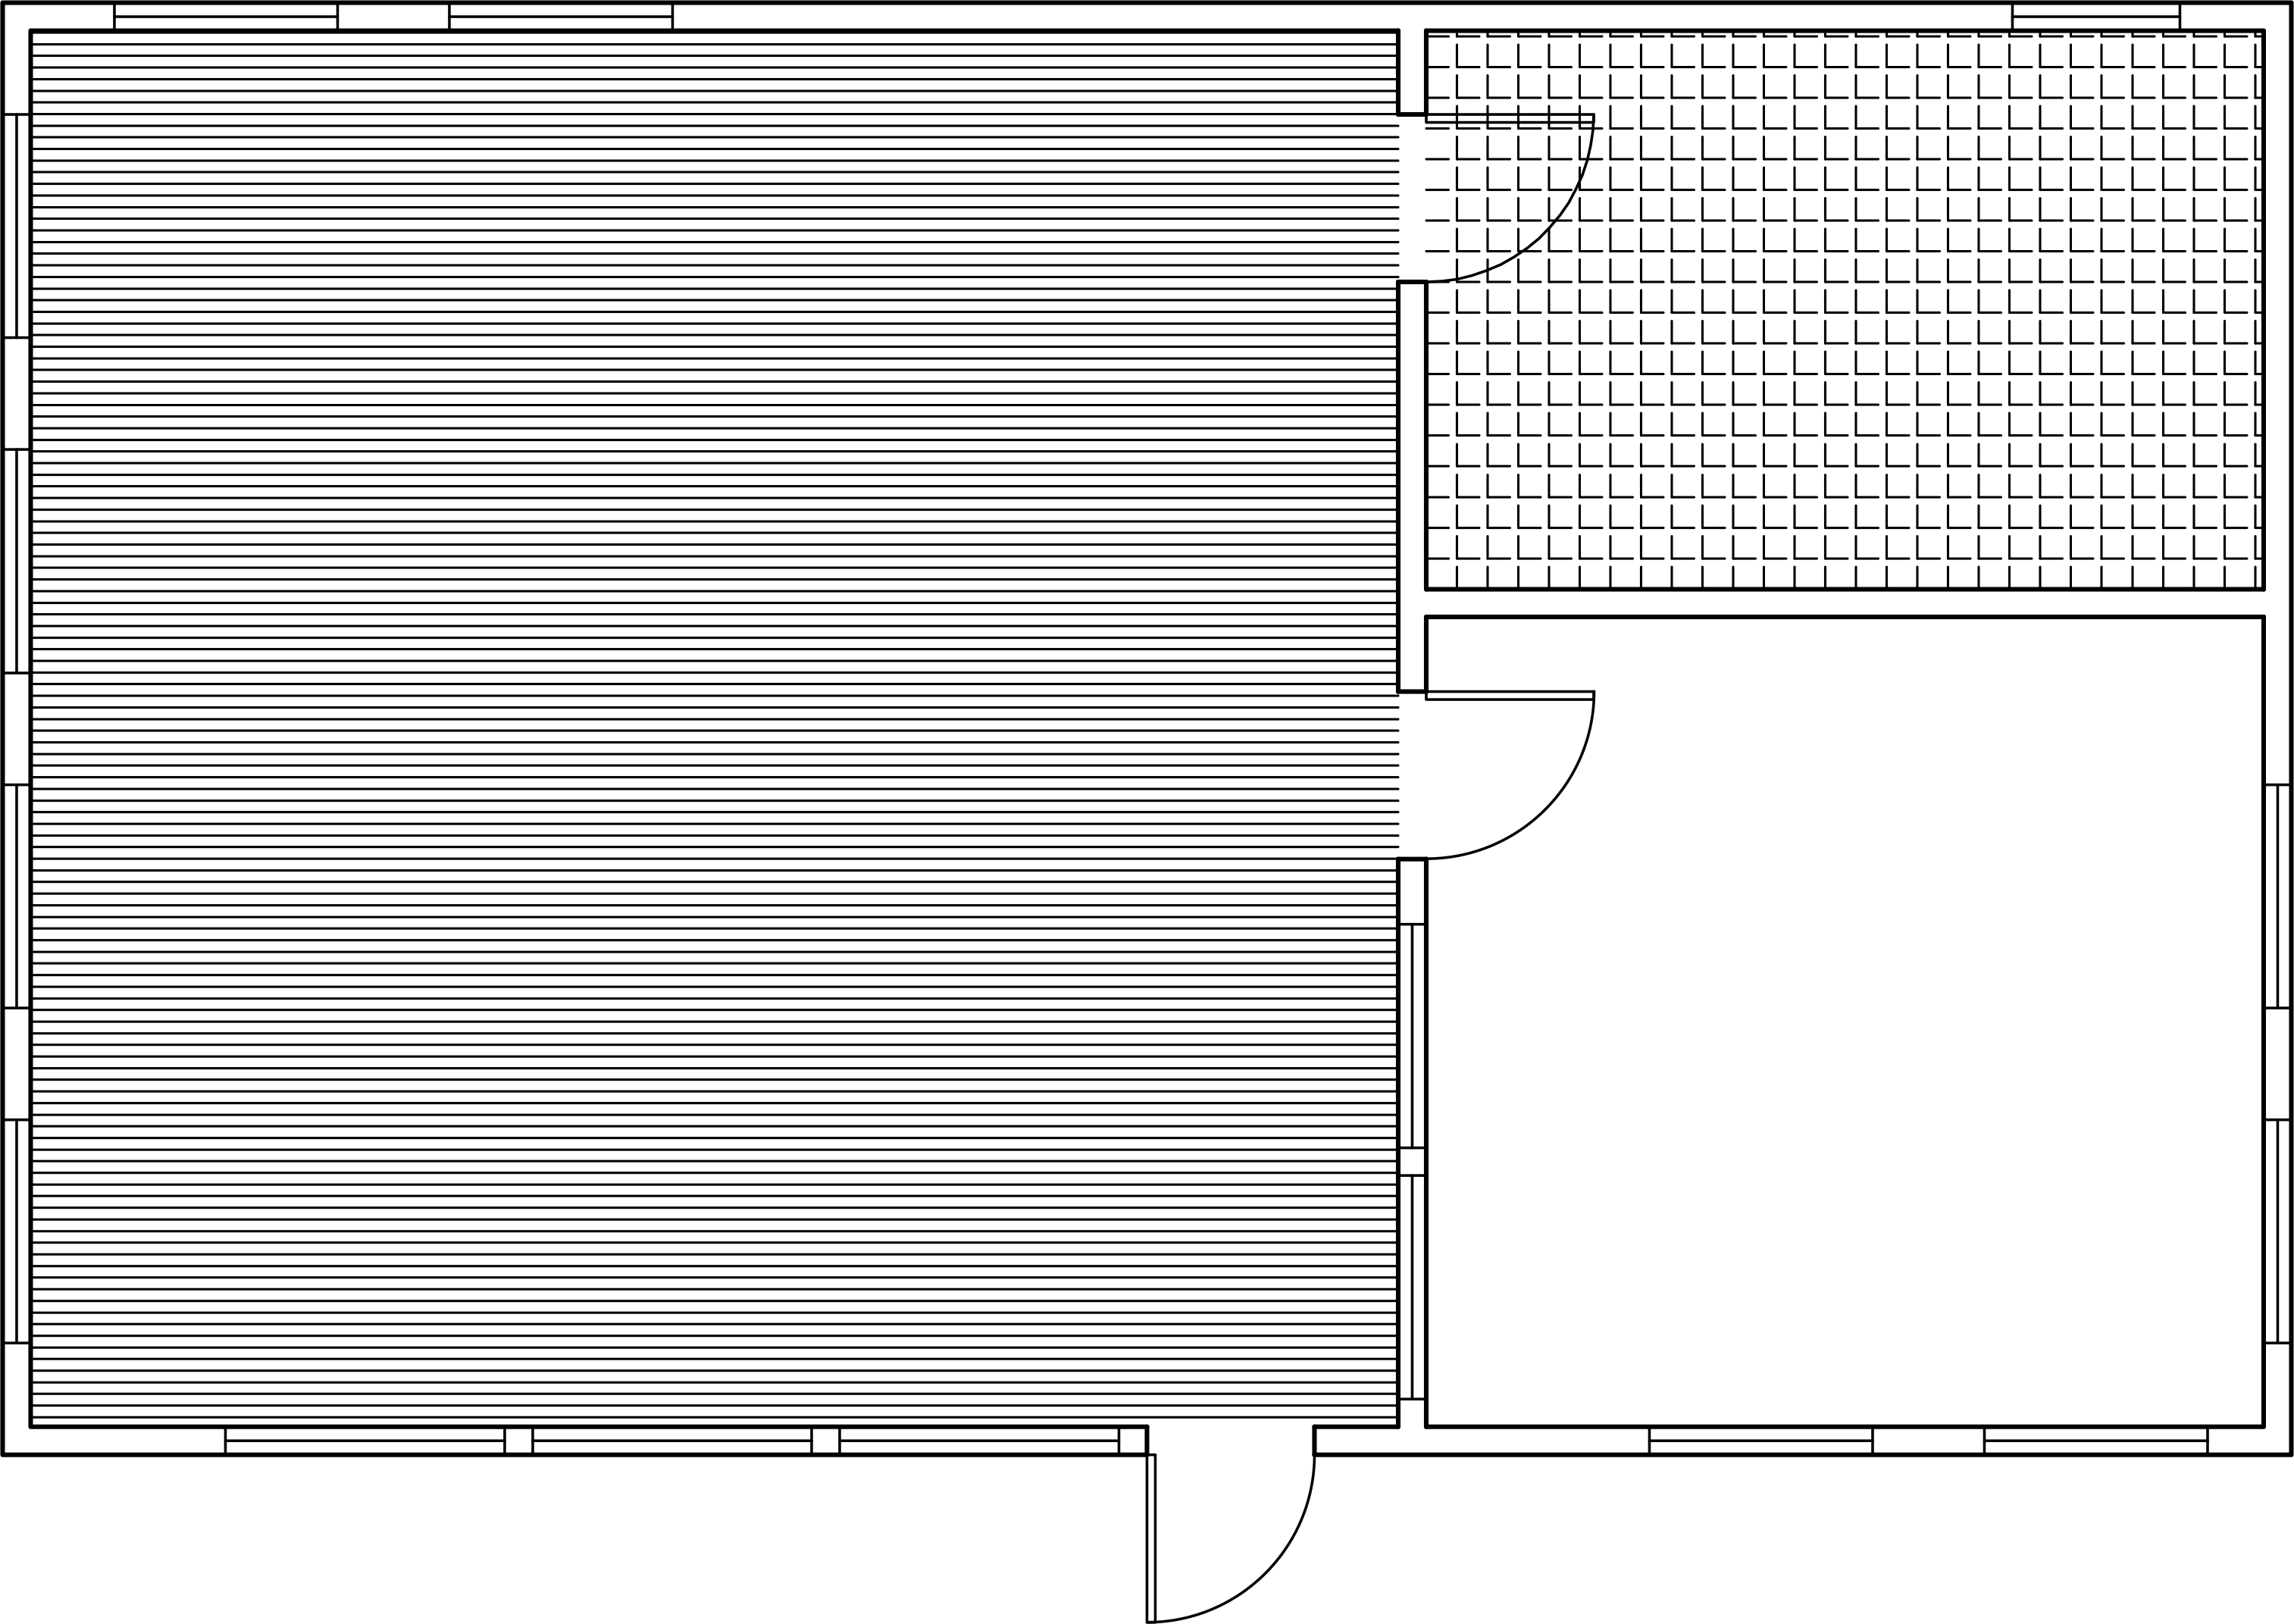
Exercise Workflow Overview
File Preparation
Open the Hatch-Architectural.dwg file and freeze the A-Doors layer to prevent interference with hatch boundaries.
Pattern Application
Apply cross-section and angle patterns to rooms using gap tolerance and proper scaling techniques.
Layout Integration
Work with scaled viewports and paper space relative scaling for professional presentation.
Tool Creation
Save custom hatch patterns to tool palettes for future use and improved workflow efficiency.
Exercise Overview
In this comprehensive exercise, you will master the Hatch command to apply professional-grade flooring patterns to architectural rooms. This skill is essential for creating detailed floor plans that communicate material specifications clearly to clients, contractors, and building teams. You'll learn to handle common challenges like open boundaries and scale adjustments that every CAD professional encounters in real-world projects.
By default, AutoCAD only hatches closed areas. Use gap tolerance or temporary lines to handle door openings in architectural drawings.
Hatch Boundary Methods
| Feature | Gap Tolerance Method | Manual Closure Method |
|---|---|---|
| Setup Speed | Fast | Slower |
| Precision Control | Limited | High |
| Associativity | Non-associative | Associative |
| Best For | Simple openings | Complex boundaries |
Hatch Flooring
Open the file Hatch-Architectural.dwg.
Start the Layer Freeze (LAYFRZ) tool and click on any of the doors to freeze the A-Doors layer. This strategic step prevents doors from interfering with hatch boundaries—a common source of frustration that can cause unexpected hatch behavior or incomplete fills.
Launch the Hatch command by pressing H Enter. In the Hatch Creation tab, expand the Properties panel and change the layer to Hatch. Organizing hatches on dedicated layers is a fundamental best practice that enables easy visibility control and editing later in your workflow.
By default, AutoCAD requires completely closed boundaries for hatching, but real architectural drawings often feature rooms with door openings. You have two solutions: draw temporary lines to close openings, or use the Gap Tolerance feature. The Gap Tolerance approach allows hatching when openings fall within your specified tolerance, though it creates non-associative hatches that won't update automatically if boundaries change.
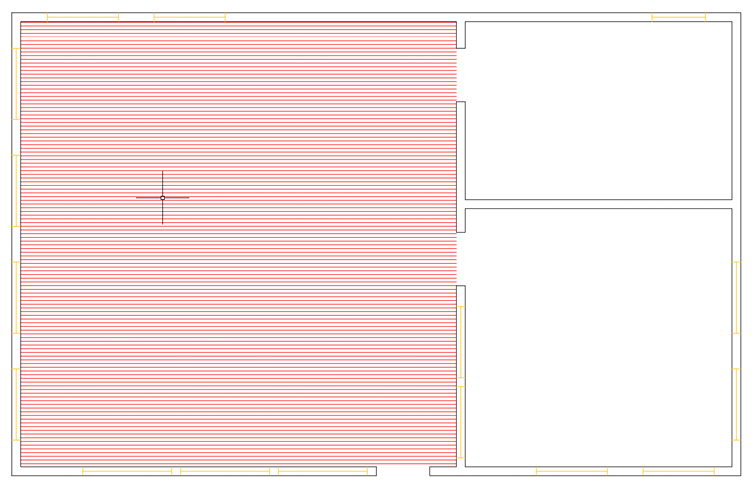
Expand the Options panel in the Hatch Creation Ribbon and enter a Gap Tolerance of 4'. Click inside the largest room on the left side of the structure. When the Open Boundary Warning dialog appears, click Continue hatching this area. The hatch will intelligently fill the room while respecting the door opening boundaries.
Initially, the hatch may appear as a solid color because the default pattern scale is designed for smaller objects, not room-sized areas. This is a common issue when applying detail-oriented patterns to architectural spaces. Zoom in closely to see the actual line pattern structure. In the Properties panel of the Hatch Creation tab, increase the Scale to 20. This adjustment reveals the Cross Section hatch pattern at an appropriate size, effectively simulating hardwood flooring grain.
The pattern defaults to a 45° angle, which may not align with your design intent. In the Properties panel, change the Angle to -45 to create horizontal lines that better represent traditional hardwood plank orientation. Press Enter to accept the settings and close the Hatch Creation Tab.
While manual scaling works for model space, AutoCAD offers a more sophisticated approach for layout presentations. The "Relative to Paper Space" feature automatically scales hatches proportionally to your layout's paper size, eliminating guesswork and ensuring consistent appearance across different drawing scales.
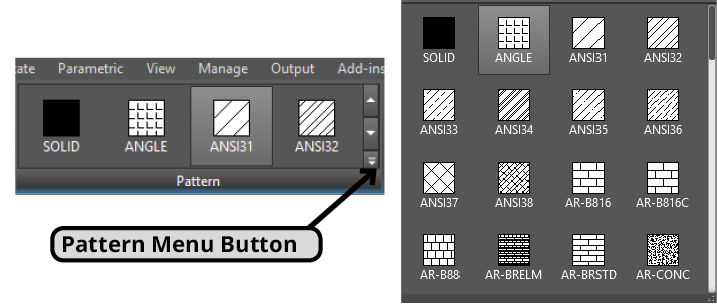
Switch to the D-Size Layout and change to Model Space. Start the Hatch command and click the dropdown menu in the Pattern panel of the Hatch Creation tab to access the complete pattern library. Select the ANGLE pattern, which works excellently for tile representations. In the Properties panel, set the Angle to 0 and the Scale to 1. Click inside the small upper-right room, then click Continue hatching this area when the boundary warning appears.
The hatch will again appear overly dense. Expand the Properties panel and activate the Relative To Paper Space button. Press Enter to complete the hatch creation. AutoCAD automatically adjusts the scale to create an appropriate tile representation that maintains consistency regardless of zoom level or plot scale.
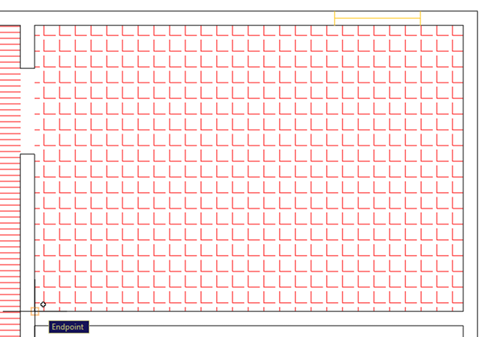
Professional presentations often require precise pattern alignment with room geometry. You'll now learn to reposition hatch patterns for optimal visual impact. Select the tile hatch and click the Set Origin button in the Hatch Editor ribbon tab. Zoom in on the hatch and click the Endpoint at the lower left corner of the room. This establishes a new origin point, repositioning the entire pattern to align with the room's geometry—a technique that significantly enhances the professional appearance of your drawings.
Press the Set Origin button and click on the Endpoint at the lower left corner of the room:
The Repositioned Hatch:

Efficiency in CAD work comes from creating reusable assets. Tool Palettes allow you to save custom-configured hatches with all their specific settings, creating a personal library that accelerates future projects and ensures consistency across your work.
Press Ctrl+3 to open the Tool Palette Window and click the Hatches tab. This palette contains preset hatches optimized for various applications, and you can expand it with your own custom configurations that reflect your firm's standards and preferences.
With the tile hatch selected, click and hold (without selecting any grips) and drag it into the Hatch Palette. This preserves all current settings—scale, angle, layer assignment, and paper space relationship—for instant future use. Avoid clicking grips during this process, as it will move the hatch rather than adding it to the palette.
Repeat this process with the hardwood floor pattern from the large room, building a custom library of professionally configured flooring hatches that will streamline your architectural drafting workflow.
Save and close the file to preserve your work and custom tool palette additions.
Key Pattern Settings
Small-scale patterns may appear as solid colors in large rooms. Always adjust scale appropriately - zoom in to verify pattern visibility before finalizing.
Pattern Types and Applications
ANSI31 Cross-Section
Ideal for hardwood flooring simulation. Requires scale adjustment to 20 for room-sized applications with angle modification to -45 degrees for horizontal lines.
ANGLE Pattern
Perfect for tile flooring representation. Works best with paper space relative scaling for consistent appearance across different viewport scales.
Paper Space Scaling Workflow
Layout Preparation
Switch to D-Size Layout and enter Model Space for proper viewport scaling context.
Pattern Selection
Choose ANGLE pattern with 0-degree angle and scale of 1 as starting parameters.
Relative Scaling
Enable 'Relative To Paper Space' option to automatically scale hatch proportional to layout paper size.
Origin Adjustment
Use Set Origin feature to reposition pattern alignment by clicking on room corner endpoints.
Tool Palette Creation Process
Provides access to preset hatches and custom pattern storage
Dedicated workspace for hatch pattern management and reuse
Ensures pattern properties are captured correctly during drag operation
Creates reusable custom hatch with all current settings preserved
Build comprehensive library of project-specific flooring patterns