Topics Covered in This After Effects Tutorial:
Guide Layers As Positioning Reference, Moving Lines of Text Using Null Objects, Moving Text Away from Expanding Graphics Using a Guide Layer, Splitting Layers to "Unparent" a Child Layer
Exercise Preview
Exercise Overview
In this exercise, we'll craft a sophisticated animated transition between the layout from our previous exercise and the next scene. Professional motion designers understand that compelling transitions don't require excessive flash or dramatic effects. Instead, the most effective transitions leverage elements already present in your design to drive the narrative forward. We'll demonstrate this principle by introducing a vector pie chart that becomes the catalyst for our entire transition—moving, covering, and revealing other elements as it expands across the composition.
This approach mirrors real-world motion design workflows where constraints breed creativity, and simple geometric shapes can become powerful storytelling devices when animated with purpose and precision.
Effective transitions don't need dramatic effects. Use existing layout elements like charts or graphics to naturally initiate and drive your transitions between scenes.
Previewing What You'll Make in This Exercise
You should still have yourname-Text Animation.aep open in After Effects. If you closed it, re-open it now. We strongly recommend completing the previous exercise (2A) before starting this one, as the techniques build upon each other. If you haven't finished it, do the following:
- Open Text Animation-Ready for Layout Transition.aep (from the Text Animation > Finished AE Projects folder).
- Save the file as yourname-Text Animation.aep in the Text Animation folder.
On the Desktop, navigate to Class Files > After Effects Level 2 Class > Text Animation > Finished Clips and double–click Text-Animation-Pie-Chart-Transition.mov.
Study the video carefully and observe these key animation principles in action (scrub the playhead slowly to catch the subtle timing):
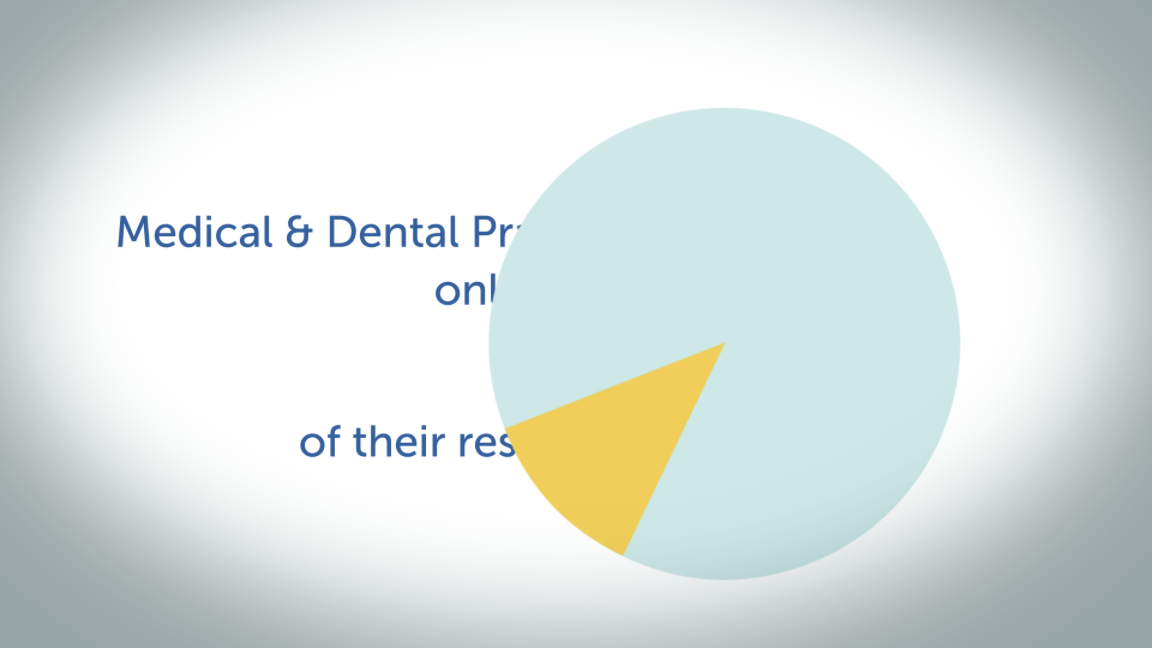
- After viewers have sufficient time to absorb the text in our initial layout, a pie chart emerges. The smaller gold "slice" represents exactly 12% of the complete shape.
- As the entire shape expands from its center point, the text lines intelligently move aside to accommodate it. Notice how they overshoot their final positions before settling into right-aligned text—this creates natural, organic motion that mimics real-world physics.
- Shortly after the text reaches its final position, the pie chart begins rotating clockwise while continuing to expand until it completely obscures all text elements.
- When the pie chart reaches maximum size, the "slice" detaches from its parent shape. As this separation occurs, it reveals the next layout underneath—a seamless transition that maintains visual continuity.
Review the video multiple times—we'll be recreating this exact sequence in this exercise. Keep it open as your reference throughout the process.
Now that you understand the motion design principles at work, let's build this transition step by step, starting with the foundational setup techniques that professional animators rely on.
Animation Sequence Breakdown
Pie Chart Appearance
Chart enters with 12% slice visible
Text Movement
Lines move to make room, overshoot and settle as right-aligned
Chart Expansion
Pie spins clockwise and grows to cover all text
Slice Separation
12% slice disengages revealing next layout
Using a Guide Layer As a Positioning Reference
Switch to After Effects, where yourname-Text Animation.aep is open.
In the Timeline, switch to the Text Animation-MAIN tab if you aren't already there.
At the top of the layer stack, locate the [02-Pie Chart] pre-comp layer and toggle its visibility on by clicking the eye switch
 .
.
You'll now see the second layout where the text lines have repositioned to the left, creating space for the pie chart on the right. This represents our target layout.
Rather than animating this layer directly, we'll use it as a positioning guide—a professional technique that ensures pixel-perfect alignment. In the Timeline, CTRL–click (Mac) or Right–click (Windows) on the layer and select Guide Layer.
Notice the new guide layer icon
 appears—this indicates the layer won't render in final output but remains visible for positioning reference.
Guide layers are composition-specific, but we need this reference in our first layout's pre-comp. Copy it now.
At the top of the Timeline, switch to the 01-12 Percent tab.
To ensure the layer pastes above all other elements, select the topmost layer, which should be line 1 matte.
Paste the guide layer.
For optimal visual reference, we'll reduce the guide's opacity. Press T to reveal the Opacity property, then change it to 50%. This creates a subtle overlay that won't interfere with your work while providing clear positioning targets.
With our guide layer properly configured, we can now set up the animation system that will drive our text movement with precision and control.
Setting Up Guide Layers
Enable Visibility
Toggle on the pie chart pre-comp layer to see the reference layout
Convert to Guide
Right-click the layer and select Guide Layer to make it reference-only
Adjust Opacity
Set opacity to 50% for better positioning reference without distraction
Creating the Null Objects That Will Move the Text
Professional animators use null objects as invisible controllers for complex animations. Since most of our text lines contain multiple words, we'll create dedicated null objects for each multi-word line, allowing us to animate them as cohesive units while maintaining individual control over timing and easing.
Let's temporarily hide the [02-Pie Chart] guide layer to clearly see our null object positioning. Click the layer's eye switch
to turn off visibility.If the text lines aren't fully visible, move the playhead to 4;21 (when the final line completes its entrance animation) or later.
Since our first null object will control the first line, select the Medical text layer.
Go to Layer > New > Null Object.
Rename it to line 1 mover to clearly indicate its purpose in our animation hierarchy.
In the Tools panel at the top, ensure the Selection tool
 is active.
Press the Up Arrow key (hold Shift for 10x speed) until the line 1 mover layer's anchor point
 (visible as a crosshair in the red wireframe) aligns with the center of line 1 text, approximately at the letter e's baseline.
Target Position should be around 960, 392.
In the Timeline, select all related red layers by clicking Medical and Shift–clicking line 1 matte.
Under any selected layer's Parent & Link column, drag the pick whip
 to the line 1 mover layer name and release. This establishes the parent-child relationship.
Repeat this process for line 4: create a new null object called line 4 mover and position it directly above the of text layer.
Set its Position Y coordinate to 740.
Change the null object's layer color to Fuchsia to match the text layers it will control.
Parent the corresponding fuchsia layers to this null object: of, their, resources text layers, plus line 4 matte.
For line 2's elements, we'll use a different approach. Select all four yellow layers and press Cmd–Shift–C (Mac) or CTRL–Shift–C (Windows) to pre-compose them. Pre-composing creates a single controllable unit—another professional technique for managing complex animations.
Name the pre-comp 01-Line 2-PC. The previous settings are suitable, so click OK.
Select the [01-Line 2-PC] layer, then press A and Shift–P to reveal both Anchor Point and Position properties.
Activate the Pan Behind (Anchor Point) tool
 to reposition this pre-comp's anchor point.
Drag the anchor point
while monitoring the Timeline values until both Position and Anchor Point read approximately 960, 488.Set the [01-Line 2-PC] layer's label color to Yellow for visual consistency.
For line 3, the individual text chunks will have disappeared by the time we need to animate, leaving only the 12% layer. This simplifies our setup—we only need to center its anchor point. Select the 12% layer and enable Solo
 to isolate it.
With this layer selected, go to Layer menu > Transform > Center Anchor Point in Layer Content.
Disable the Solo switch
to return to full layer visibility.
With our control system established, we can now animate the pie chart entrance that will drive the entire transition sequence.
Multi-word text lines work best when parented to null objects for unified movement. Single elements like the 12% text can be animated directly by centering their anchor points.
Null Object Setup Process
Name them descriptively like 'line 1 mover' for clear organization
Use arrow keys for precise positioning around the middle letter
Include both text layers and their associated matte layers
Alternative method for moving multiple layers as single units
Expanding the Pie Chart As It Enters the Composition
The pie chart's entrance serves as the primary animation driver, influencing every other element's behavior. By establishing this foundational animation first, we create clear timing reference points that ensure all secondary animations feel cohesive and purposeful.
Let's return to the master composition using After Effects' Composition Mini-Flowchart—a powerful navigation tool. Click its icon
 at the top center of the Timeline:

The mini-flowchart displays your project's hierarchical structure: nested pre-comps on the right, parent comps on the left. This visual representation helps you understand complex project architectures at a glance. Click Text Animation-MAIN to navigate up to the main composition:

Move the playhead to 5;20—this marks the end of our pie chart's entrance animation.
Configure layer visibility for optimal workflow: hide the distracting guide layer and reveal our vector elements. Toggle the eye switches
for [02-Pie Chart], slice, and pie layers.
Notice the parent-child relationship: the pie layer controls the slice layer, ensuring they move together as a unified element.
We'll animate backward from the end state—a professional technique that ensures precise final positioning. Select the pie layer and press Opt–S (Mac) or ALT–Shift–S (Windows) to create a Scale keyframe.
Professional animations often include subtle overshoots that create more natural, appealing motion. Move the playhead to 5;16 to create our overshoot keyframe.
Rather than calculating percentages manually, let After Effects handle the math. Click in either 84% field and change it to 84*1.1.
This expression tells After Effects to multiply the current value by 1.1 (scaling to 110%). Press Return (Mac) or Enter (Windows) to execute, resulting in 92.4% scale.
Press I to jump to the layer's in-point at 5;06.
Set Scale to 0% for our initial keyframe. Keep the playhead here for the next steps.
Select the middle keyframe
 (at 5;16) and press F9 to apply Easy Ease, creating more organic motion curves.
Preview the chart's expansion impact on our text layout. Starting at 5;06, use Cmd-Right Arrow (Mac), Page Down (Windows), or Fn–Down Arrow to advance frame-by-frame.
At 5;11, the pie chart begins intersecting the top text line. By the next frame, it contacts the bottom line, and soon affects all middle elements as well.
For professional-quality animation, we'll anticipate these collisions: each text element should begin moving approximately three frames before contact, creating the illusion that they're reacting to the approaching chart. We'll prioritize movement based on proximity to the expanding element.
Navigate back to our text pre-comp using the composition directory at the top left of the Composition panel. Click 01-12 Percent as shown:

Now we'll choreograph the text movement with the precision and timing that distinguishes professional motion design work.
Use mathematical expressions in property fields like '84 * 1.1' to let After Effects calculate scaling values automatically, avoiding manual math calculations.
Pie Chart Animation Setup
Set End Keyframe
Start at the animation end point and work backwards for better timing control
Create Overshoot
Scale to 110% of target size for natural bouncy animation feel
Add Entry Keyframe
Set initial scale to 0% at the start point for smooth entrance
Make Way for Pie: Moving the Lines Away from the Chart Using the Guide Layer
In professional motion design, secondary animations should feel like natural reactions to primary events. Our text lines will behave as if they're being displaced by the expanding chart—rushing to new positions with slight overshoots before settling, mimicking real-world physics and creating more engaging, believable motion.
Restore visibility to the [02-Pie Chart] guide layer by clicking its eye switch
.The chart first contacted the top line at 5;11, so we'll start the text movement three frames earlier at 5;08—just two frames after the chart begins expanding.
Line 1 extends furthest toward the chart's position, making it the first to react. Select the red line 1 mover null object.
Press P for Position, then CTRL–click (Mac) or Right–click (Windows) on the Position property and select Separate Dimensions. This allows independent control of horizontal and vertical movement.
Click away to deselect, then enable horizontal keyframing by clicking the stopwatch
 next to X Position.
Jump forward 10 frames using Shift-Cmd-Right Arrow (Mac), Shift–Page Down (Windows), or Shift–Fn–Down Arrow. You should land at 5;18—our overshoot timing.
Activate the Selection tool with V.
Use the Left Arrow key (hold Shift for faster movement) to position the null object so the text line sits approximately one letter-width to the left of its guide layer counterpart, as shown below:

Target an X Position of approximately 572.
The pie chart settled into its final position four frames after overshooting. We'll match this timing for visual consistency. Move the playhead four frames forward to 5;22.
Use the Right Arrow key to align the text precisely with the guide layer. Zoom in with the period (.) key if needed for pixel-perfect positioning.
Note: The guide layer text sits slightly higher than our animated text. This vertical offset is intentional—don't adjust the null object vertically. The offset helps you gauge horizontal alignment more accurately.
Apply professional easing to the overshoot keyframe. Select the middle keyframe
(at 5;18) and press F9 for Easy Ease.Review the transition from its beginning. In the Timeline, locate the [02-Pie Chart] layer's triangular marker
 labeled start transition—we'll learn to create these organizational markers in later exercises.
Markers function like keyframes for navigation. Hold Shift and drag the playhead until it snaps to the marker
(at 5;06).
Make text react to approaching graphics 3 frames before contact. This creates believable anticipation as if the elements are aware of each other's presence.
Text Movement Timing Sequence