Topics Covered in This After Effects Tutorial:
Master advanced animation techniques including syncing audio with text presets, customizing animation properties within existing presets, creating dynamic shape layers, and designing curved position motion paths for realistic movement.
Exercise Preview
Exercise Overview
In this comprehensive exercise, we'll advance our Superman animation by implementing sophisticated text animation presets and learning how to extend their capabilities by adding custom properties. You'll master the Convert Vertex tool to create smooth, curved motion paths for shape layer animations, and discover how to synchronize multiple audio elements to enhance the overall cinematic experience. These techniques are essential for creating professional-quality motion graphics that feel polished and engaging.
Animation Timeline Structure
Layout Transition
Locomotive layout rotates and scales up at 5:03 with reverse parenting technique
Text Animation Start
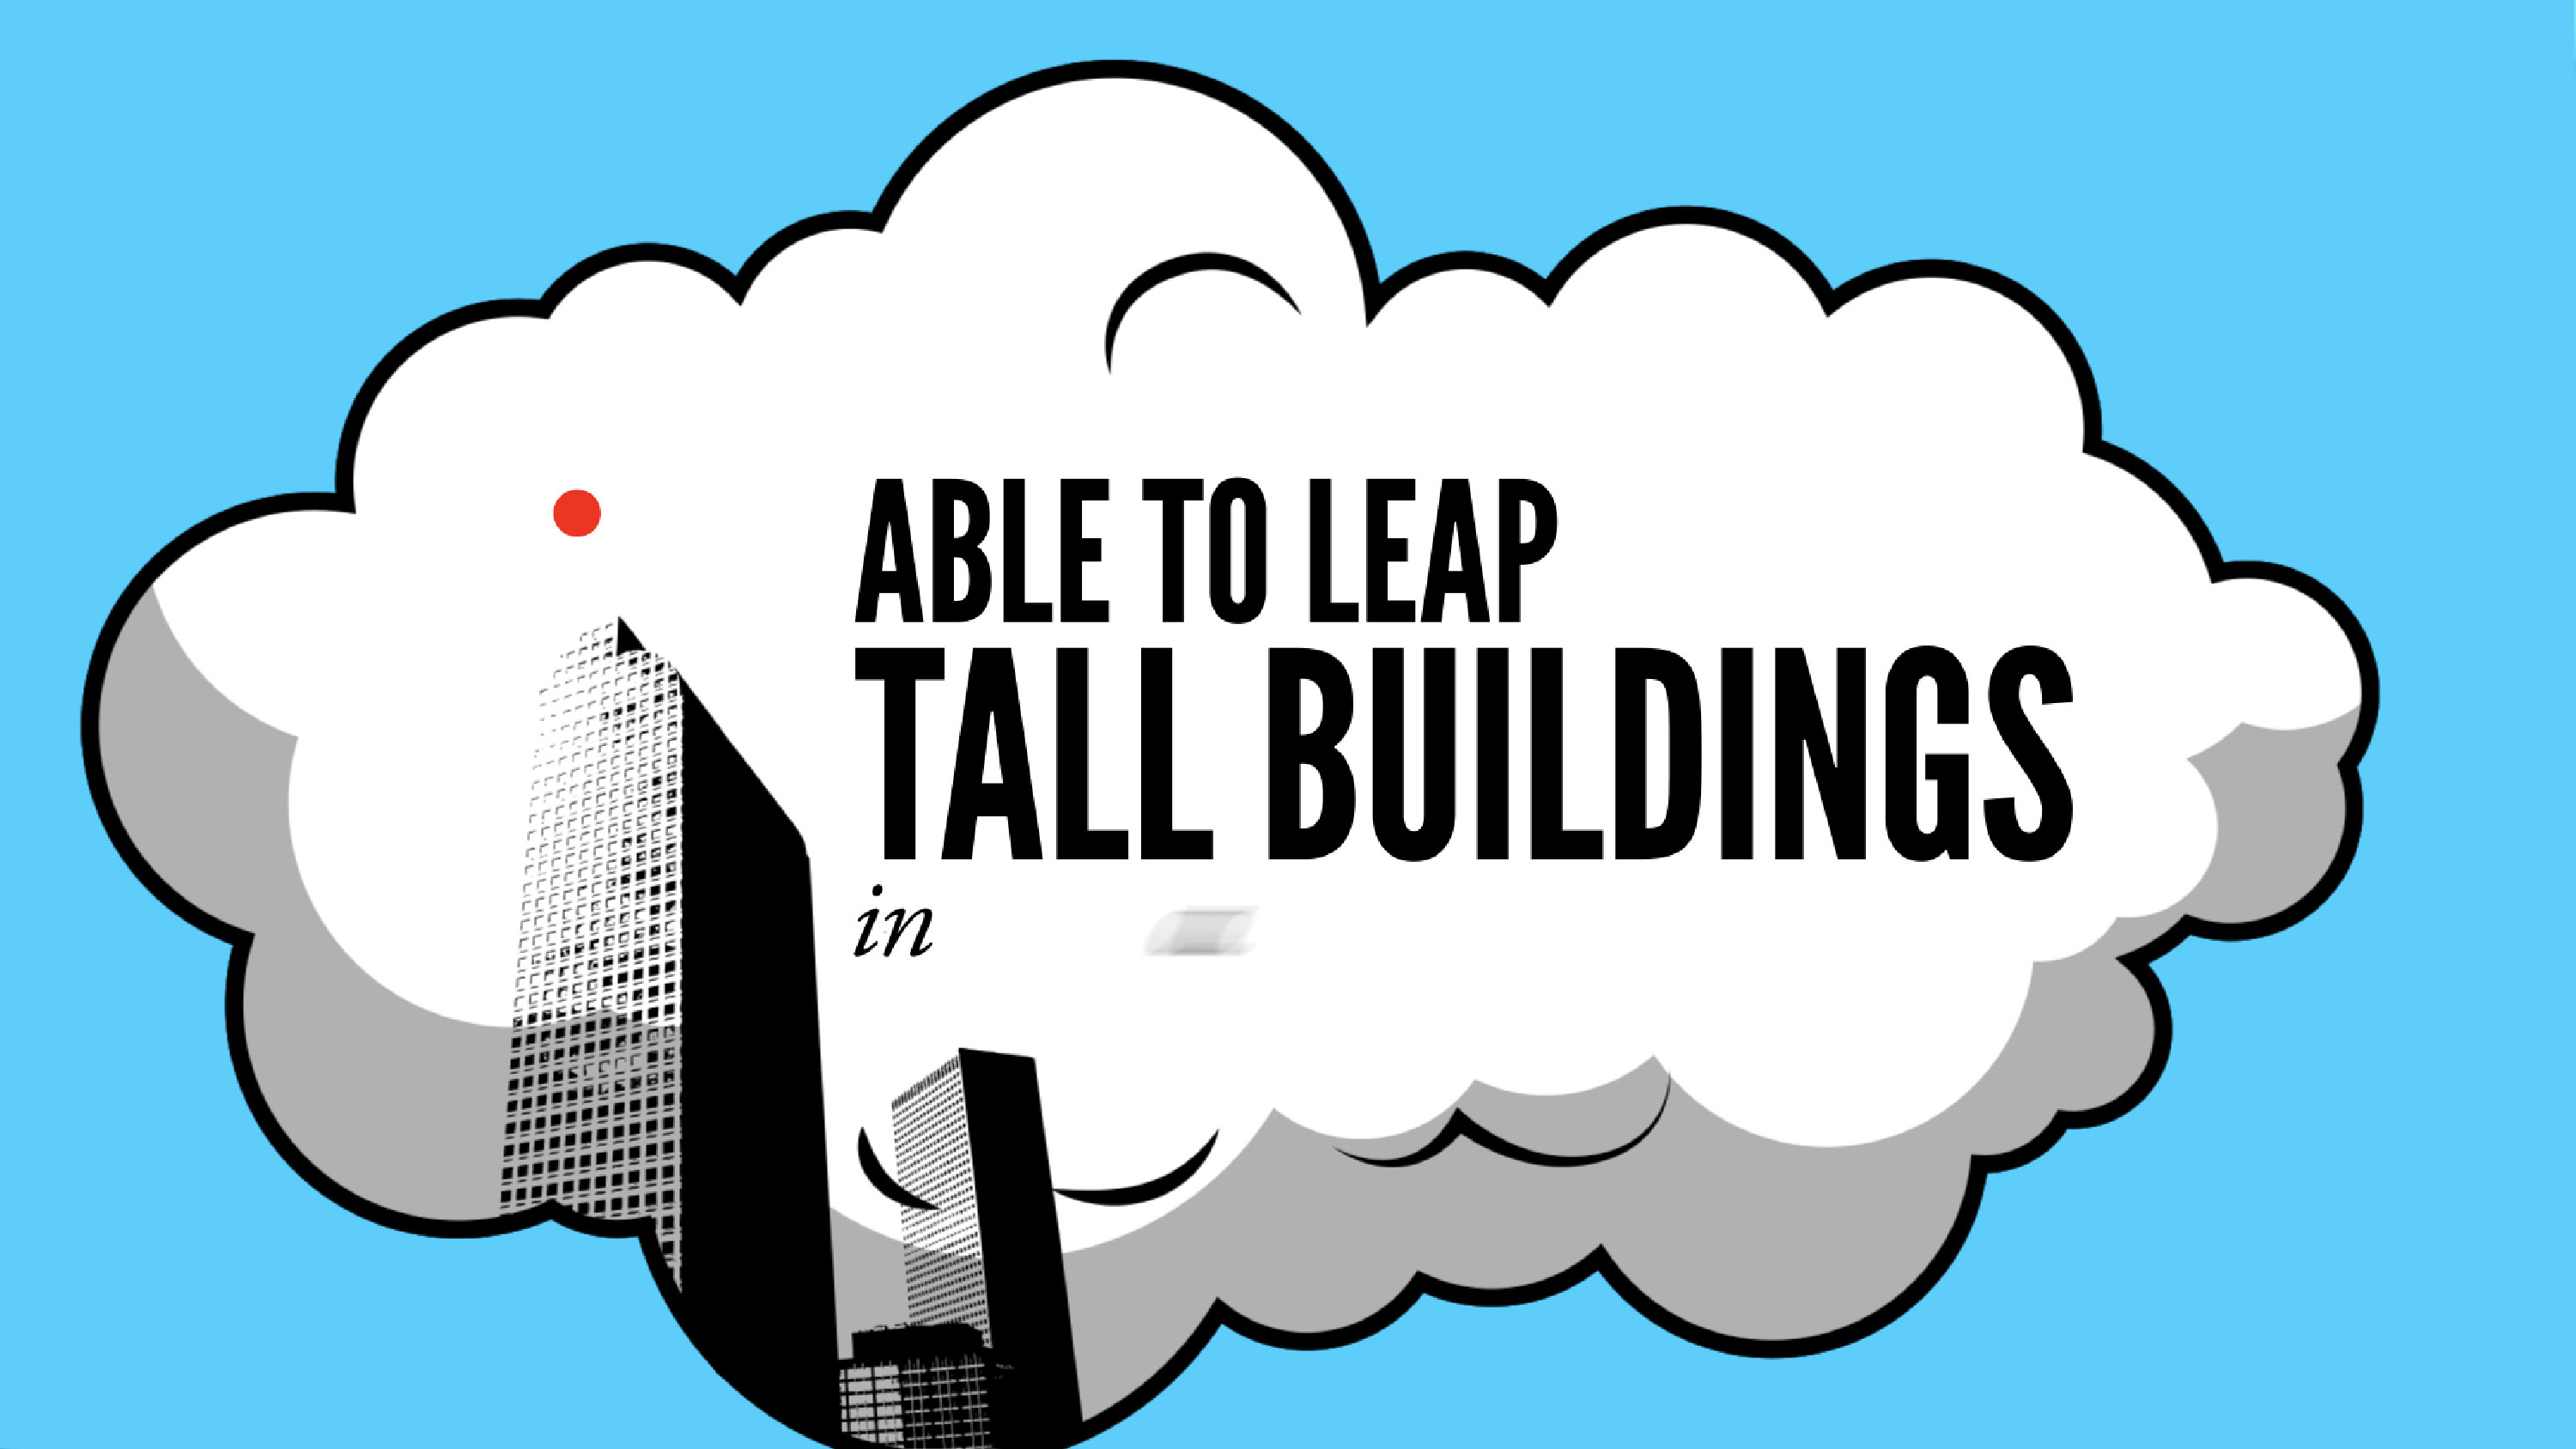
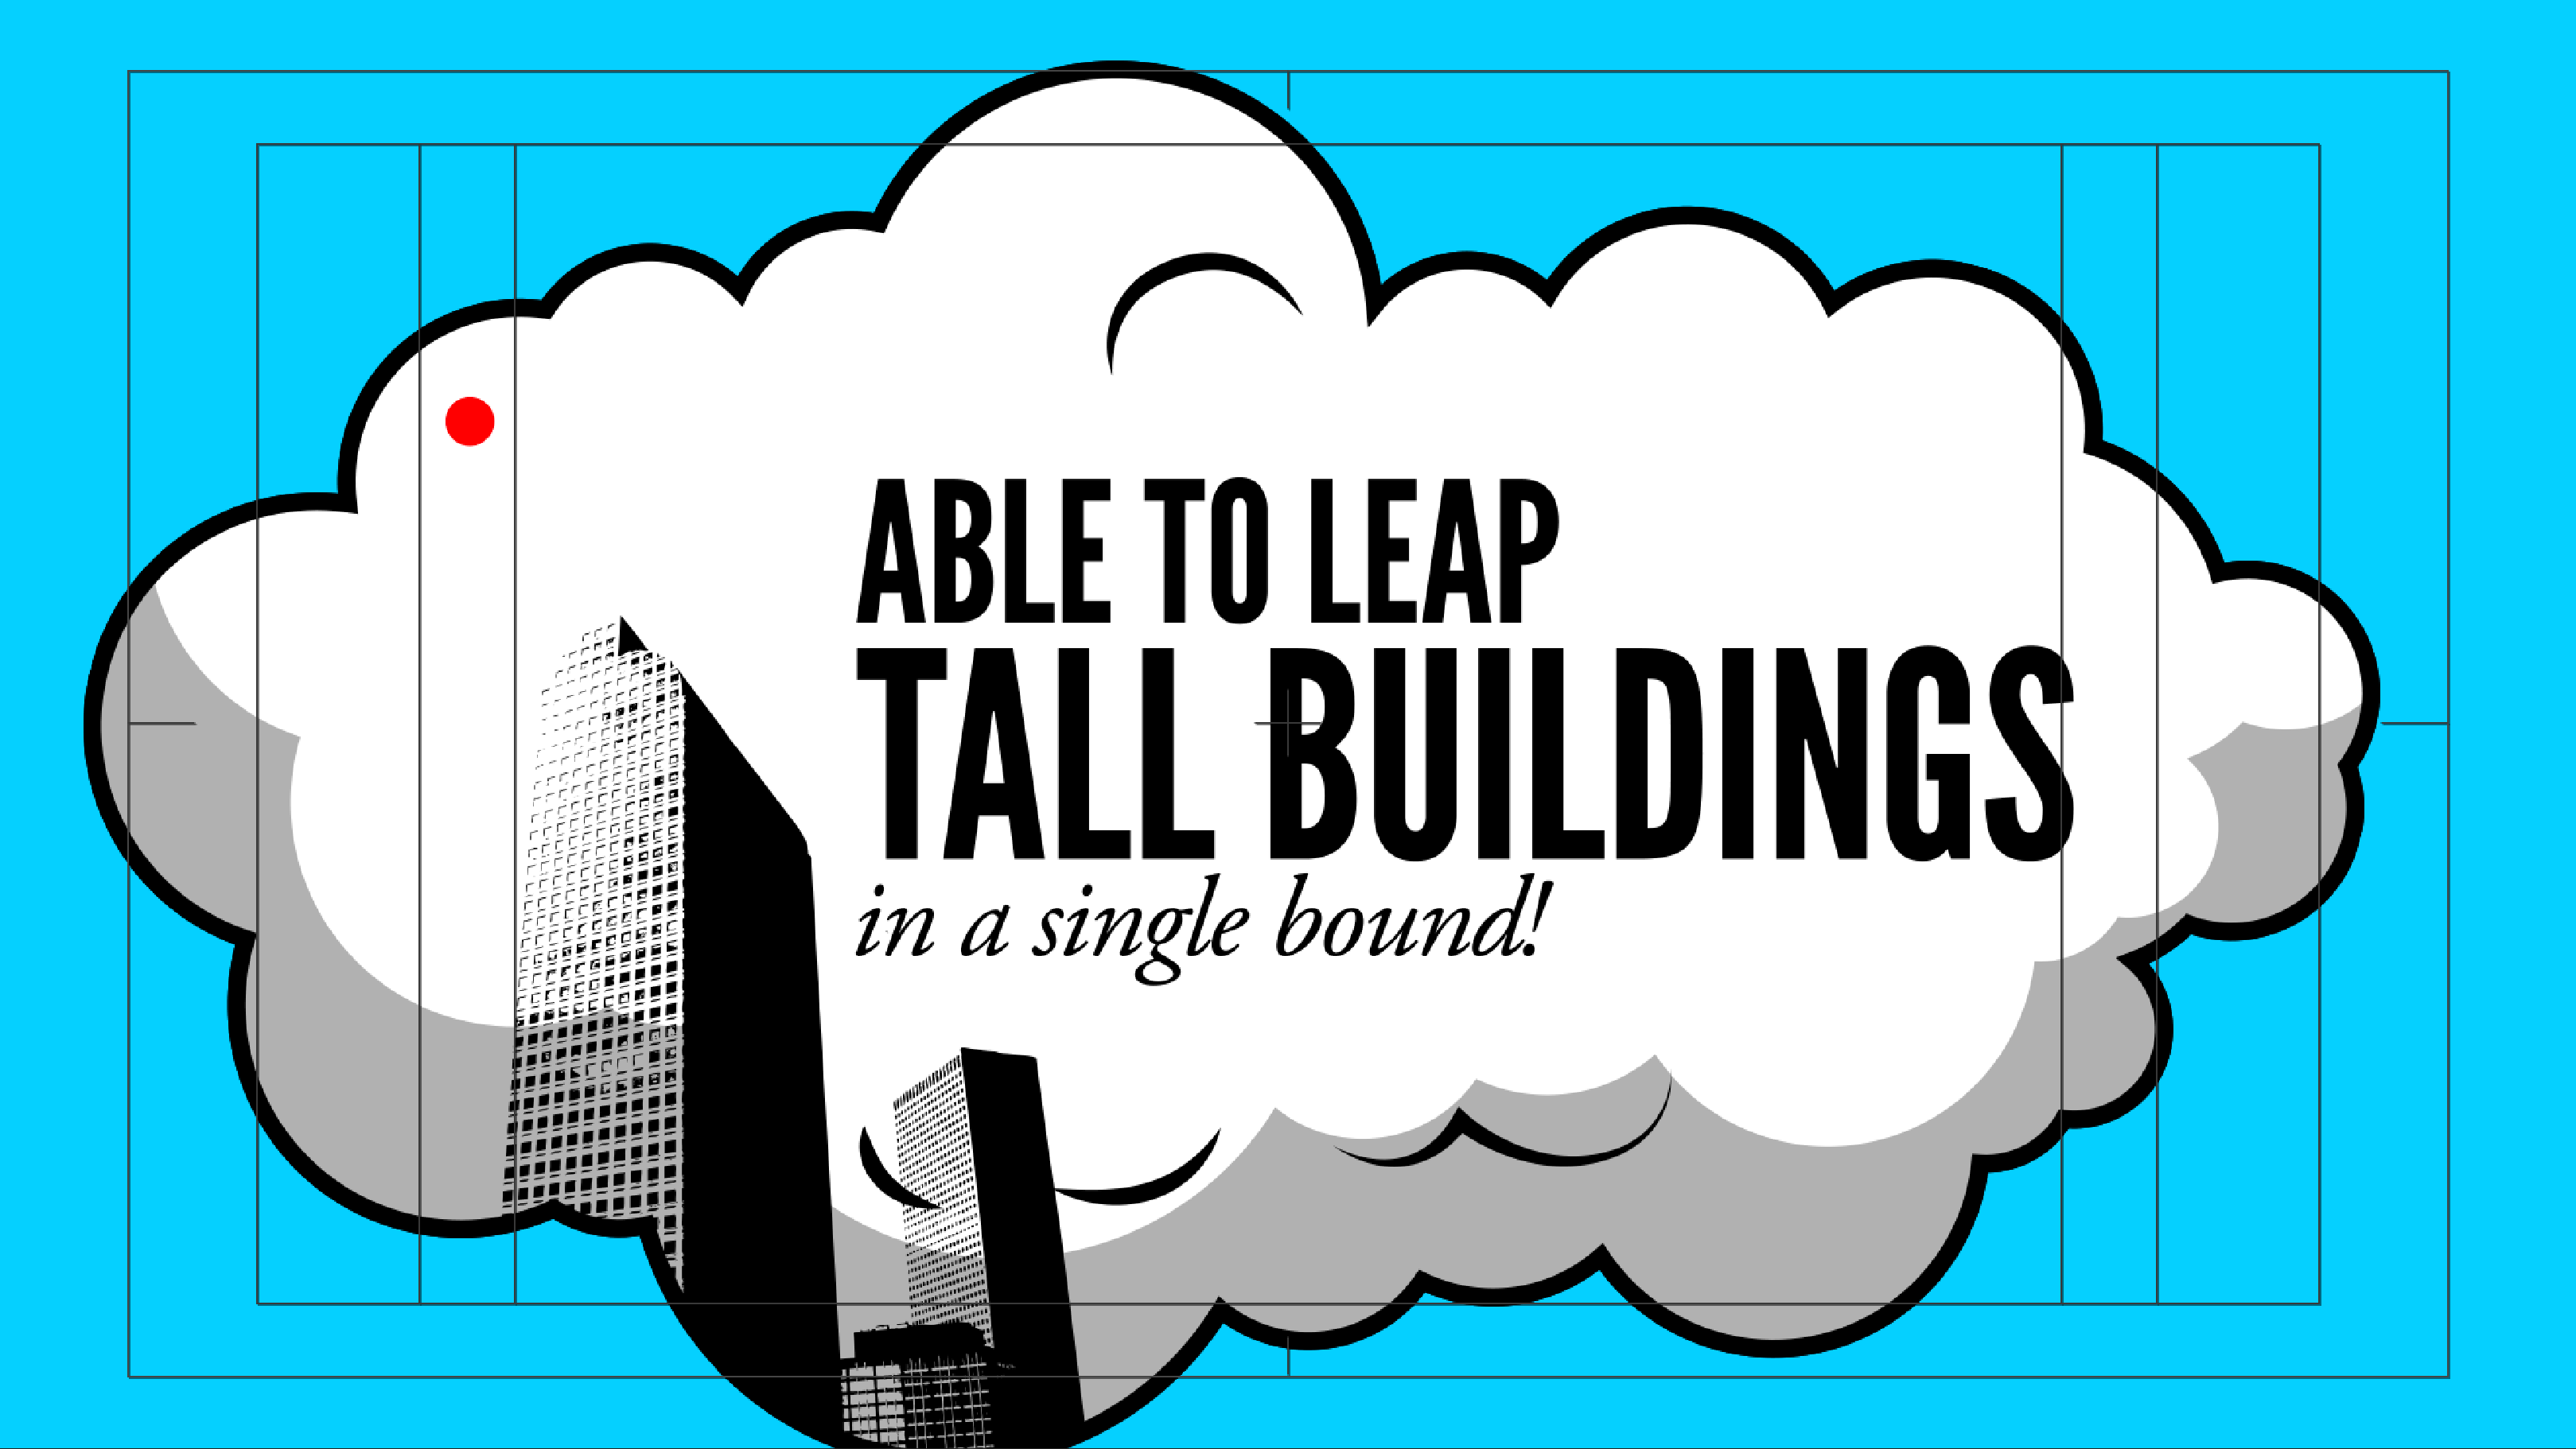
ABLE TO LEAP text begins Large Scale animation preset
Shape Layer Animation
Red dot follows curved motion path over tall buildings
Previewing What You'll Make in This Exercise
You should still have yourname-Superman.aep open in After Effects. If you closed it, re-open it now. We strongly recommend completing the previous exercises (B1–B2) before starting this one, as each builds upon the previous work. If you haven't finished the prior exercises, follow these steps:
- Open Superman-Ready for Tall Buildings.aep (from the Superman > Finished AE Projects folder).
- Save the file as yourname-Superman.aep in the Superman folder.
On the Desktop, navigate to Class Files > After Effects Level 2 Class > Superman > Finished Clips and double–click Tall-Buildings.mov to preview the final result.
Play the video and observe these key animation elements (you may need to scrub the playhead slowly to catch all the details):
- Notice how the previous locomotive layout rotates and scales up while the next layout seamlessly transitions through the train's cyan stripe—this creates visual continuity.
- The new layout demonstrates multiple text animation presets working in harmony with the audio track.
- A small red dot traces an elegant arc over the "tall buildings" text, accompanied by a slide whistle sound effect that enhances the playful motion.
Study this reference video carefully—replay it as many times as needed to understand the timing and movement. Keep it open throughout the exercise so you can compare your progress against the intended result.
Reverse Parenting to a Static Layout
Building on the techniques from our previous exercise, we'll employ reverse parenting to create a smooth transition from the second locomotive layout to our new static third layout. This approach maintains visual continuity while setting up the foundation for our upcoming animations.
In the Timeline, ensure you're working in the Superman-MAIN tab.
Select the [02-Locomotive.mov] layer to prepare it for transformation.
Position the playhead at 5;03—this timing ensures our next layout transition begins at the optimal moment for visual flow.
Select the Pan Behind (Anchor Point) tool
 and carefully move the anchor point
  to a cyan section of the train as shown below. This positioning is crucial for creating the transition effect through the colored stripe:
For precise alignment, we set our Anchor Point values to 1160,792 and Position values to 1106,504.7. These specific coordinates ensure the transition feels natural and visually appealing.
If not already visible, expand the [02-Locomotive.mov] layer's Transform properties to access the animation controls.
Click the stopwatch
 next to Position, Scale, and Rotation to establish keyframes at this starting position.
Note that the Scale value appears unusually small because this layer inherits scaling from its parent [01-Speeding Bullet-PC] layer, which has an extremely large scale value.
Advance the playhead to 5;09 to set the end point of our transition.
Increase the Scale value to 25% to create dramatic zoom effect.
Set the Rotation value to 0x+145° for dynamic movement that adds energy to the transition.
Adjust the Position to move the layer upward and leftward, filling the screen predominantly with the cyan train stripe. Set the Position values to 1118,495 for optimal coverage.
Return the playhead to 5;03 where we'll introduce the third layout element.
Switch to the Superman PSD comp tab at the top of the Timeline panel.
Select the 03-Tall Buildings layer and copy it to your clipboard.
Return to the Superman-MAIN tab and paste the layer. Ensure it appears above [02-Locomotive.mov] in the layer stack for proper visual hierarchy.
Press the left bracket ([) key to trim the layer's in point to 5;03, synchronizing it with our transition timing.
Press K to jump the playhead to 5;09, the precise moment where we'll establish the parent-child relationship.
Create the reverse parent relationship by accessing the [03-Tall Buildings] layer's Parent & Link dropdown menu and changing None to 3. 02-Locomotive.mov. This links the new layout to the locomotive's motion.
Enable Motion Blur
 for the [03-Tall Buildings] layer. You'll notice After Effects prevents this action initially.
Temporarily disable Continually Rasterize
 , and observe that the Motion Blur switch becomes available. Since we need both settings active, we'll work around this limitation by enabling Motion Blur within the composition itself.
Re-enable Continually Rasterize
to maintain image quality during scaling.Double–click [03-Tall Buildings] to open its composition in a new Timeline tab.
Locate the Motion Blur button
in the Timeline header, then click and drag down the entire column to enable motion blur for all layers simultaneously.Return to the Superman-MAIN tab to continue working on the main composition.
Select the initial keyframes (at 5;03) under the [02-Locomotive.mov] layer.
Apply Easy Ease Out by pressing Cmd–Shift–F9 (Mac) or CTRL–Shift–F9 (Windows). This creates smoother, more professional-looking motion curves.
Scrub through the timeline to verify that the new layout transitions smoothly through the train's cyan stripe. The motion should feel natural and visually compelling.
Collapse the [02-Locomotive.mov] layer to clean up the Timeline interface.
Disable the layer's audio by clicking the Audio switch
 to prevent audio conflicts in subsequent steps.
Setting Up Reverse Parenting
Position Anchor Point
Use Pan Behind tool to move anchor point to cyan stripe area. Set values to 1160,792 for position and 1106,504.7 for anchor.
Add Transform Keyframes
Click stopwatch for Position, Scale, and Rotation at 5:03 timeline position to establish starting keyframes.
Animate Scale and Rotation
At 5:09, change Scale to 25% and Rotation to 0x +145 degrees for smooth transition effect.
When Continually Rasterize is enabled, Motion Blur becomes unavailable. Turn off Continually Rasterize temporarily, enable Motion Blur for individual layers in the composition, then re-enable Continually Rasterize for the best quality.
Syncing Audio & Adding Text Presets
Precise audio synchronization elevates any motion graphics project from amateur to professional quality. We'll extract the relevant audio section and copy it into our layout pre-composition, enabling frame-accurate timing between text animations and dialogue.
Position the playhead at 5;09 to mark our audio split point.
Select the [Superman-1940-no4.mp4] audio layer and execute Edit > Split Layer to divide the audio at the current time.
Copy the second portion of the split audio, which should automatically be selected.
Preserve the original audio structure by undoing the split operation—go to Edit > Undo Split Layer or use Cmd–Z (Mac) or CTRL–Z (Windows). After Effects retains the copied audio segment in memory despite the undo action.
Access the layout composition by double–clicking [03-Tall Buildings].
Paste the audio using Cmd–V (Mac) or CTRL–V (Windows). The audio layer should appear at the top of the layer stack.
Fine-tune the audio timing by accessing the In column value for the [Superman-1940-no4.mp4] layer. If the In column isn't visible, CTRL–click (Mac) or Right–click (Windows) on any column header, navigate to Columns, and enable In.
In the Layer In Time dialog, set the value to 6 (0;06) and confirm with OK. This synchronizes the audio with our intended animation timing.
Enable the title-safe grid for precise text positioning by clicking the Choose grid and guide options button
 at the bottom of the Composition panel and selecting Title/Action Safe.
Select all three text layers by clicking ABLE TO LEAP and then Shift–clicking in a single bound! This selects the entire text group for batch processing.
Convert these layers for animation preset compatibility by choosing Layer > Create > Convert to Editable Text. This step is essential for applying text animation presets.
Begin with the first text element by ensuring the playhead remains at 0;06, then deselect all layers and select only the ABLE TO LEAP layer.
Open the Effects & Presets panel via Window > Effects & Presets if it's not already accessible.
Use the search functionality by typing large scale in the Effects & Presets panel's search field
 .
.Apply the animation by double–clicking Large Scale. This preset creates a dynamic scaling effect perfect for impactful text reveals.
Review the animation keyframes by selecting the layer and pressing U. We'll adjust the timing to create more responsive animation that better matches the audio pacing.
Move the playhead to 0;16 to set our new animation endpoint.
Drag the second keyframe
 leftward toward the playhead. Hold Shift as you approach 0;16 to snap precisely to that timing.
Preview the animation by scrubbing through the timeline. You'll notice the letters appear in random order, which can feel chaotic and unprofessional.
Refine the animation order by expanding the ABLE TO LEAP layer's properties: Text > Animator 1 > Range Selector 1 > Advanced. You may need to collapse and re-expand the layer to see these options clearly.
Disable the random ordering by clicking On next to Randomize Order to change it to Off. This creates more predictable, readable animation.
Test the improved animation—letters now scale up sequentially, creating better visual flow.
Clean up the Timeline by collapsing the completed ABLE TO LEAP layer.
Advance the playhead to 0;22 for the next text animation sequence.
Select the TALL BUILDINGS layer for the word-based animation treatment.
Search for scale up w in the Effects & Presets panel search field
.Apply Scale Up Word by double–clicking. This preset animates entire words rather than individual characters, creating different visual rhythm.
Access the keyframes by pressing U with the layer selected.
Set the animation completion point by moving the playhead to 1;03.
Adjust the timing by dragging the second keyframe
to snap to 1;03 while holding Shift.Collapse this layer to maintain Timeline organization.
Position the playhead at 1;09 and select the in a single bound! layer for the final text animation.
Efficiently reuse a previous preset by navigating to Animation > Recent Animation Presets and selecting Straight In By Word—the same effect we successfully used in the first layout.
Preview the complete text animation sequence by pressing Spacebar.
You'll notice the in a single bound! text has visibility issues—it's neither properly off-screen nor invisible before the corresponding audio cue, and the animation pacing feels sluggish. We'll solve this by adding a custom property to the existing preset and optimizing the timing.
Text Animation Timing
Adding a Property to a Preset
One of After Effects' most powerful features is the ability to extend existing animation presets with additional properties. This technique allows you to customize presets to fit specific project needs without building animations from scratch.
Optimize the animation timing by moving the playhead to 2;02—this creates a more responsive feel that better matches the dialogue pace.
With in a single bound! selected, press U to reveal the current keyframe structure.
Adjust the animation duration by selecting the second keyframe
and dragging it to snap to the playhead at 2;02 while holding Shift.Expand the view to see all modified properties by pressing UU. This reveals the complete animation structure.
Enhance the preset by clicking the arrow
 next to Add under Animator 1, then select Opacity from the Property menu.
This addition allows us to control both position and transparency simultaneously, creating more sophisticated animation behavior.
Configure the starting state by ensuring the Opacity property is selected and setting the Opacity value to 0%. This ensures the text starts completely invisible.
Enable motion blur for professional-quality animation by activating the large Motion Blur button
above the Timeline.Test the enhanced animation by pressing Spacebar. The text now appears smoothly with proper opacity control and improved timing.
Adding Opacity to existing animation presets allows for more sophisticated entrance effects. Set initial opacity to 0% to ensure text remains invisible before animation begins, creating seamless transitions.
Creating a Shape Layer
Shape layers in After Effects offer vector-based graphics that remain crisp at any resolution. We'll create an animated red dot that will follow a curved path over the buildings, adding visual interest and supporting the narrative action.
Prepare for shape creation by collapsing any open layers and clicking in an empty Timeline area to deselect everything.
This deselection step is critical—if any layer remains selected, After Effects will attempt to create a mask on that layer instead of generating a new shape layer.
Access the Ellipse tool
 by clicking and holding the Rectangle tool
  in the Tools panel.
Configure the tool options by ensuring the checkbox next to Bezier Path is unchecked in the Tools options panel. This creates a filled shape rather than just a path.
Set up the fill properties by clicking the blue word Fill (not the color swatch) in the Tools panel.
Configure the fill settings by ensuring the Solid Color (second) swatch
 is selected, Blend Mode is set to Normal, and Opacity is at 100%.
Confirm these settings by clicking OK.
Customize the color by clicking the color swatch next to Fill.
Enter the bright red color code #F41F14 and click OK. This vibrant red will stand out clearly against the background elements.
Remove the stroke by clicking the blue word Stroke and ensuring None
 is selected. Click OK to confirm.
Create the dot by holding Shift and drawing a small circle anywhere in the composition, following the reference screenshot below. The Shift key constraint ensures a perfect circle rather than an ellipse:
Shape Layer Setup Requirements
Prevents After Effects from creating masks instead of shape layers
Ensures high visibility against background elements
Creates clean solid shape without outlines
Constrains proportions for perfect circular shape
Creating a Position Motion Path
Motion paths allow for sophisticated movement that goes beyond simple linear animation. We'll create a curved path that simulates the arc of Superman jumping over the buildings, adding dynamic energy to our composition.
Access the shape properties by selecting Shape Layer 1 in the Timeline and pressing UU to reveal all modified parameters.
Center the shape group by locating Transform: Ellipse 1 and setting the Position values to 0,0.
Important: These are the shape group's Transform properties, which differ from the layer's Transform properties. Using 0,0 for the shape group is ideal because these coordinates represent the composition center.
Improve Timeline organization by renaming the layer—click on the layer name and change it to dot.
Establish proper layering by dragging the dot layer between the skyscrapers and cloud layers. This positioning ensures the dot appears to move through the scene realistically.
Prevent accidental path modification by ensuring the Toggle Mask and Shape Path Visibility button
 at the bottom left of the Composition panel is turned off (appears gray).
Set the animation starting point by moving the playhead to 1;16.
Initialize the motion path by pressing the left bracket ([) key
Motion Path Creation Process
Set Initial Position
Zero out shape group Position values (0,0) and set layer position to 284,952 at bottom-left of buildings.
Create End Keyframe
Move to 1:24 and set final position to 864,1084 for the dot's landing point after jump.
Convert to Curved Path
Use Convert Vertex tool to drag vertices upward, creating smooth arc over buildings.
Duplicate the cloud layer and use it as an Alpha Matte above the dot layer. This ensures the red dot only appears within the cloud boundaries, hiding it during start and end positions outside the cloud area.