
Getting the Project Files
- Download the project files.
- Once the download completes, extract the ZIP file if your system hasn't done so automatically. You'll find an After Effects Keyframe Assistant folder containing all necessary assets for this tutorial.
Setup Requirements
Ensures all animation frames are accessible
Contains individual PNG files for animation sequence
Ready for import and timeline operations
Project Overview
In this comprehensive tutorial, we'll master the fundamentals of frame-based animation in After Effects. Starting with proper import techniques for animation frames, we'll explore how frame sequencing impacts your project workflow and final output quality. You'll learn to harness the power of Keyframe Assistant for precise timing control, understand frame rates and their creative applications, and discover professional techniques for creating seamless animation loops.
We'll then elevate the animation by adding realistic shadows to our running character, demonstrating how layering effects can transform simple frame sequences into polished, professional animations. These techniques form the foundation of character animation workflows used across the motion graphics industry.
Animation typically runs at 24 frames per second, meaning 24 images flash onscreen every second. This project uses 'running on twos' - displaying each frame for 2 timeline frames for a stylized animation effect.
Import Methods Comparison
| Feature | Individual Frames | PNG Sequence |
|---|---|---|
| Layer Control | Individual layer per frame | Single combined layer |
| Frame Modification | Full control per frame | Limited editing options |
| Timeline Organization | Manual sequencing needed | Automatic frame order |
| Best For | Custom timing effects | Quick standard playback |
Setting Up Your Animation Sequence
1. Begin by importing your animation frames. Press Command-I (Mac) / Ctrl-I (Windows) to open the Import dialog.
2. Navigate to the Character Run Frames folder within your downloaded project files.
3. You'll see multiple individual image files representing each frame of animation. Hold Shift and click to select all frame images simultaneously.
4. In the import settings panel, ensure the PNG Sequence checkbox remains unchecked. This is crucial for maintaining individual layer control.
5. Verify that the Import As dropdown menu is set to Footage. Your import settings should match this configuration:
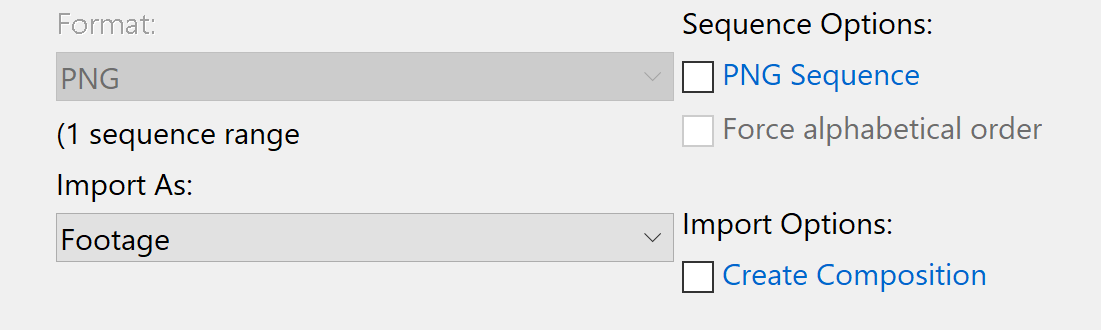
6. Pro Tip: While importing as a PNG sequence creates a single layer with all frames pre-sequenced (ideal for quick previews), importing as individual footage items gives you granular control over each frame's properties, timing, and effects—essential for professional animation workflows. For complex projects requiring frame-level adjustments, individual import is always the preferred method.
With all frames selected, click Import to bring them into your project.
7. All animation frames now appear in your Project panel. With them still selected, drag the entire group onto your timeline, positioning them above the existing bg layer.
8. Don't be concerned if the composition looks chaotic initially—we'll organize everything systematically. With all animation layers still selected, press S to reveal the Scale property.
9. Adjust the Scale value to 50% on any selected layer. After Effects will apply this scaling uniformly across all selected layers, creating consistent sizing.
10. Locate the Zoom In (In Time) tool at the bottom of the Timeline panel.

11. Drag the zoom slider fully to the right. This expands your timeline view, allowing precise frame-by-frame editing—essential for animation timing control.
Understanding Frame Rates: Animation traditionally operates at 24 frames per second (fps), meaning 24 individual images display each second to create motion illusion. However, many animators use "animation on twos" (12 unique drawings per second, each held for 2 frames) to balance workload with smooth motion. Modern projects may work at 30fps or even 60fps for ultra-smooth motion, particularly in gaming and high-end commercial work.
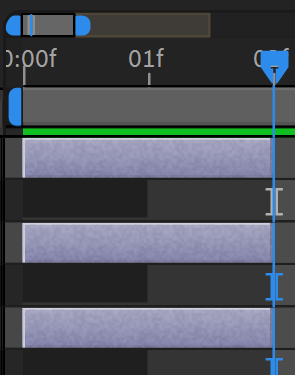
12. Position your Playhead at 00;00;00;02 (the 2-frame mark).
13. With all animation layers selected, press Alt-] to trim each layer to exactly two frames duration. Alternatively, manually drag each layer's out-point to the 2-frame position. Your timeline should display uniform 2-frame durations down to the bg layer:
14. Keep those animation layers selected (don't worry if your character appears to vanish—this is temporary). Navigate to Animation > Keyframe Assistant > Sequence Layers.

15. Accept the default settings by clicking OK. Keyframe Assistant automatically arranges your layers in sequential order with perfect timing.
16. Your layers are now properly sequenced! Press Spacebar to preview the animation. You'll see your character running smoothly, with each frame displaying for 2 frames (classic "animation on twos" technique used by Disney and other major studios).
17. With all animation layers still selected, right-click on any layer to open the context menu.
18. Select Pre-compose to consolidate all frames into a single manageable layer.
19. Name your new composition Running Precomp. This organizational step is crucial for maintaining clean project structure in professional workflows.
20. Click OK. You now have a streamlined precomposition containing your entire animation sequence, ready for additional effects and refinements.
Creating Realistic Shadows
Now we'll enhance the animation's visual impact by adding a convincing ground shadow—a technique that dramatically improves the perceived weight and realism of animated characters.
1. With your Running Precomp layer selected, press Cmd-D (Mac) / Ctrl-D (Windows) to create a duplicate layer.
2. Select the newly created duplicate layer.
3. Press Return (Mac) / Enter (Windows) and rename this layer to Shadow for clear project organization.
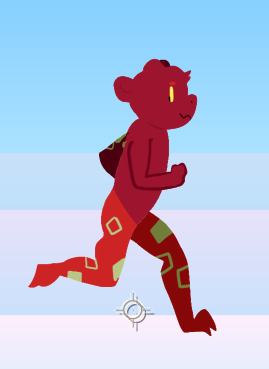
4. Press Y to activate the Pan Behind (Anchor Point) tool. 
5. Using the Pan Behind tool, reposition the Anchor Point to the base of the character, between the legs. This creates the proper pivot point for shadow transformation:
6. Press S to access the Scale properties.
7. Click the constraint proportions chain link icon  to unlink width and height values, enabling independent scaling control.
8. Set the height value (second number) to -40. The negative value flips the character vertically while the 40% creates appropriate shadow compression.
9. Press P to reveal Position properties.
10. Enter position coordinates 958, 825. This aligns the shadow's "feet" with the character's feet, creating believable ground contact.
11. With the shadow layer active, apply Effect > Color Correction > Hue/Saturation.
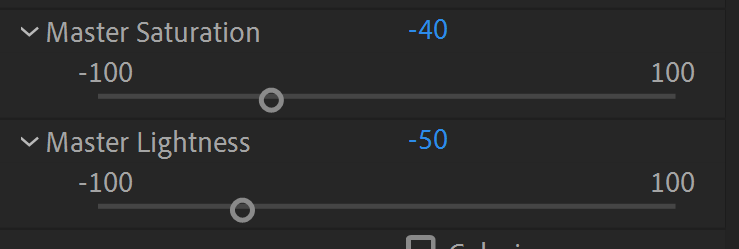
12. In the Effect Controls panel, reduce Master Saturation to -40, removing color information for realistic shadow appearance.
13. Lower the Master Lightness to -55, darkening the shadow appropriately. Your effect settings should match:
14. Add a second effect: Effect > Blur & Sharpen > Gaussian Blur.
15. Set Blurriness to 90 for soft, natural shadow edges.
16. Enable Repeat Edge Pixels to ensure consistent blur coverage across the entire layer boundary.
17. Drag the shadow layer beneath your original Running Precomp layer in the timeline. This layering order ensures the shadow appears behind the character.
Your animation now features professional-quality ground shadows that enhance the illusion of weight and three-dimensional space.
Creating Realistic Shadows
Duplicate and Rename
Duplicate precomp with Cmd-D (Mac) or CTRL-D (Windows), then rename to 'Shadow' for clear layer organization.
Anchor Point Adjustment
Use Pan Behind tool (Y) to move anchor point between character's legs for proper shadow rotation reference.
Transform Properties
Unlink scale proportions, set height to -40% for flip and squash effect, adjust position to align feet.
Color and Blur Effects
Apply Hue/Saturation for darkness, add Gaussian Blur with 90 blurriness and Repeat Edge Pixels enabled.
Shadow Technique Benefits
Conclusion
You've successfully created a polished frame-based animation using After Effects' professional workflow tools. This foundational technique scales from simple character animation to complex motion graphics projects used in film, television, and digital media production.
The skills you've developed—proper frame import, sequence timing, precomposition organization, and effect layering—form the backbone of professional animation workflows. Whether working with hand-drawn frames, digital illustrations, or mixed media elements, these techniques remain consistent across project scales and complexity levels.
Consider experimenting with different frame rates (trying "ones" for ultra-smooth motion or "threes" for more stylized movement), exploring additional shadow techniques like contact shadows or cast shadows, and investigating how these principles apply to other animation styles including motion graphics and title sequences.
The Keyframe Assistant toolset offers numerous other automation features worth exploring as your projects grow in complexity—from velocity ramping to expression-driven animation systems that can accelerate your workflow significantly.
Happy animating!
You now have a professional running animation with realistic shadows. This technique can be applied to any hand-drawn animation frames, whether created digitally or scanned from paper drawings.
Next Steps for Animation
Expand Your Library
Create multiple character animations using the same frame sequencing techniques. Build a collection of reusable animation precomps.
Advanced Effects
Experiment with different shadow styles, lighting effects, and environmental elements to enhance your animations further.
Optimize Workflow
Develop templates and presets for common animation tasks. Streamline your import and sequencing process for faster production.
Learn More About Motion Graphics
We offer the most comprehensive motion graphics training in NYC, designed for creative professionals seeking to advance their careers in 2026's competitive digital landscape. Our expert instructors bring real-world industry experience from leading studios and agencies, guiding you through hands-on projects that mirror current professional workflows and client demands.
- NYC After Effects classes - Master industry-standard motion graphics and visual effects
- NYC video editing classes - Learn cutting-edge editing techniques and storytelling methods
- NYC Premiere Pro classes - Professional video production and post-production workflows