Topics Covered in This Adobe Bridge Tutorial:
Making Edits with Adobe Camera Raw, Synchronizing Raw Settings, Batch Processing Images, Benefits of Working with Raw Files
Exercise Preview
Exercise Overview
Professional photographers and designers know that efficiency is everything. Instead of constantly switching between applications to process Camera Raw files in Photoshop, you can streamline your entire workflow by handling everything directly in Adobe Bridge. This approach eliminates the time-consuming back-and-forth between applications, allowing you to maintain focus and momentum while processing large batches of images.
Processing Camera Raw files directly in Adobe Bridge eliminates the need to jump back and forth between Bridge and Photoshop, creating a more streamlined editing workflow.
Setting Preferences
By default, Adobe Bridge displays Camera Raw images as thumbnails and in slideshows, but double-clicking opens the RAW file in Photoshop for editing. For a truly efficient workflow, you'll want to configure Bridge to handle Camera Raw editing internally, keeping everything in one application.
In Bridge, navigate to the Adobe Bridge CC menu (Mac) or Edit menu (Windows) and select Preferences. Note that this is the main Bridge preferences, not the Camera Raw-specific preferences.
In the left sidebar, click General.
On the right side, enable Double-Click Edits Camera Raw Settings in Bridge.
Click OK to save your changes.
Configure Bridge for RAW Editing
Access Preferences
Navigate to Adobe Bridge CC menu (Mac) or Edit menu (Windows) and select Preferences - not Camera Raw Preferences
Select General Settings
Click on General in the left panel to access the main preference options
Enable Direct Editing
Check 'Double-Click Edits Camera Raw Settings in Bridge' to enable direct RAW editing without opening Photoshop
Navigating to a Folder
Before diving into the actual editing process, let's ensure your workspace is optimized for this tutorial.
First, standardize your workspace layout:
- Navigate to Window > Workspace > Essentials.
- Then select Window > Workspace > Reset Workspace.
In the Favorites panel at the top left, click Desktop.
The default thumbnail size can make it difficult to read file names efficiently. At the bottom right of the window, drag the zoom slider slightly to the right for better visibility.

In the main content area, double-click the Class Files folder to open it.
Navigate into the Bridge Files folder.
Finally, open the Camera Raw Pics folder where our sample images are located.
Adjusting a Raw Image: White Balance & Straightening
Now we'll tackle the fundamental adjustments that can transform a mediocre capture into a professional-quality image. White balance and straightening are often the first corrections that separate amateur work from professional results.
Double-click Noble Desktop.cr2 to open it in the Camera Raw interface.
At the top of the window, select the White Balance tool
 . This tool is incredibly powerful for correcting color casts that occur under different lighting conditions.
Experiment by clicking on different neutral areas—try the white wall and white column. Each click will instantly adjust the image's color temperature and tint. Look for the most natural-looking result.
For precise control, use the Temperature and Tint sliders on the right panel. Professional photographers often prefer this manual approach for consistency across a series.
For this particular image, we recommend approximately Temperature: 3150 and Tint: –4, though your artistic preference may vary.
The camera was slightly tilted during capture—a common issue that's easily corrected. Select the Straighten tool
 from the top toolbar.
Identify a line that should be perfectly vertical or horizontal, such as the white column or the junction where the red wall meets the white wall. Click and drag from one end of this reference line to the other.
Upon release, you'll see grayed-out areas indicating the new crop boundaries. This automatic cropping ensures your straightened image maintains proper rectangular dimensions.
Click Done at the bottom right to apply your changes. Watch as the thumbnail updates in the Bridge window, reflecting your professional-grade corrections.
TIP: To remove a crop applied in Camera Raw, click and hold the Crop tool
 and select Clear Crop.
NOTE: Camera Raw's Straighten tool necessarily crops portions of the image. For situations where you need to preserve the entire frame, consider performing straightening operations in Photoshop instead.
For optimal white balance on the Noble Desktop image, target Temperature around 3150 and Tint at -4. Use the White Balance tool to click on neutral white areas like walls or columns for automatic correction.
The Straighten tool in Camera Raw crops off part of the photo. If preserving the entire image is critical, consider straightening in Photoshop instead of Camera Raw.
Adjusting a Raw Image
Let's dive deeper into exposure and tonal adjustments—skills that distinguish professional image processing from basic corrections.
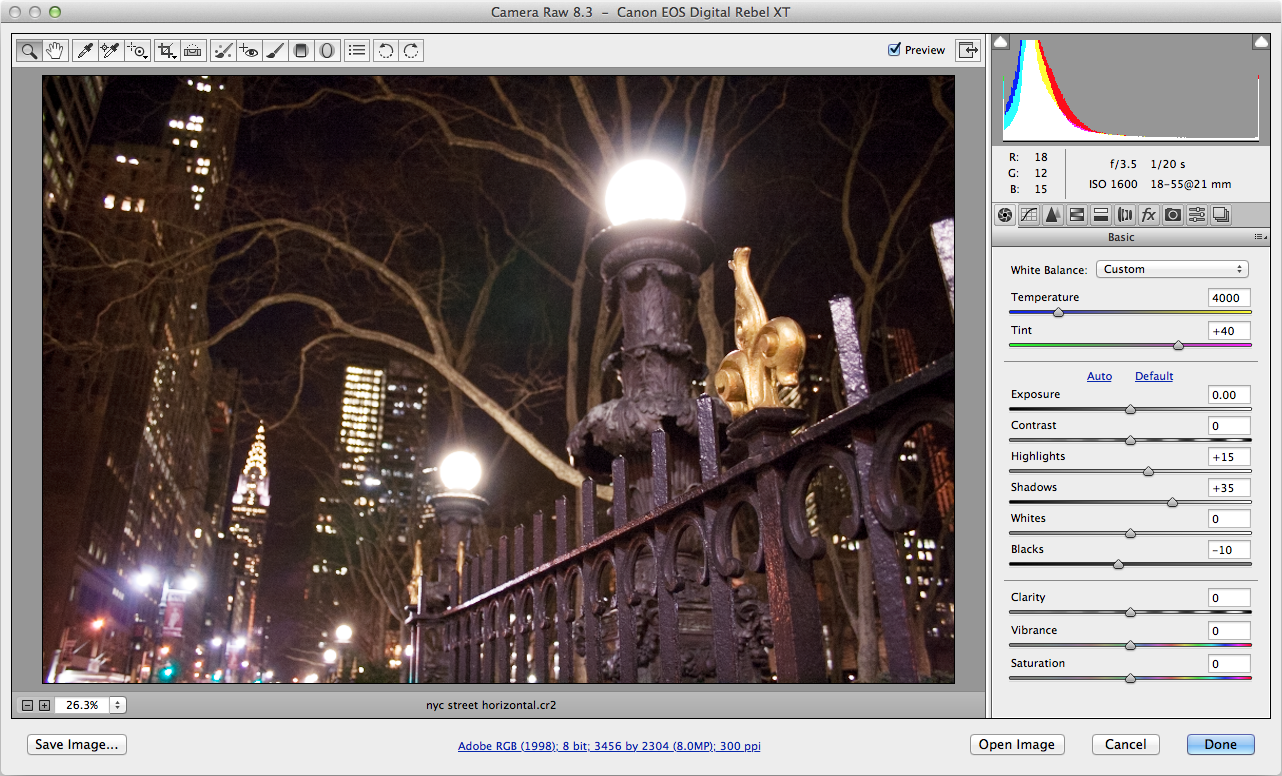
Double-click nyc street horizontal.cr2 to begin working with a more complex exposure scenario.
Hold off on clicking Done until instructed—we'll be making multiple coordinated adjustments.
This image exhibits a slight color cast toward yellow-green, typical of mixed lighting conditions. Apply these precise corrections:
Temperature: 5,000 Tint: +40 Now we'll address highlight detail recovery. Drag the Highlights slider right to brighten highlights, or left to darken them and recover detail in bright areas.
PRO TIP: Hold Option (Mac) or Alt (Windows) while dragging to activate clipping preview—areas turning white indicate complete loss of highlight detail.
Set Highlights to +15 for optimal detail retention.
The shadow areas need lifting to reveal hidden detail. Set Shadows to +35 to brighten these darker regions without affecting midtones.
NOTE: The same Option/Alt-dragging technique works for shadows—black areas in the preview indicate completely blocked shadows.
For final contrast refinement, set Blacks to –10. This deepens the darkest tones, adding punch and visual depth to the image.
Click Done to commit these professional-grade adjustments.
For optimal white balance on the Noble Desktop image, target Temperature around 3150 and Tint at -4. Use the White Balance tool to click on neutral white areas like walls or columns for automatic correction.
The Straighten tool in Camera Raw crops off part of the photo. If preserving the entire image is critical, consider straightening in Photoshop instead of Camera Raw.
Copying Raw Settings from One File to Another
Professional workflows demand consistency, especially when processing images from the same shoot or lighting conditions. Bridge's settings synchronization feature is a massive time-saver for maintaining visual coherence across multiple images.
Ensure nyc street horizontal.cr2 is selected—this will be your source image for the perfectly dialed-in settings.
Copy the Camera Raw settings using either method:
- Control-click (Mac) or Right-click (Windows) and choose Develop Settings > Copy Settings.
- Use the keyboard shortcut: Cmd-Option-C (Mac) or Ctrl-Alt-C (Windows).
Select nyc street vertical.cr2—your target image.
Apply the copied settings using either approach:
- Control-click (Mac) or Right-click (Windows) and select Develop Settings > Paste Settings.
- Keyboard shortcut: Cmd-Option-V (Mac) or Ctrl-Alt-V (Windows).
In the Paste Camera Raw Settings dialog:
- Verify the Subset dropdown shows Settings.
- Uncheck Crop at the bottom—each image typically needs individual crop adjustments.
Click OK to apply the synchronized settings.
Copy and Paste RAW Settings
Copy Settings
Right-click on the adjusted image and choose Develop Settings > Copy Settings, or use Cmd+Opt+C (Mac) / Ctrl+Alt+C (Windows)
Select Target Image
Click on the image you want to apply the same settings to
Paste and Configure
Right-click and choose Develop Settings > Paste Settings, ensure Subset is set to Settings, and uncheck Crop if you don't want to copy crop settings
Adjusting Multiple Raw Files at Same Time
Batch processing represents the pinnacle of efficient Raw workflow management. This technique allows you to apply consistent adjustments across multiple images simultaneously—essential for professional productivity.
Click snow 1.cr2 to begin your selection.
Shift-click snow 3.cr2 to select all three snow images in the sequence.
With all three images selected, double-click any of them to launch the batch-capable Camera Raw interface.
Click Select All at the top left to ensure changes affect all loaded images—this is crucial for batch processing.
Locate the Saturation slider and drag it completely left to –100. This removes all color information, creating dramatic black and white conversions.
Notice all three thumbnails on the left update to black and white. During processing, you'll see a
 icon—this indicates preview generation in progress.
Click the snow 2.cr2 thumbnail (center image) to make individual adjustments.
Drag the Blacks slider left to approximately –65, darkening the image until the background building nearly disappears. This creates more dramatic contrast.
Click Select All again to prepare for synchronization across all images.
Notice that while all images are highlighted, snow 2.cr2 displays a darker border—this indicates it's the "master" image whose settings will be copied to others.
Click the Synchronize button to propagate changes.
In the synchronization dialog, ensure Settings is selected and click OK to apply uniform adjustments across the batch.
When multiple files are selected and opened in Camera Raw, click Select All to apply changes to all images simultaneously. The image with the darker border serves as the master for synchronization.
Batch Processing Multiple Raw Images
With your creative adjustments complete, it's time to export optimized files for your final deliverables. Professional workflows require specific output formats depending on the intended use—print, web, or archival purposes.
If your images aren't still selected in the Camera Raw interface, click Select All at the top left.
These files have been professionally optimized and are ready for export as print-ready TIFF files for layout applications.
Click the workflow options link at the bottom of the window (it displays current settings like Adobe RGB (1998); 8 bit…).

Configure the Workflow Options for professional print output:
Space: Adobe RGB (1998) — Provides wider color gamut than sRGB, essential for print reproduction Depth: 8 Bits/Channel — Adequate for most professional applications while maintaining reasonable file sizes Image Sizing: Keep Resize to Fit unchecked to preserve original camera resolution. The adjacent menu shows your camera's native resolution (e.g., Default (8.2MP)). Resolution: 300 pixels/inch — Industry standard for high-quality print reproduction Click OK to confirm your professional output settings.
Click Save Images at the bottom left to begin the export process.
Under Destination, select Save in New Location to maintain organized file management.
Navigate to the Camera Raw Pics folder: Class Files > Bridge Files > Camera Raw Pics.
Create a new folder named Output files for Print Layout and click Select. This organizational approach is essential for professional client delivery.
Under File Naming, verify the first dropdown shows Document Name to maintain original file identification.
Set File Extension to .tif for maximum compatibility with professional layout applications.
Under Format, choose LZW compression. This lossless compression reduces file size by approximately 30% while maintaining full image quality—though verify compatibility with your specific layout software.
Click Save to initiate batch processing.
The Camera Raw window displays a countdown of remaining files during processing. You can safely click Done and close the interface—Bridge continues background processing, allowing you to work on other tasks while your exports complete.
Batch Export Configuration
Provides wider color gamut for print applications
Standard depth for most print layout programs
Optimal resolution for high-quality print output
Reduces file size without quality loss
What is Camera Raw & Should I Use It?
Understanding Raw format is crucial for any serious photographer or creative professional. When a digital camera captures an image, it must make decisions about sharpening, white balance, contrast, and color saturation. With JPEG capture, these decisions are permanently "baked into" the file in what's called destructive processing—you're locked into the camera's interpretation of the scene.
Raw format, however, preserves all the original sensor data along with the camera's suggested settings, but applies them non-destructively. Think of Raw as a digital negative—it contains far more information than the final image will use, giving you tremendous flexibility in post-processing. This approach yields superior image quality and allows for corrections that would be impossible with processed files.
Consider this scenario: you're shooting a corporate event and forget to adjust white balance when moving from tungsten-lit interiors to daylight. With JPEGs, those outdoor shots would have a severe blue color cast that's difficult to correct convincingly. With Raw files, you simply adjust the white balance slider in post-processing—the camera's original sensor data allows for perfect color correction as if you'd set the camera correctly initially.
The tradeoffs are significant, however. Raw files are typically 3-5 times larger than equivalent JPEGs, meaning slower camera performance, fewer shots per memory card, and substantially more storage requirements. Additionally, Raw files require processing before use—you can't simply upload them to social media or send them directly to clients. This adds a mandatory post-processing step to your workflow.
Raw capture is now available on most cameras above entry-level, and even many smartphones offer Raw capabilities in 2026. For professional work, the quality advantages typically outweigh the workflow complexity.
Camera Raw's processing tools also work on JPEG files, giving you access to powerful color correction and exposure tools. While you won't get Raw's full flexibility—the camera has already made destructive processing decisions—you can still achieve significant improvements over basic editing tools.
To automatically process JPEGs through Camera Raw, select a JPEG and choose File > Open in Camera Raw. For automatic processing of all JPEGs, navigate to the Adobe Bridge CC menu (Mac) or Edit menu (Windows), select Camera Raw Preferences, and in the JPEG section, choose Automatically open all supported JPEGs.
RAW vs JPEG Comparison
| Feature | RAW Files | JPEG Files |
|---|---|---|
| Image Processing | Non-destructive | Destructive (permanent) |
| File Size | 4x larger | Smaller, compressed |
| White Balance | Fully adjustable | Limited adjustment |
| Ready to Use | Requires processing | Immediate use |
| Image Quality | Maximum quality | Good quality |
RAW File Format Analysis