Topics Covered in This Ruby on Rails Tutorial:
Polymorphic Relationships, Making the Checkout Button Functional, Adding an Order Model, Checking Out & Emptying the Cart
Exercise Overview
In this exercise, we'll implement a fully functional checkout system. While we won't be integrating payment processing (which would typically involve services like Stripe or PayPal in production applications), we'll create the core e-commerce functionality by transitioning cart contents into persistent order objects. This pattern forms the backbone of virtually every e-commerce platform and demonstrates advanced Rails concepts including polymorphic associations.
If you completed the previous exercises, you can skip the following sidebar. We strongly recommend completing exercises 8A–10A before starting this one, as they establish the foundational cart functionality we'll be extending. If you haven't finished them, follow the setup instructions below.
Prerequisites RequiredThis exercise builds on exercises 8A-10A. If you haven't completed them, follow the Git checkout instructions to get the proper starting point.
If You Did Not Do the Previous Exercises (8A–10A)
- Close any files you may have open.
- Open the Finder and navigate to Class Files > yourname-Rails Class
- Open Terminal.
- Type
cdand a single space (do NOT press Return yet). - Drag the yourname-Rails Class folder from the Finder to the Terminal window and press ENTER.
- Run
rm -rf nuttyto delete your copy of the nutty site. - Run
Git clone https://bitbucket.org/Noble Desktop/nutty.Gitto copy the That Nutty Guy Git repository. - Type
cd nuttyto enter the new directory. - Type
Git checkout 10Ato bring the site up to the end of the previous exercise. - Run
bundleto install any necessary gems. - Run
yarn install—check-filesto install JavaScript dependencies.
Making the Checkout Button Functional
Currently, our checkout button is a non-functional placeholder. Let's transform it into a proper form submission that will handle the order processing workflow.
For this exercise, we'll continue working with the nutty folder located in Desktop > Class Files > yourname-Rails Class > nutty.
If you haven't already done so, we suggest opening the nutty folder in your code editor if it allows you to (like Sublime Text does). This provides better project navigation and file management.
You should still have a window with two tabs open in Terminal from the last exercise, the first of which is running the server. If you don't, complete the following sidebar to get your development environment running.
Converting Static Button to Functional Form
1Replace HTML Button
Convert the static anchor tag checkout button to a Rails form with proper routing
2Configure Routes
Add both POST and GET routes for cart completion in routes.rb file
3Implement Controller Actions
Create complete and complete_page methods in cart controller
Restarting the Rails Server
- In Terminal,
cdinto the nutty folder:
- Type
cdand a space. - Drag the nutty folder from Desktop > Class Files > yourname-Rails Class onto the Terminal window (so it will type out the path for you).
- In Terminal, hit Return to change directory.
In Terminal, type the following:
rails s- Open a new tab (Cmd–T) leaving our server running in the old tab.
- In the new tab,
cdinto the nutty folder:
- Type
cdand a space. - Drag the nutty folder from Desktop > Class Files > yourname-Rails Class onto the Terminal window (so it will type out the path for you).
- In Terminal, hit Return to change directory.
In your code editor, open nutty > app > views > cart > index.html.erb
Locate the checkout button code around line 72:
<a href="#"><button type="button" id="check-out" class="btn-red btn-lg">Checkout</button></a>Replace this placeholder link with a proper Rails form that will handle the checkout submission (shown in bold):
</div>
   <%= form_with url: '/cart/complete', method: :post do %>
     <%= submit_tag 'Checkout', id: 'check-out', class: "btn-red btn-lg" %>
   <% end %>
</div>
The form_with helper creates a form that will POST to our cart completion endpoint, while maintaining the original styling and behavior.
Save the file. This form submission needs corresponding routes to handle both the POST request and the confirmation page display.
In your code editor, open nutty > config > routes.rb
Around line 9, add the following bold code to set up both routes we'll need:
resources :line_items, only: [:create, :update, :destroy]

   post 'cart/complete' => 'cart#complete'
   get 'cart/complete' => 'cart#complete_page'

   root 'products#index'
end
We're creating two distinct routes: the POST route processes the checkout logic, while the GET route displays the order confirmation page. This separation of concerns is a Rails best practice.
Save the file, then close it.
In your code editor, open nutty > app > controllers > cart_controller.rb
Add the controller methods to handle both the checkout processing and confirmation page display (shown in bold):
def index
      @title = "Your Cart"
   end

   def complete
    redirect_to '/cart/complete' and return
   end

   def complete_page
    @title = "Your Order is Complete"
    end
end
The complete method will eventually handle the order creation logic, while complete_page displays the confirmation. The redirect pattern prevents duplicate submissions if users refresh the page.
Save the file.
Open a Finder window and navigate to: Desktop > Class Files > yourname-Rails Class > snippets
Click on the complete_page.html.erb file and hit Cmd–C to copy it.
Still in the Finder, navigate to: Desktop > Class Files > yourname-Rails Class > nutty > app > views > cart
Hit Cmd–V to paste the file into the cart folder.
In your code editor, open nutty > app > views > cart > complete_page.html.erb
Review the template code—this saves significant development time and ensures consistent styling. In production applications, order confirmation pages typically include order numbers, shipping details, and next steps for customers.
Switch to the browser and go to localhost:3000.
Click on any product and click Add To Cart.
On the Cart page, click the Checkout button on the right.
You should be taken to a confirmation page for your order! However, we still need to implement the core functionality: creating persistent orders and clearing the cart after checkout.
Adding an Order Model
To properly handle completed purchases, we need an Order model that will store customer purchase history and serve as the permanent record of transactions. This is essential for business operations, customer service, and analytics.
Generate the Order model with its database table by typing the following in Terminal:
rails g model order customer:references
rails db:migrate
This creates an Order model with a foreign key relationship to customers, establishing the foundation for order tracking.
Now we need to establish the bidirectional relationship between customers and orders. In your code editor, open: nutty > app > models > customer.rb
Add the relationship declaration shown in bold around line 8:
has_one :cart
   has_many :orders
end
This establishes that a customer maintains one active cart for ongoing shopping, but accumulates multiple orders over time—a pattern that mirrors real-world e-commerce behavior.
Save the file.
In your code editor, open nutty > app > models > order.rb
Add the relationships and delegation shown in bold around line 8:
class Order < ActiveRecord::Base
   belongs_to :customer

   has_many :line_items
   has_many :products, through: :line_items

   delegate :email, to: :customer
end
The delegation provides convenient access to customer email without additional queries, while the
throughrelationship gives us direct access to ordered products for reporting and analytics.Save the file.
A customer can only have one cart at a time but can have multiple orders throughout their lifetime. This relationship design prevents data conflicts.
Customer Relationship Structure
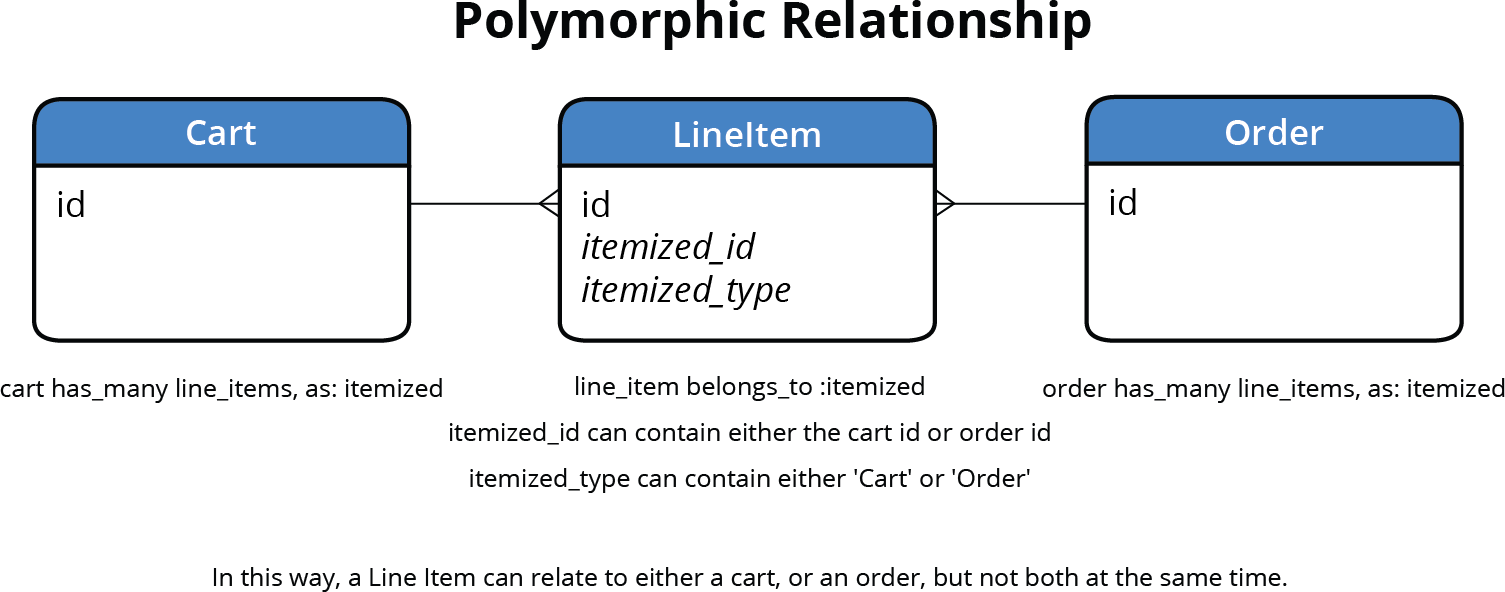
Polymorphic Relationships
Here's where we encounter a sophisticated Rails concept: polymorphic associations. Consider this challenge—both Cart and Order models need to contain line items, but a line item should only belong to one container at a time. A line item in someone's cart shouldn't simultaneously exist in a completed order, and vice versa.
We could add separate foreign keys for both cart_id and order_id to line items, but this approach is fragile and confusing. Which field should be populated? How do we prevent both from being set? Rails' polymorphic associations provide an elegant solution: they allow a model to belong to multiple types of parent models through a single, consistent interface.
This pattern is widely used in modern Rails applications for comments systems, attachments, and any scenario where multiple models share similar child relationships.
Generate the polymorphic association by running this migration in Terminal:
rails g migration add_itemizable_to_line_items itemizable:referencesThe name "itemizable" represents our polymorphic interface—line items can belong to any "itemizable" object (Cart or Order).
The generated migration needs significant customization for our polymorphic setup and data preservation. Close any open files to organize your workspace, then open the migration file.
In your code editor, open: nutty > db > migrate > #
_add_itemizable_to_line_items.rbNOTE: The number represented by # is a timestamp and will vary.
This migration requires custom up/down methods because we're not only changing the schema but also migrating existing data. Polymorphic relationships store both an ID and a type, unlike simple foreign keys.
Replace the generated code with our polymorphic setup:
class AddItemizableToLineItems < ActiveRecord::Migration[6.0]
   def self.up
      add_reference :line_items, :itemizable, polymorphic: true, index: true
   end
Remove the foreign_key constraint (polymorphic relationships handle this differently):
class AddItemizableToLineItems < ActiveRecord::Migration[6.0]
       def self.up
          add_reference :line_items, :itemizable, polymorphic: true, index: true, foreign_key: true, null: false
       end
Now add the data migration logic to preserve existing cart relationships:
class AddItemizableToLineItems < ActiveRecord::Migration[6.0]
   def self.up
      add_reference :line_items, :itemizable, polymorphic: true, index: true
      LineItem.all.each do |li|
         li.itemizable_id = li.cart_id
         li.itemizable_type = 'Cart'
         li.save
      end
   end
This preserves all existing line items by converting their cart relationships to the new polymorphic format. Every current line item becomes associated with its respective Cart through the polymorphic interface.
Remove the old cart reference since it's now redundant:
li.save
      end
      remove_reference :line_items, :cart
   end
Add the down method to make this migration fully reversible:
remove_reference :line_items, :cart
   end

   def self.down
      add_reference :line_items, :cart, index: true
      LineItem.all.each do |li|
         li.cart_id = li.itemizable_id
         li.save!
      end
      remove_reference :line_items, :itemizable, polymorphic: true
   end
end
Reversible migrations are crucial for team development and production deployment safety. This down method restores the original cart-based relationships if needed.
Save the file and close it.
Apply the migration by running:
rails db:migrateNow we need to update our model associations to work with the new polymorphic structure.
In your code editor, open nutty > app > models > order.rb
Update the line items relationship to use the polymorphic interface:
has_many :line_items, as: :itemizableThe
as: :itemizabletells Rails this model can serve as the polymorphic parent for line items.Copy this line—we'll need the same change in the Cart model.
Save the file, then close it.
In your code editor, open nutty > app > models > cart.rb
Replace the existing
has_many :line_itemswith the polymorphic version around line 4.Save the file, then close it.
The Product model needs more complex associations to work with polymorphic relationships. Open nutty > app > models > product.rb
Update the carts relationship to specify the polymorphic source:
has_many :carts, through: :line_items, source: :itemizable, source_type: 'Cart'The
sourceandsource_typeoptions tell Rails how to navigate the polymorphic relationship to reach carts specifically.Copy this line and paste it directly below to create the orders relationship.
Modify the duplicate for orders:
has_many :line_items
has_many :carts, through: :line_items, source: :itemizable, source_type: 'Cart'
has_many :orders, through: :line_items, source: :itemizable, source_type: 'Order'
Save the file, then close it.
Finally, update the LineItem model to use the polymorphic association. Open nutty > app > models > line_item.rb
Replace the cart relationship with the polymorphic one:
class LineItem < ActiveRecord::Base
   belongs_to :itemizable, polymorphic: true
   belongs_to :product
Note that we keep the product relationship unchanged—line items still belong to specific products regardless of whether they're in carts or orders.
Save the file and close it.
Standard vs Polymorphic Relationships
| Feature | Standard Approach | Polymorphic Approach |
|---|---|---|
| Foreign Keys | Multiple (cart_id, order_id) | Two fields (itemizable_id, itemizable_type) |
| Data Integrity | Risk of belonging to both | Exclusive relationship guaranteed |
| Code Complexity | Simple initial setup | Complex but cleaner long-term |
This migration requires custom up and down methods because we're preserving existing cart data while changing the relationship structure. Standard change method isn't sufficient.
Checking Out & Emptying the Cart
Now comes the critical moment: implementing the actual checkout logic that transitions line items from cart to order. This operation must be atomic to prevent data inconsistencies in production environments.
In your code editor, open nutty > app > controllers > cart_controller.rb
Implement the core checkout logic in both controller methods:
def complete
      @order = Order.new(customer: current_customer)
      @order.line_items = @cart.line_items
      @order.save
      @cart.destroy
      redirect_to '/cart/complete' and return
   end

   def complete_page
     @order = current_customer.orders.last
     @title = "Your order is complete."
    end
This sequence creates a new order, transfers all line items from cart to order (the polymorphic association handles updating the foreign keys automatically), saves the order, and destroys the empty cart. The customer gets a fresh cart automatically when they add their next item.
Save the file.
Update the confirmation page template to display order information instead of cart data. Open nutty > app > views > cart > complete_page.html.erb
Replace all instances of
@cartwith@orderthroughout the file. There are four instances around lines 20, 45, 66, and 80.If you're using Sublime Text for efficient editing:
- Around line 20, highlight
@cartin:<%@cart.line_items.each do |line_item| %> - Press Ctrl–Cmd–G to select all instances in the file.
- Type
@orderto replace all instances simultaneously.
If using another editor, update each instance manually:
- Line 20:
<%@order.line_items.each do |line_item| %> - Line 45:
<td><%= number_to_currency@order.subtotal %></td> - Line 66:
<td><%= number_to_currency@order.total %></td> - Line 80:
<%=@order.email %>
- Around line 20, highlight
Save the file, then close it.
The Order model needs calculation methods for subtotals and totals. Rather than duplicating the cart logic, we'll extract it into a reusable module—a common Rails pattern for shared functionality.
In your code editor, open nutty > app > models > cart.rb
Cut (Cmd–X) the calculation methods:
delegate :email, to: :customer

   def subtotal
      return 0 unless line_items.any?
      line_items.sum(&:subtotal)
   end

   def total
      subtotal
   end
end
Save the file.
We'll create a module to share this calculation logic between Cart and Order models, following the DRY principle and Rails best practices for code organization. This modular approach makes the codebase more maintainable and testable.
Order Creation Process
Create Order Object
Initialize new order with current customer reference
Transfer Line Items
Move all cart line items to the new order using polymorphic relationship
Clean Up Cart
Destroy the empty cart and redirect to confirmation page